|
|
Using the JFC/Swing Packages |
With theJTableclass, you can display tables of data, optionally allowing the user to edit the data.
JTabledoesn't contain or cache data; it's simply a view of your data. Here's a picture of a typical table displayed within a scroll pane:[PENDING: Label these parts: each cell displays an item of data; the column header displays the column name; maybe: each column contains one type of data]The rest of this section tells you how to accomplish some common table-related tasks. Because
JTablehas too many features to be completely described in this tutorial, please periodically search The Swing Connection for pointers to other table documentation. Here are the topics this section covers:
- Creating a Simple Table
- Adding a Table to a Container
- Setting and Changing Column Widths
- Detecting User Selections
- Creating a Table Model
- Detecting Data Changes
- Concepts: Cell Editors and Renderers
- Validating User-Entered Text
- Using a Combo Box as an Editor
- Specifying Other Editors
- Further Customizing the Display and Event Handling
- Sorting and Otherwise Manipulating Data
- The Table API
- Examples that Use Tables
Creating a Simple Table
Here is the code that implements the table in
Try this:
- Compile and run SimpleTableDemo. The source file is
SimpleTableDemo.java.
See Getting Started with Swing if you need help.- Click the cell that contains "Snowboarding".
The entire first row is selected, indicating that you have selected Mary Campione's data. If you don't want row selection, you can specify a different selection model using theJTablesetCellSelectionEnabledorsetColumnSelectionAllowedmethod. A special highlight indicates that the "Snowboarding" cell is editable. Generally, you begin editing a text cell by double-clicking it.- Position the cursor over the "First Name" heading. Now press the mouse button and drag the heading to the right.
As you can see, users can rearrange columns in tables.- Position the cursor just to the right of a heading. Now press the mouse button and drag to the right or left.
The column changes size, and the other columns adjust to fill the remaining space.- Resize the window containing the table so that it's bigger than necessary to display the whole table.
All the table cells become larger, expanding to fill the extra space.
SimpleTableDemo.java:The SimpleTableDemo example uses one of twoObject[][] data = { {"Mary", "Campione", "Snowboarding", new Integer(5), new Boolean(false)}, {"Alison", "Huml", "Rowing", new Integer(3), new Boolean(true)}, {"Kathy", "Walrath", "Chasing toddlers", new Integer(2), new Boolean(false)}, {"Mark", "Andrews", "Speed reading", new Integer(20), new Boolean(true)}, {"Angela", "Lih", "Teaching high school", new Integer(4), new Boolean(false)} }; String[] columnNames = {"First Name", "Last Name", "Sport", "# of Years", "Vegetarian"}; final JTable table = new JTable(data, columnNames);JTableconstructors that directly accept data:The advantage of using one of these constructors is that it's easy. However, these constructors also have disadvantages:
JTable(Object[][] rowData, Object[] columnNames)JTable(Vector rowData, Vector columnNames)If you want to get around these restrictions, you need to implement your own table model, as described in Creating a Table Model.
- They automatically make every cell editable.
- They treat all data types the same. For example, if a table column has
Booleandata, the table can display the data in a check box. However, if you use one of the data-acceptingJTableconstructors, yourBooleandata will be displayed as a String. You can see this difference in the last column of the two previous pictures of tables.- They require that you put all of the table's data in the array or vector, which isn't appropriate for some data. For example, if you're reading data from a large database, then you almost certainly don't want to read the whole database and store it in an array or vector.
Adding a Table to a Container
It's easy to put a table in a scroll pane. You need just one or two lines of code:The scroll pane automatically gets the table's header, which displays the column names, and puts it on top of the table. Even when the user scrolls down, the column names remain visible at the top of the viewing area. The scroll table also tries to make its viewing area the same as the table's preferred viewing size. The previous code snippet sets the table's preferred viewing size with theJScrollPane scrollPane = new JScrollPane(table); table.setPreferredScrollableViewportSize(new Dimension(500, 70));setPreferredScrollableViewportSizemethod.
Note: Before Swing 1.0.2, the scroll pane didn't get the table header unless you created the scroll pane using theJTable.createScrollPaneForTablemethod. For example:
//1.0.1 code (causes deprecation warning in 1.0.2 and later releases):
scrollPane = JTable.createScrollPaneForTable(table);
//Recommended code (causes missing column headers in 1.0.1):
scrollPane = new JScrollPane(table);
If you're using a table without a scroll pane, then you must get the table header component and place it yourself. For example:
container.setLayout(new BorderLayout());
container.add(table.getTableHeader(), BorderLayout.NORTH);
container.add(table, BorderLayout.CENTER);
Setting and Changing Column Widths
By default, all columns in a table start out with equal width, and the columns automatically fill the entire width of the table. When the table becomes wider or narrower (which might happen when the user resizes the window containing the table), all the column widths change appropriately.When the user resizes a column by dragging its right border, then either other columns must change size, or the table's size must change. By default, the table's size remains the same, and all columns to the right of the drag point resize to accommodate space added or removed from the column to the left of the drag point.
The following figures illustrate the default resizing behavior.
Initially, the columns have equal width.
[PENDING: show resize cursor between Sport and # columns]:
When the user resizes a column, some of the other columns must adjust size for the table to stay the same size.
When the entire table is resized, all the columns are resized.To customize initial column widths, you can invoke
setMinWidthon each of your table's columns. This sets both the minimum widths of the columns and their approximate relative widths. For example, adding the following code to SimpleTableDemo makes its third column bigger than the other columns:// Implementing a flexible-width table. TableColumn column = null; for (int i = 0; i < 5; i++) { column = table.getColumnModel().getColumn(i); if (i == 2) { column.setMinWidth(100); //sport column is bigger } else { column.setMinWidth(50); } }
Note: If you usesetMinWidth, be sure to invoke it on every column. Otherwise, the columns you miss will be very thin.
Note: When the next Swing 1.1 release comes out, change all references tosetMinWidthto be tosetPreferredWidthinstead. ThesetPreferredWidthandgetPreferredWidthmethods will be released for the first time in the next Swing 1.1 release. When the user resizes columns, the new sizes become the columns' new preferred widths.
As the preceding code shows, each column in a table is represented by a
TableColumnsetMinWidth,TableColumnalso supplies methods for getting/setting the maximum width and current width of a column. [PENDING: Soon it'll have methods for getting/setting the preferred width.] For an example of setting cell widths based on the actual amount of space needed to draw the cells' contents, see theinitColumnSizesmethod inTableRenderDemo.java, which is discussed in Further Customizing the Display and Event Handling.You can change a table's resize behavior by invoking the
setAutoResizeModemethod. The method's argument should have one of these values (defined as constants inJTable):
AUTO_RESIZE_SUBSEQUENT_COLUMNS- The default. In addition to resizing the column to the left of the drag point, adjusts the sizes of all columns to the right of the drag point.
AUTO_RESIZE_NEXT_COLUMN- Adjusts only the columns immediately to the left and right of the drag point.
AUTO_RESIZE_OFF- Adjust the table size instead.
Note: Before the Swing 1.1 Beta release, the default resize mode wasAUTO_RESIZE_ALL_COLUMNS. However, that mode isn't intuitive, so we recommend against using it.
To create a fixed-width table with customized column widths, turn auto-resizing off and use the
setWidthmethod to initialize the width of every column. If the table is in a scroll pane, be sure to set the table's preferred scrollable viewport width to be no more than the sum of its columns' widths, or else you'll get white space at the right edge of the table. For example:// Implementing a fixed-width table. table.setPreferredScrollableViewportSize(new Dimension(425, 50)); table.setAutoResizeMode(JTable.AUTO_RESIZE_OFF); for (int i = 0; i < 5; i++) { column = table.getColumnModel().getColumn(i); if (i == 2) { column.setWidth(125); //sport column is bigger } else { column.setWidth(75); } }Detecting User Selections
The following code snippet shows how to detect when the user selects a table row. You can find the entire program, which demonstrates many more selection features, inSimpleTableSelectionDemo.java.ListSelectionModel rowSM = table.getSelectionModel(); rowSM.setSelectionMode(ListSelectionModel.SINGLE_SELECTION); rowSM.addListSelectionListener(new ListSelectionListener() { public void valueChanged(ListSelectionEvent e) { ListSelectionModel lsm = (ListSelectionModel)e.getSource(); int selectedRow = lsm.getMinSelectionIndex(); if (selectedRow >= 0) { ...//selectedRow is selected } else { ...//no rows are selected } } });SimpleTableSelectionDemo also has code (not included in the preceding snippet) that changes the table's selection orientation. By copying the relevant code, you can make the table allow either column selections or individual cell selections, instead of row selections.
Because tables use
ListSelectionModelobjects to control row and column selection, you can easily specify which selection mode the table uses. For example, the preceding code snippet makes the row selection model allow at most a single selection. See Writing a List Selection Listener for information about and examples of using selection modes.Creating a Table Model
As the following figure shows, every table gets its data from an object that implements theTableModel[Model (TableModel)] --> [View (JTable)][PENDING: make that a real figure, similar to the circle/big-arrow one below.]Here's the code that the data-accepting
JTableconstructor shown previously uses to create its table model:As the preceding code shows, implementing a table model can be simple. Generally, you implement your table model in a subclass of thenew AbstractTableModel() { public String getColumnName(int col) { return columnNames[col].toString(); } public int getRowCount() { return rowData.length; } public int getColumnCount() { return columnNames.length; } public Object getValueAt(int row, int col) { return rowData[row][col]; } public boolean isCellEditable(int row, int col) { return true; } public void setValueAt(Object value, int row, int col) { rowData[row][col] = value; } }AbstractTableModelYour model might hold its data in an array, vector, or hashtable, or it might get the data from an outside source such as a database. It might even generate the data at execution time. For examples of getting data from a database, see the
examples/Tabledirectory in the Swing release.Here again is a picture of a table implemented by TableDemo, which has a custom table model:
This table is different from the SimpleTableDemo table in the following ways:
- SimpleTableDemo's table model, having been created automatically by
JTable, isn't smart enough to know that the # of Years column contains numbers (which should generally be right aligned). It also doesn't know that the Vegetarian column contains boolean values, which can be represented by check boxes. TableDemo's custom table model, even though it's simple, can easily determine the data's type, helping theJTabledisplay the data in the best format.- In SimpleTableDemo, all cells are editable. In TableDemo, we implemented the custom table model so that it doesn't let you edit the name columns; it does, however, let you edit the other columns.
Below is the code from
TableDemo.javathat is different from the code inSimpleTableDemo.java. Bold font indicates the code that makes this table's model different from the table model defined automatically in SimpleTableDemo.public TableDemo() { ... MyTableModel myModel = new MyTableModel(); JTable table = new JTable(myModel); table.setPreferredScrollableViewportSize(new Dimension(500, 70)); //Create the scroll pane and add the table to it. JScrollPane scrollPane = new JScrollPane(table); //Add the scroll pane to this window. setContentPane(scrollPane); ... } class MyTableModel extends AbstractTableModel { final String[] columnNames = ...//same as before... final Object[][] data = ...//same as before... public int getColumnCount() { return columnNames.length; } public int getRowCount() { return data.length; } public String getColumnName(int col) { return columnNames[col]; } public Object getValueAt(int row, int col) { return data[row][col]; } public Class getColumnClass(int c) { return getValueAt(0, c).getClass(); } /* * Don't need to implement this method unless your table's * editable. */ public boolean isCellEditable(int row, int col) { //Note that the data/cell address is constant, //no matter where the cell appears onscreen. if (col < 2) { return false; } else { return true; } } /* * Don't need to implement this method unless your table's * data can change. */ public void setValueAt(Object value, int row, int col) { ...//debugging code not shown... ...//ugly class cast code for Integers not shown... data[row][col] = value; ...//debugging code not shown... } ...Detecting Data Changes
A table and its model automatically detect whenever the user edits the table's data. However, if the data changes for another reason, you must take special steps to notify the table and its model of the data change. Also, if you don't implement a table model, as in SimpleTableDemo, then you must take special steps to find out when the user edits the table's data.An example of updating a table's data without directly editing it is in the BINGO application. The BINGO application, which is presented in BINGO!
, has a table that displays some information about each user who is signed up to play the game. When a new user signs up to play BINGO, the table needs to add a new row for that user. More precisely, the table model needs to get the data for the new user, and then the table model needs to tell the table to display the new data.
To notify the table model about a new user, the BINGO application invokes the table model's
updatePlayermethod. You can see the code for that method inPlayerInfoModel.java, which contains the implementation of the table model. TheupdatePlayermethod records the new user's data and fires a table-model event. Because every table listens for table-model events from its model, the user-information table automatically detects the change and displays the new data.To fire the table-model event, the model invokes the the
fireTableRowsInsertedmethod, which is defined by theAbstractTableModelfireXxxxmethods thatAbstractTableModeldefines to help you fire table-model events arefireTableCellUpdated,fireTableChanged,fireTableDataChanged,fireTableRowsDeleted,fireTableRowsInserted,fireTableRowsUpdated, andfireTableStructureChanged. See [PENDING: API table] for information about these methods.If you have a program such as SimpleTableDemo that doesn't implement a table model, then you need to do something special to find out when the user edits the table's data. Specifically, you need to register a table-model listener on the table model. Here is code, taken from
SimpleTableEditDemo.java, that registers a table-model listener and reacts to events:public class SimpleTableEditDemo ... implements TableModelListener { ... public SimpleTableEditDemo() { ... model = table.getModel(); model.addTableModelListener(this); ... } public void tableChanged(TableModelEvent e) { ... int row = e.getFirstRow(); int column = e.getColumn(); String columnName = model.getColumnName(column); Object data = model.getValueAt(row, column); ...// Do something with the data... } ... }
Concepts: Cell Editors and Renderers
Before you go on to the next few tasks, you need to understand how tables draw their cells. You might expect each cell in a table to be a component. However, for performance reasons, Swing tables aren't implemented that way. Instead, each column has a single cell renderer that draws all of its cells. You can think of the renderer as a configurable ink stamp that the table uses to stamp appropriately formatted data onto each cell. When the user starts to edit a cell's data, a cell editor controls the cell's editing behavior.For example, each cell in the # of Years column in TableDemo contains
Numberdata -- specifically, anIntegerobject. By default, the cell renderer for aNumber-containing column uses a singleJLabelinstance to draw the appropriate numbers, right-aligned, on the column's cells. If the user begins editing one of the cells, the default cell editor uses a right-alignedJTextFieldto control the cell editing.The following list shows the components that a table uses to render and edit the specified kinds of data. The table gets the column data type by invoking the
getColumnClassmethod on the table model. Remember that if you letJTablecreate its own model, it usesObjectas the type of every column.TableDemo.javashows how to specify more precise column types.
Column Data Type Default Rendering Component Default Editing Component ObjectJLabelJTextFieldImageIconJLabelJTextField[PENDING: ???]NumberJLabel(right aligned)JTextField(right aligned)BooleanJCheckBoxJCheckBoxTo customize cell display and editing, you can specify different cell editors and renderers either by column or by data type, as described in the next couple of sections.
Validating User-Entered Text
In the table examples you've seen so far, the user can enter any text into the # of Years column. SimpleTableDemo doesn't check the data's value, at all. The TableDemo example is slightly improved in that when the user is done editing, the code checks whether the entry can be parsed as an integer. However, TableDemo must use a bit of ugly code to convert the string returned by the default cell editor into anInteger. If it didn't do the conversion, then the actual type of the data would change fromIntegertoString.What we'd really like to do is to check the user's input while the user is typing, and to have the cell editor return an
Integerinstead of a string. You can accomplish one or both of these tasks by using a custom text field to control the cell editing.A custom text field can check the user's input either while the user is typing, or after the user has indicated the end of typing (such as by pressing return). We call these two types of validation keystroke checking and action checking, respectively.
The following code, taken from
TableEditDemo.java, sets up a keystroke-checking text field. The bold line of code makes the text field the editor for all columns that contain data of typeInteger.Thefinal WholeNumberField integerField = new WholeNumberField(0, 5); integerField.setHorizontalAlignment(WholeNumberField.RIGHT); DefaultCellEditor integerEditor = new DefaultCellEditor(integerField) { //Override DefaultCellEditor's getCellEditorValue method //to return an Integer, not a String: public Object getCellEditorValue() { return new Integer(integerField.getValue()); } }; table.setDefaultEditor(Integer.class, integerEditor);WholeNumberFieldclass used above is a customJTextFieldsubclass that allows the user to enter only digits. ThegetValuemethod returns theintvalue of theWholeNumberField's contents. See How to Use Text Fields for more information aboutWholeNumberField. That section also provides a more general-purpose validating text field, calledDecimalField, that you can customize so that it validates any number format that you specify.Using a Combo Box as an Editor
Here is an example of setting up a combo box editor. The bold line of code sets up the combo box as the editor for a column, rather than for a specific data type.Here is a picture of the combo box editor in use:TableColumn sportColumn = table.getColumnModel().getColumn(2); ... JComboBox comboBox = new JComboBox(); comboBox.addItem("Snowboarding"); comboBox.addItem("Rowing"); comboBox.addItem("Chasing toddlers"); comboBox.addItem("Speed reading"); comboBox.addItem("Teaching high school"); comboBox.addItem("None"); sportColumn.setCellEditor(new DefaultCellEditor(comboBox));The combo box editor is implemented inTableRenderDemo.java, which is discussed further in Further Customizing the Display and Event Handling.Specifying Other Editors
As the previous sections showed, you can set the editor for an entire column using theTableColumnsetCellEditormethod, or for a specific type of data using theJTablesetDefaultEditormethod. For both methods, you must specify an argument that implements theTableCellEditorinterface. Fortunately, theDefaultCellEditorclass implements this interface and provides constructors to let you specify an editing component that's aJTextField,JCheckBox, orJComboBox. You usually don't have to explicitly specify a check box as an editor, since columns withBooleandata automatically use a check box renderer and editor.What if you want to specify an editor that isn't a text field, check box, or combo box? Well, because
DefaultCellEditordoesn't support other types of components, you must do a little more work. You need to create a subclass of the desired editor component, and the subclass must implement theTableCellEditorsetDefaultEditororsetCellEditormethod, respectively.Here is a picture of a dialog that a serves, indirectly, as a cell editor. When the user begins editing a cell in the Last Name column, a button (the true cell editor) appears and brings up the dialog, through which the user chooses a last name.
You can find the code inTableDialogEditDemo.javaandTableDialog.java. The example also requiresWholeNumberField.java.
Further Customizing the Display and Event Handling
You've already seen how to specify cell editors. You can also specify renderers for cells and for column headers. Customizing renderers lets you either display data in custom ways or add non-editing functionality such as tool tips.To add tool tips to a column's cells, you need to get or create the column's default cell renderer, and then use the
setToolTipTextmethod of the renderer's component. Here is the code inTableRenderDemo.javathat adds tool tips to both the cells and header for the Sport column:Here is the code that TableRenderDemo uses to size its columns. For each column, the code gets the components used to render that column's header and cells. It then asks the components how much space they need. Finally, it uses the space information to set the column's width.//Set up tool tips for the sport cells. DefaultTableCellRenderer renderer = new DefaultTableCellRenderer(); renderer.setToolTipText("Click for combo box"); sportColumn.setCellRenderer(renderer); //Set up tool tip for the sport column header. TableCellRenderer headerRenderer = sportColumn.getHeaderRenderer(); if (headerRenderer instanceof DefaultTableCellRenderer) { ((DefaultTableCellRenderer)headerRenderer).setToolTipText( "Click the sport to see a list of choices"); }TableColumn column = null; Component comp = null; int headerWidth = 0; int cellWidth = 0; Object[] longValues = model.longValues; for (int i = 0; i < 5; i++) { column = table.getColumnModel().getColumn(i); comp = column.getHeaderRenderer(). getTableCellRendererComponent( null, column.getHeaderValue(), false, false, 0, 0); headerWidth = comp.getPreferredSize().width; comp = table.getDefaultRenderer(model.getColumnClass(i)). getTableCellRendererComponent( table, longValues[i], false, false, 0, i); cellWidth = comp.getPreferredSize().width; ...//debugging code not shown... column.setMinWidth(Math.max(headerWidth, cellWidth)); } ...//In the model: public final Object[] longValues = {"Angela", "Andrews", "Teaching high school", new Integer(20), Boolean.TRUE};Sorting and Otherwise Manipulating Data
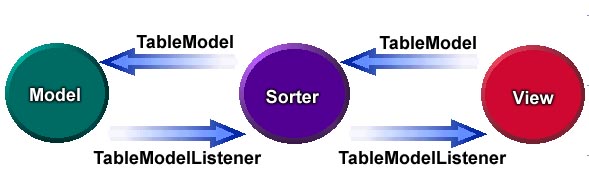
To perform data manipulation such as sorting, you can use one or more specialized table models (data manipulators), in addition to the table model that provides the data (the data model). The data manipulators should sit between the table and the data model, as the following picture shows:You can use theTableMapandTableSorterclasses when implementing your data manipulator.TableMapimplementsTableModeland serves as a superclass for data manipulators.TableSorteris aTableMapsubclass that sorts the data provided by another table model. You can either change these classes, using them as a basis for writing your own data manipulator, or use the classes as-is to provide sorting functionality.To implement sorting with
TableSort, you need just three lines of code. The following listing shows the differences between TableDemo and its sorting cousin, TableSorterDemo.TheTableSorter sorter = new TableSorter(myModel); //ADDED THIS //JTable table = new JTable(myModel); //OLD JTable table = new JTable(sorter); //NEW sorter.addMouseListenerToHeaderInTable(table); //ADDED THISaddMouseListenerToHeaderInTablemethod adds a mouse listener that detects clicks over the column headers. When the listener detects a click, it sorts the rows based on the clicked column. For example, when you click "Last Name", then the rows are reordered so that the row with "Andrews" becomes the first row. When you Shift-click a column header, the rows are sorted in reverse order.The Table API
[PENDING: put API tables here]Examples that Use Tables
This table lists examples that useJTableand where those examples are described.
Example Where Described Notes TableDemo.javaThis page A basic table with no model. [PENDING: LIST MORE...]
|
|
Using the JFC/Swing Packages |