GPS is a complete integrated development environment that gives access to a wide range of tools and integrates them smoothly.
GPS gives access to built-in file editing; HTML based help system; complete compile/build/run cycle; intelligent source navigation; project management; general graph technology giving access to many different browsers such as source dependency, project dependency, call graphs, etc...; fully integrated visual debugger, based on the GVD technology, and enhanced for inclusion in GPS; generic version control system, providing access to CVS, Subversion, ClearCase, and possibly others in the future; many other tools such as a visual comparison, automatic generation of files, source reformatting.
GPS is fully customizable, providing several levels of customizations: a first level, available through the preferences and key manager dialogs; a second level, which allows you to customize your menu items, tool bar and key bindings; a third level, which allows you to automate processing through scripts; and a fourth level, which allows any kind of very specific or tight integration, due to the open nature of GPS, and to its architecture. See Customizing and Extending GPS for more details.
GPS also integrates with existing editors such as Emacs and Vi, see Using an External Editor.
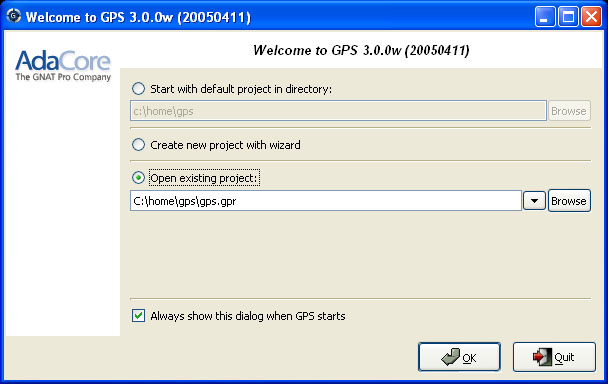
When starting GPS, a welcome dialog is displayed by default, giving the following choices:
OK button, GPS will create a
default internal project with the following properties:
The project supports Ada files only, using the default GNAT
naming scheme: .ads for spec files, .adb for body files.
A single source directory corresponding to the current directory.
The current directory can be set by modifying the text entry on clicking
on the Browse button. All the Ada files found in this directory
will be considered as part of the default project.
The object directory where the object and executable files will
be put, corresponding also to the current directory.
OK button will start a
wizard allowing you to specify most of the properties for a new project. Once
the project is created, GPS will save it and load it automatically.
See The Project Wizard for more details on the project wizard.
Several kinds of wizard are available. Depending on the kind of project, you will get asked different type of information. In the end, GPS will create one or more project files, and automatically load them.
One of the wizard, "From existing Ada sources", will try and import a set of
sources and object files, and attempt to create one or more project files so
that building your application through these project files will put the objects
in the same directory they are currently in. If you have not compiled your
application when launching this wizard, GPS will create a single project file
and all object files will be put in the same object directory. This is the
prefered method when importing sources with duplicate file names, since the
latter is only authorized in a single project file, not across various project
files.
Browse button,
or by using a previously loaded project listed in the combo box. When a
project is selected, clicking on the OK button will load this
project and open the main window.
-P switch on the command line, and load the corresponding project if
present.
Then, it will look for a project file in the current directory and will
load the first project file found.
If no project file can be found in the current directory, GPS will start with the default project.
To reset this property, go to the menu Edit->Preferences.
See The Preferences Dialog.
When you specify a -P switch on the command line, or if there is only one project file in the current directory, GPS will start immediately with the project file specified, instead of displaying the welcome dialog.
In addition, if you specify source files on the command line, GPS will also start immediately, using the default project if no project is specified.
By default, files specified on the command line are taken as is and can
be absolute or relative pathnames. In addition, if you prepend a filename
with the = character, then GPS will look for the file in the source
search path of the project.
This is a standard menu bar that gives access to all the global functionalities of GPS. It is usually easier to access a given functionality using the various contextual menus provided throughout GPS: these menus give direct access to the most relevant actions given the current context (e.g. a project, a directory, a file, an entity, ...). Contextual menus pop up when the right mouse button is clicked.
The menu bar gives access to the following items:
The tool bar provides shortcuts via buttons to some typical actions: creating a new file, opening a file, saving the current file; undo/redo last editing; cut to clipboard, copy to clipboard, paste from clipboard; go to previous/next location; start/continue the debugging session, step/next execution, finish current procedure.
The icon on the far right of the tool bar will be animated to indicate that an action (e.g. a build or a search) is going on in the background.
The whole work space is based on a multiple document interface, See Multiple Document Interface.
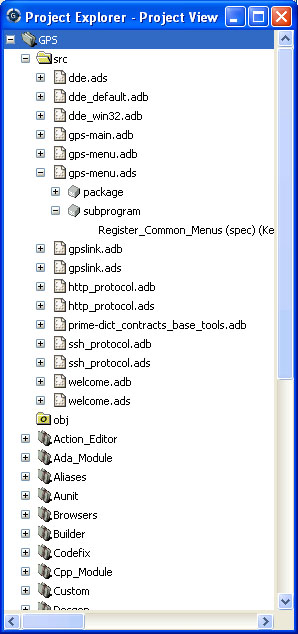
The project explorer provides a view of the various components of your project
hierarchy, as listed below.
It is displayed by default on the left side of the main window, and can
be selected by using the Project->Project View menu item.
Under Windows, it is possible to drop files (coming e.g. from the Explorer)
in the project explorer with the following behavior: a project file dropped
will be loaded; any other file will be opened in a new source editor.
The project explorer, as well as the file and outline view provide an interactive search capability allowing you to quickly search in the information currently displayed. The default key to start an interactive search is <Ctrl-i>. This will open a small window at the bottom of the explorer where you can interactively type names. The first matching name in the tree will be selected while you type it. You can then also use the <up> and <down> keys to navigate through all the items matching the current text.
The various components that are displayed are:
They can be organized into a project hierarchy, where a root project can import other projects, with their own set of sources.
Initially, a default project is created, that includes all the sources in the current directory.
The Project View displays this project hierarchy: the top node
is the root project of your application (generally, this is where the
source file that contains the main subprogram will be located). Then a node
is displayed for each imported project, and recursively for their own imported
projects.
A given project might appear multiple times in the
Project View, if it is imported by several other projects.
There exists a second display for this project view, which lists all projects with no hierarchy: all projects appear only once in the explorer, at the top level. This display might be useful for deep project hierarchies, to make it easier to find projects in the explorer.
This display is activated through the contextual menu entry
Show flat view, which acts as a switch between the two displays.
A special icon with an exclamation mark is displayed if the project
was modified, but not saved yet. You can choose to save it at any time
by right-clicking on it. GPS will remind you to save it before any
compilation, or save it automatically, if the corresponding preference
is saved.
Project View
You can chose whether you want to see the absolute path names for the
directories or paths relative to the location of the project. This is done
through the Show absolute paths contextual menu.
Special nodes are created for object and executables directories. No
files are shown for these.
A given file might appear multiple times in the Project View,
if the project it belongs to is imported by several other projects.
Double-clicking on a file, or simple clicking on any entity will open a source editor and display respectively the first line in this file or the line on which the entity is defined.
If you open the search dialog through the Navigate->Find...
menu, you have the possibility to search for anything in the explorer,
either a file or an entity. Note that searching for an entity can be slow
if you have lots of files, and/or big files.
A contextual menu, named Locate in Explorer, is also provided when
inside a source editor. This will automatically search for the first entry for
this file in the explorer. This contextual menu is also available in other
modules, e.g. when selecting a file in the Dependency Browser.
As described in the GNAT User's Guide, the project files can be configured through external variables (typically environment variables). This means that e.g. the exact list of source files, or the exact switches to use to compile the application can be changed when the value of these external variables is changed.
GPS provides a simple access to these variables, through a window
called the Scenario View. These variables are called
Configuration Variables, since they provide various scenarios for
the same set of project files.
A combo box is displayed in this area for each environment variable the project depends on. The current value of the variable can be set simply by selecting it from the pop-down window that appears when you click on the arrow on the right of the variable name
New variables can be added through the contextual menu
Edit Project->Add Configuration Variable in the Project View.
The list of possible values for a variable can be changed by clicking on the
button on the left of the variable's name.
Whenever you change the value of one of the variables, the project is automatically recomputed, and the list of source files or directories is changed dynamically to reflect the new status of the project. Starting a new compilation at that point will use the new switches, and all the aspects of GPS are immediately affected according to the new setup.
In addition to the Project View, GPS also provides a
File View through the Tools->File View menu.
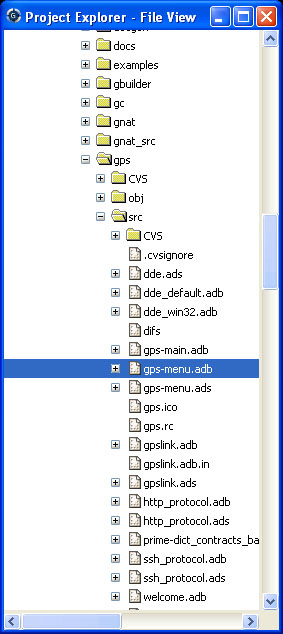
In this view, directories are displayed exactly as they are organized physically on the disk (including Windows drives).
By default, the File View will display all the files that exist
on the disk. Filters can be set through the contextual menu to only
show the files and directories that belong to the project
hierarchy by using the contextual menu Show files from project only.
Each source file can also be explored as described in The Project View.
The Outline View, which you can choose to activate through the
Tools->Outline View menu, shows the contents of the current file.
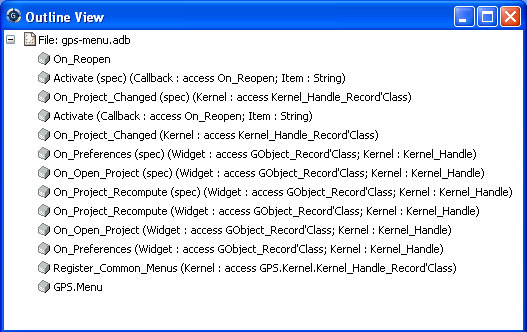
The exact meaning of this depends on the language you are seeing. For Ada, C and C++ files, this is the list of entities that are declared at the global level in your current file (Ada packages, C++ classes, subprograms, Ada types, ...).
Clicking on any entity in this view will automatically jump to the right line in the file, including if your file has been slightly modified since the outline view was last refreshed.
To refresh the contents of the view, select the Refresh
entry in the contextual menu (right-click anywhere in the outline view).
Alternatively, you can switch temporarily to another window and come back
to the same editor, and the outline view will be refreshed.
There are several preferences associated with the outline view, See Outline Preferences.
The Messages window is used by GPS to display information and feedback
about operations, such as build output, information about processes
launched, error messages.
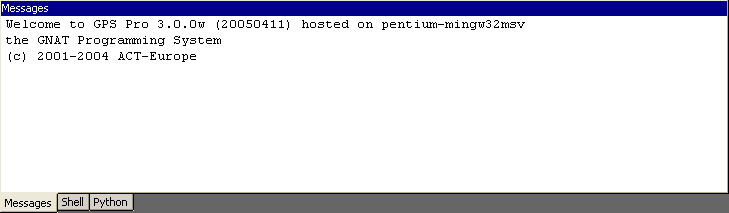
This is a read-only window, which means that only output is available, no input is possible.
For an input/output window, see The Execution Window and also The Shell and Python Windows.
These windows give access to the various scripting languages supported by GPS, and allow you to type commands such as editing a file or compiling without using the menu items or the mouse.
Some of these windows, especially the python window, might not be visible in your version of GPS, if GPS wasn't compiled with the support for that specific scripting language.
To show the shell consoles, select the menu Tools.
See Scripting GPS for more information on using
scripting languages within GPS.
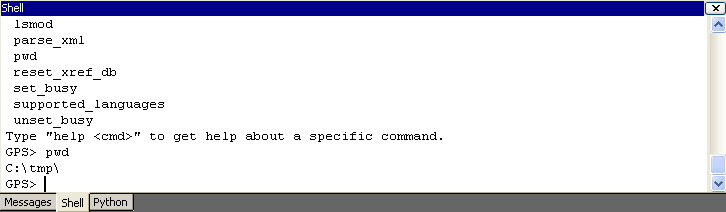
You can use the <up> and <down> keys to navigate through the history of commands.
The Location Tree is filled whenever GPS needs to display a list of
locations in the source files (typically, when performing a global
search, compilation results, and so on).
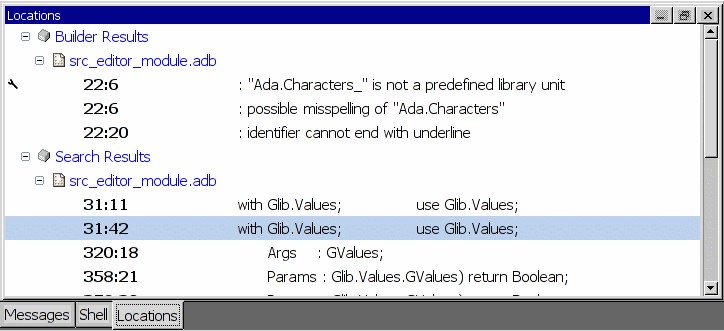
The Location Tree shows a hierarchy of categories, which contain files, which contain locations. Clicking on a location item will bring up a file editor at the requested place. Right-clicking on file or category items brings up a contextual menu allowing you to remove the corresponding node from the view.
Every time a new category is created, as a result of a compilation or a
search operation for instance, the first entry of that category is
automatically selected, and the corresponding editor opened. This behavior
can be controlled through a preference Jump To First Location.
To navigate through the next and previous location (also called Tag),
you can use the menu items Navigate->Previous Tag and
Navigate->Next Tag, or the corresponding key bindings.
Left-clicking on a line in the Location Tree brings up a contextual menu with the following entries:
In some cases, a wrench icon will be associated on the left of a compilation message. See Code Fixing for more information on how to make advantage of this icon.
Each time a program is launched using the menu Build->Run, a new
execution window is created to provide input and output for this program.
In order to allow post mortem analysis and copy/pasting, the execution windows are not destroyed when the application terminates.
To close an execution window, click on the cross icon on the top right corner
of the window, or use the menu File->Close, or the menu
Window->Close or the key binding <Ctrl-W>.
If you close the execution window while the application is still running, a dialog window is displayed, asking whether you want to kill the application, or to cancel the close operation.
The status line is composed of two areas: on the left a status bar and on the right one or several progress bars.
The status bar is used to display temporary information about GPS
operations. Note that most of the information GPS displays can be found
in the Messages window.
The progress bars are used to display information about on going operations such as builds, searches, or VCS commands. These tasks operate in the background, and can be paused/resumed via a contextual menu. This contextual menu is available by right-clicking on the progress bars themselves or on the corresponding lines in the Task Manager. See The Task Manager
The Task Manager window lists all the currently running GPS operations that run in the background, such as builds, searches or VCS commands.
For each of these tasks, the Task Manager shows the status of the task, and the current progress. The execution of theses tasks can be suspended using a contextual menu, brought up by right-clicking on a line.
When exiting GPS, if there are tasks running in the Task Manager, a window
will display those tasks. You can also bring up a contextual menu on the
items in this window.
You can force the exit at any time by pressing the confirmation button, which
will kill all remaining tasks, or continue working in GPS by pressing the
Cancel button.
By default when you start GPS, the working area contains a welcome page giving a few starting points in the online help.
Online help for the GNAT tools is available from the Help menu item.
GPS launches an external html browser to view these pages. (See
The Preferences Dialog on how to configure this under Unix. Under
Windows systems, the default HTML browser is used.)
The Help menu item provides the following entries:
This menu contains a number of additional entries, depending on what documentation packages were installed on your system. See the next section to see how to add new help files.
GPS will search for the help files in the list of directories set in
the environment variable GPS_DOC_PATH (a colon-separated list
of directories on Unix systems, or semicolon-separated list of
directories on Windows systems). In addition, the
default directory <prefix>/doc/gps/html is also searched. If the
file cannot be found in any of these directories, the corresponding
menu item will be disabled.
The environment variable GPS_DOC_PATH can either be set by each
user in his own environment, or can be set system-wide by modifying
the small wrapper script gps itself on Unix systems.
It can also be set programmatically through the GPS shell or any of the
scripting languages. This is done with
GPS.add_doc_directory ("/home/foo")
The specific list of files shown in the menus is set by reading the
index files in each of the directories in GPS_DOC_PATH. These
index files must be called gps_index.xml.
The format of these index files is specified in see Adding documentation.
All the windows that are part of the GPS environment are under control of what is commonly called a multiple document interface (MDI for short). This is a common paradigm on windowing systems, where related windows are put into a bigger window which is itself under control of the system or the windows manager.
This means that, by default, no matter how many editors, browsers, explorers,... windows you have opened, your system will still see only one window (On Windows systems, the task bar shows only one icon). However, you can organize the GPS windows exactly the way you want, all inside the GPS main window.
This section will show the various capacities that GPS provides to help you organize your workspace.
At any time, there is only one selected window in GPS (the active
window). You can select a window either by clicking in its title bar,
which will then get a different color, or by selecting its name in the
menu Window.
Alternatively, windows can be selected with the keyboard. By default, the selection key is <Alt-Tab>. When you press it, a temporary dialog is popped-up on the screen, with the name of the window that will be selected when the key is released. If you press the selection key multiple times, this will iterate over all the windows currently open in GPS.
This interactive selection dialog is associated with a filter, displayed below the name of the selected window. If you maintain <Alt> pressed while pressing other keys than <Tab>, this will modify the current filter. From then on, pressing <Alt-Tab> will only iterate through those windows that match the filter.
The filter is matched by any window whose name contains the letter you
have typed. For instance, if you are currently editing the files
unit1.adb and file.adb, pressing <t> will only leave
unit1.adb selectable.
Wherever the windows are displayed, they are always closed in the same manner. In the right side of the title bar of the window, one small button is displayed, looking like a cross. Clicking on this button will close the window.
When a window is closed, the focus is given to the window of the same part of the MDI (each of the docks or the middle area) that previously had the focus. Therefore, if you simply open an editor as a result of a cross-reference query, you can simply close that editor to go back to where you were before.
Alternatively, you can also select the window by clicking anywhere in
its title bar, and then select the menu Window->Close
The window in the central area of the MDI can be split at will, through
any combination of horizontal and vertical splits.
This feature requires at least two windows (text editors, browsers,...)
to be superimposed in the central area. Selecting either the
Window->Split Horizontally or Window->Split Vertically menus
will then split the selected window in two. In the left (resp. top) pane,
the currently selected window will be left on its own. The rest of the
previously superimposed windows will be put in the right (resp. bottom)
pane. You can then in turn split these remaining windows to achieve any
layout you want.
All split windows can be resized interactively by dragging the handles that
separate them. A preference (menu
Edit->Preferences) controls whether this resizing is done in opaque
mode or border mode. In the latter case, only the new handle position will
be displayed while the mouse is dragged.
You may want to bind the key shortcuts to the menus
Window->Split Horizontally
as well as Window->Split Vertically using either the preference
Dynamic Key Binding, or the key manager. In addition, if you want to
achieve an effect similar to e.g. the standard Emacs behavior (where
<control-x 2> splits a window horizontally, and <control-x 3> splits
a window vertically), you can use the key manager
(see The Key Manager Dialog).
Several editors or browsers can be put in the same area of the MDI. In such a case, they will be grouped together in a notebook widget, and you can select any of them by clicking on the corresponding tab. Note that if there are lots of windows, two small arrows will appear on the right of the tabs. Clicking on these arrows will show the remaining tabs.
In some cases GPS will change the color and size of the title (name) of a window in the notebook tab. This indicates that the window content has been updated, but the window wasn't visible. Typically, this is used to indicate that new messages have been written in the messages or console window.
Although the MDI, as described so far, is already extremely flexible, it is possible that you prefer to have several top-level windows under direct control of your system or window manager. This would be the case for instance if you want to benefit from some extra possibilities that your system might provide (virtual desktops, different window decoration depending on the window's type, transparent windows,...).
GPS is fully compatible with this behavior, since windows can also be
floating windows. Any window that is currently embedded in the MDI
can be made floating at any time, simply by selecting the window and
then selecting the menu Window->Floating. The window will then
be detached, and can be moved anywhere on your screen, even outside of
GPS's main window.
There are two ways to put a floating window back under control of GPS.
The more general method is to select the window through its title in
the menu Window, and then unselect Window->Floating.
The second method assumes that the preference Destroy Floats in
the menu Edit->Preferences has been set to false. Then, you can
simply close the floating window by clicking in the appropriate title
bar button, and the window will be put back in GPS. If you actually
want to close it, you need to click once again on the cross button in
its title bar.
A special mode is also available in GPS, where all windows are floating. The MDI area in the main window becomes invisible. This can be useful if you rely on windows handling facilities supported by your system or window manager but not available in GPS. This might also be useful if you want to have windows on various virtual desktops, should your window manager support this.
This special mode is activated through a preference (menu
Edit->Preferences). This preference is entitled All
Floating.
As we have seen, the organization of windows can be changed at any time
by selecting a notebook containing several editors or browsers, and selecting
one of the Split menus in the Window menu.
A more intuitive method is also provided, based on the drag-and-drop paradigm. The idea is simply to select a window, wherever it is, and then, by clicking on it and moving the mouse while keeping the left button pressed, drop it anywhere else inside GPS.
Selecting an item so that it can be dragged is done simply by clicking with the left mouse button in its title bar, and keep the button pressed while moving the mouse.
If the window is inside a notebook, you can also choose to select the notebook tab to start dragging the window around.
While you keep the mouse button pressed, and move the mouse around, the selected drop area is highlighted with a dashed border. This shows precisely where the window would be put if you were to release the mouse button at that point.
Here are the various places where a window can be dropped:
If you maintain the <shift> key pressed while dropping the window, this might result in a copy operation instead of a simple move. For instance, if you are dropping an editor, a new view of the same editor will be created, resulting in two views present in GPS: the original one is left at its initial location, and a second view is created at the new location.
If you maintain the <control> key pressed while dropping the window, all the windows that were in the same notebook are moved, instead of the single one you selected. This is the fastest way to move a group of windows to a new location, instead of moving them one by one.
Source editing is one of the central parts of GPS, giving in turn access
to many other functionalities, including extended source navigation and
source analyzing tools.
The integrated source editor provides all the usual capabilities found in integrated environments, including:
Ada, C and C++
have this ability. See The Preferences Dialog to enable or
disable this feature.
The second box shows the current editing mode. This is either Insert or Overwrite and can be changed using the insert keyboard keys by default.
The third box shows the writable state of the file. You can change this state by clicking on the label directly: this will switch between Writable and Read Only. Note that this will not change the permissions of the file on disk, it will only change the writable state of the source editor within GPS.
When trying to save a file which is read only on the disk, GPS will ask for confirmation, and if possible, will force saving of the file, keeping its read only state.
The fourth box shows whether the file has been modified since the last save. The three possible states are:
The fifth box displays the position of the cursor in the file by a line and a column number.
If a set of lines is selected when you press the indentation key, this whole
set of lines will be indented.
The type of information displayed depends on the current state of GPS.
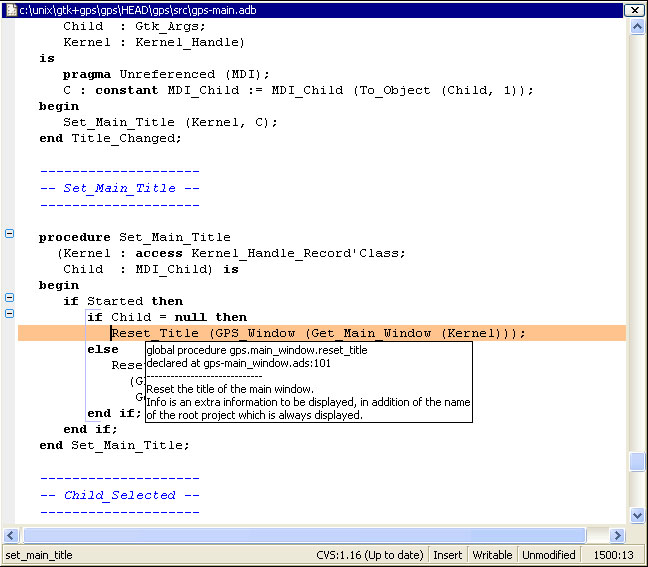
In normal mode, the entity kind and the location of declaration is displayed when this information is available. That is, when the cross-reference information about the current file has been generated. If there is no relevant information, no tooltip is displayed. See Support for Cross-References for more information.
In addition, the documentation for the entity is displayed. This is the block
of comments just before or just after the entity's declaration of body. There
mustn't be any blank line between the two. For instance, the following are
valid documentation for Ada and C:
--  A comment for A
A : Integer;

B : Integer;
--  A comment for B

C : Integer;

--  Not a comment for C, there is a blank linke
In debugging mode, the value of the variable under the mouse is displayed in the pop up window if the variable is known to the debugger. Otherwise, the normal mode information is displayed.
You can disable the automatic pop up of tool tips in the Editor section of
the preferences dialog. See The Preferences Dialog.
Completions are searched in the edited source file, by first looking at the
closest words and then looking further in the source as needed.
You can also jump to a corresponding delimiter by using the <Ctrl-'> key,
that can be configured in the preferences. Typing twice on this key will move
the cursor back to its original position.
begin...end block, or loop statement,
etc...
The block highlighting will also take into account the changes made in your source code, and will recompute automatically the current block when needed.
This capability is currently implemented for Ada, C and C++ languages.
- icons on the left side,
corresponding to the beginning of subprograms. If you click on one of these
icons, all the lines corresponding to this subprogram are hidden, except
the first one. As for the block highlighting, these icons are recomputed
automatically when you modify your sources and are always kept up to date.
This capability is currently implemented for Ada, C and C++ languages.
GPS also integrates with existing third party editors such as
Emacs or vi. See Using an External Editor.
In addition to the standard keys used to navigate in the editor (up, down, right, left, page up, page down), the integrated editor provides a number of key bindings allowing easy navigation in the file.
In addition, there are several ways to define new key bindings, see Defining text aliases and Binding actions to keys.
The file selector is a dialog used to select a file. Under Windows, the
default is to use the standard file selection widget. Under other platforms,
the file selector is a built-in dialog:

This dialog provides the following areas and capabilities:
/ if
not defined)
+ and - icons on the left of the directories, or
navigate using the keyboard keys: <up> and <down> to select the
previous or the next directory, <+> and <-> to expand and collapse
the current directory, and <backspace> to select the parent directory.
OK and Cancel buttons.
When you have selected the right file, clock on OK to confirm, or
click on Cancel at any time to cancel and close the file selection.
The main menus that give access to extended functionalities related to source editing are described in this section.
When you save a new file for the first time, GPS will ask you to enter the
name of the file. In case you have started typing Ada code, GPS will try
to guess based on the first main entity in the editor and on the current
naming scheme, what should be the default name of this new file.
A new view can also be created by keeping the <shift> key pressed while
drag-and-dropping the editor (see Moving Windows). This second method is
preferred, since you can then specify directly where you want to put the new
view. The default when using the menu is that the new view is put on top of
the editor itself.
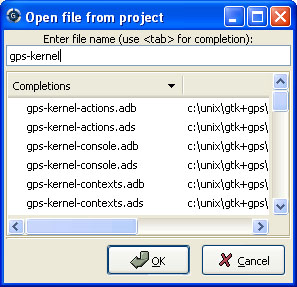
The first text area allows you to type a file name. You can start the beginning of a file name, and use the <Tab> key to complete the file name. If there are several possible completions, the common prefix will be displayed, and a list of all possible completions will be displayed in the second text area.
You can then either complete the name by typing it, or continue hitting the <Tab> key to cycle through the possible completions, or click on one of the completions in the list displayed.
If you press the down arrow key, the focus will move to the list of completions, so that you can select a file from this list without using the mouse.
Once you have made your choice, click on the OK button to validate.
Clicking on Cancel or hitting the <Esc> key will cancel the
operation and close the dialog.
This dialog will only show each file once. If you have extended
projects in your hierarchy, some files may be redefined in some
extending project. In this case, only the files from the extending
project are shown, and you cannot have access through this dialog to
the overridden files of the extended project. Of course, you can still
use the project explorer or the standard File->Open menu to
open these files.
On Windows, if no command is specified in the preferences the standard Windows
print dialog box is displayed. This dialog box allows the user to specify the
target printer, the properties of the printer, which pages to print (all, or a
specific range of pages), the number of copies to print, and, when more than
one copy is specified, whether the pages should be collated. Pressing the
Cancel button on the dialog box returns to GPS without printing the window
contents; otherwise the specified pages and copies are printed on the selected
printer. Each page is printed with a header containing the name of the file
(if the window has ever been saved). The page number is printed on the bottom
of each page.
See Print Command.
gnatstub.
gnatpp. It is possible to specify gnatpp switches in the
switch editor. See The Switches Editor.
Whenever you ask for a contextual menu (using e.g. the third button on your mouse) on a source file, you will get access to a number of entries, displayed or not depending on the current context.
Menu entries include the following categories:
GPS keeps a set of case exceptions that is used by all case insensitive languages. When editing or reformatting a buffer for such a language the case exception dictionary will be checked first. If an exception is found for this word or a substring of the word, it will be used; otherwise the specified casing for keywords or identifiers is used. A substring is defined as a part of the word separated by underscores.
Note that this feature is not activated for entities (keywords or
identifiers) for which the casing is set to Unchanged. See
see The Preferences Dialog.
A contextual menu named Casing has the following entries:
To add or remove a substring exception into/from the dictionary you need to first select the substring on the editor. In this case the last two contextual menu entries will be:
GPS is fully integrated with a number of external editors, in
particular Emacs and vi. The choice of the default
external editor is done in the preferences. See The Preferences Dialog.
The following values are recognized:
gnuclient
By default, gnuclient will open a new Emacs frame for every file
that is opened. You might want to add the following code to your
.emacs file (create one if needed) so that the same Emacs frame
is reused every time:
(setq gnuserv-frame (car (frame-list)))
See <http://www.hpl.hp.com/people/ange/gnuserv/home.html> for more
information.
emacsclient
emacs
emacsclient instead, since it is much
faster, and makes it easier to copy and paste between multiple
files. Basically, the only reason to use this external editor is if
your system doesn't support emacsclient.
vim
Vim is a vi-like editor that provides a number of enhancements,
for instance syntax highlighting for all the languages supported by
GPS. Selecting this external editor will start an xterm (or command
window, depending on your system) with a running vim process editing
the file.
Note that one limitation of this editor is that if GPS needs to open the same file a second time, it will open a new editor, instead of reusing the existing one.
To enable this capability, the xterm executable must be found in the PATH,
and thus is not supported on Windows systems. Under Windows systems,
you can use the custom editor instead.
vi
vi
command instead of vim.
custom
none
In the cases that require an Emacs server, GPS will try several solutions if no already running server was found. It will first try to spawn the glide environment distributed with GNAT. If not found in the PATH, it will then start a standard Emacs. The project file currently used in GPS will be set appropriately the first time Emacs is spawned. This means that if you load a new project in GPS, or modify the paths of the current project, you should kill any running Emacs, so that a new one is spawned by GPS with the appropriate project.
Alternatively, you can reload explicitly the project from
Emacs itself by using the menu Project->Load
In the preferences, there are three settings that allow you to select the external editor (if left to an empty string, GPS will automatically select the first editor available on your system), to specify the custom editor command, in case you've selector this item, and whether this editor should always be used every time you double-click on a file, or whether you need to explicitly select the contextual menu to open the external editor.
This section concerns X-Window users who are used to cutting and pasting with the middle mouse button. In the GPS text editor, as in many recent X applications, the GPS clipboard is set by explicit cut/copy/paste actions, either through menu items or keyboard shortcuts, and the primary clipboard (i.e. the "middle button" clipboard) is set by the current selection.
Therefore, copy/paste between GPS and other X applications using the primary clipboard will still work, provided that there is some text currently selected. The GPS clipboard, when set, will override the primary clipboard.
See <http://www.freedesktop.org/standards/clipboards.txt> for more
information.
After you have finished modifying your files, you need to save them. The basic
method to do that is to select the menu File->Save, which saves the
currently selected file.
You can also use the menu File->Save As... if you want to save the
file with another name, or in another directory.
If you have multiple files to save, another possibility is to use the menu
File->Save More->All. This will open a dialog listing all the currently
modified editors that need saving. You can then select individually which
one should be saved, and click on Save to do the actual saving.
When calling external commands, such as compiling a file, if the
Auto save preference is disabled, this same dialog is also used,
to make sure that e.g. the compiler will take into account your local changes.
If the preference is enabled, the saving is performed automatically.
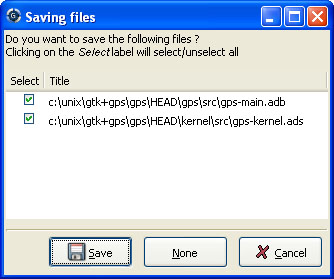
You can conveniently select or unselect all the files at once by clicking on the title of the first column (labeled Select). This will toggle the selection status of the first line, and have the same status for all other editors.
If you press Cancel instead of Save, no saving will take place,
and the action that displayed this dialog is also canceled. Such actions can
be for instance starting a compilation command, a VCS operation, or quitting
GPS with unsaved files.
GPS has a basic support for working with files on remote hosts. This includes a number of protocols, described below, which allow you to read a file from a remote host, edit it locally, and then save it transparently to the remote machine.
For now, the support for remote files is only available through the GPS
shell window. You start editing a remote file by typing a line similar to
Editor.edit protocol://user@machine/full/path
where "protocol" should be replaced by the name of the protocol you want to use, "user" is the login name you wish to use on the remote "machine", and "/full/path" is the full path on the remote machine to access the file.
The user name is optional. If it is the same as on the local machine, you can omit the user name as well as the "@" sign.
Likewise, the machine name is optional, if you want to get a file from the local host. This can be used to access files belonging to another user. In this case, you need to specify the "@" sign, but do not insert a machine name right after it.
Remote files can also be used if you want to work with GPS, but the machine on which the files are found isn't supported by GPS.
The following protocols are supported:
Although ssh can be setup not to require a password, GPS will automatically detect if a password is asked and open a dialog to query it.
The remote system must be a Unix-like system with support for standard Unix
commands like test, echo, rm and ls.
In the sample shell command above, you would replace the word "protocol" with
"ssh" to use this protocol.
It has the same requirements that the ssh protocol. To use it, substitute the
word "rsh" to "protocol" in the example above.
To use it, substitute the word "telnet" to "protocol" in the example above.
It basically has the same behavior as the ssh protocol, although it might be slightly slower since a new connection has to be established every time a file is fetched from, or written to the remote host. However, it might work better than ssh if the file contains 8 bit characters.
To use it, substitute the word "scp" to "protocol" in the example above.
Rsync is specially optimized to transfer only the parts of a file that are different from the one already on the remote host. Therefore, it will generally provide the best performance when writing the file back to the remote host.
If you set up the environment variable RSYNC_RSH to ssh before starting gps, the connection will then be encrypted when transferring the files.
To use this protocol, substitute the word "rsync" to "protocol" in the
example above.
To use this protocol, substitute the word "ftp" to "protocol" in the example
above.
GPS provides cross-reference navigation for program entities, such as types, procedures, functions, variables, ..., defined in your application. The cross-reference support in GPS relies on language-specific tools as explained below.
If you need to navigate through sources that do not compile (e.g after
modifications, or while porting an application), GNAT can still generate
partial cross-reference information if you specify the -gnatQ
compilation option. Along with the -k option of gnatmake, it is
then possible to generate as much relevant information as possible for
your non compilable sources.
There are a few special cases where GPS cannot find the external file
(called ALI file) that contains the cross-reference
information. Most likely, this is either because you haven't compiled
your sources yet, or because the source code has changed since the
ALI file was generated.
It could also be that you haven't included in the project the object
directories that contain the ALI files.
In addition, one special case cannot be handled automatically. This
is for separate units, whose file names have been crunched through the
gnatkr command. To handle this, you should force GPS to parse
all the ALI files in the appropriate object directory. This is
done by right-clicking on the object directory in the explorer
(left-side panel on the main window), and selecting the menu "Parse
all xref information".
In some cases, GPS won't be able to determine the exact function involved
in a cross-reference. This will typically occur for overloaded functions,
or if multiple functions with the same name, but under different
#ifdef sections, are defined. In this case, GPS will display a
dialog listing the possible choices to resolve the ambiguity.
In addition, the C/C++ parser has the following limitations: namespaces are currently ignored (no specific processing is done for namespaces); minimal support for templates; no attempt is made to process the macros and other preprocessor defines. Macros are considered as special entities, so it is possible to navigate from a macro use to its definition, but the macro content is ignored, which means for example that function calls made through macros won't be detected.
This capability requires support for cross-references.
This item is also accessible through the editor's contextual menu
This contextual menu is available from any source editor. If you right click over an entity, or first select text, the contextual menu will apply to this selection or entity.
Entity calls
Entity is called by
Note that this capability requires a global look up in the project
cross-references, which may take a significant amount of time the first
time. After a global look up, information is cached in memory, so that
further global queries will be faster.
Find all references to entity
Find all references ...
Find all local references to entity
The section on the project view (The Project View) has already given a brief overview of what the projects are, and the information they contain.
This chapter provides more in-depth information, and describes how such projects can be created and maintained.
This section describes what the projects are, and what information they contain.
The most important thing to note is that the projects used by GPS are
the same as the ones used by GNAT. These are text files (using the
extension .gpr) which can be edited either manually, with any
text editor, or through the more advanced GPS interface.
The exact syntax of the project files is fully described in the GNAT
User's Guide (<gnat_ug.html>) and GNAT Reference Manual
(<gnat_rm.html>). This is recommended reading if you want to use
some of the more advanced capabilities of project files which are not
yet supported by the graphical interface.
GPS can load any project file, even those that you have been edited manually. Furthermore, you can manually edit project files created by GPS.
Typically you will not need to edit project files manually, since several graphical tools such as the project wizard (The Project Wizard) and the properties editor(The Project Properties Editor) are provided.
GPS doesn't preserve the layout nor comments of manually created projects after you have edited them in GPS. For instance, multiple case statements in the project will be coalesced into a single case statement. This normalization is required for GPS to be able to preserve the previous semantic of the project in addition to the new settings.
All command-line GNAT tools are project aware, meaning that the notion of project goes well beyond GPS' user interface. Most capabilities of project files can be accessed without using GPS itself, making project files very attractive.
GPS uses the same mechanisms to locate project files as GNAT itself:
Project files contain all the information that describe the organization of your source files, object files and executables.
A project file can contain comments, which have the same format as in Ada,
that is they start by "-" and extend to the end of the line.
You can add comments when you edit the project file manually. GPS will
attempt to preserve them when you save the project through the menu, but this
will not always be possible. It helps if the comments are put at the end of
the line, as in
project Default is
    for Source_Dirs use ();  --  No source in this project
end Default;
Generally, one project file will not be enough to describe a complex organization. In this case, you will create and use a project hierarchy, with a root project importing other sub projects. Each of the projects and sub projects is responsible for its own set of sources (compiling them with the appropriate switches, put the resulting files in the right directories, ...).
Each project contains the following information (see the GNAT user's guide for the full list)
If one of the source files of project A depends on some source files from project B, then B must be imported by A. If this isn't the case, the compiler will complain that some of the source files cannot be found.
One important rule is that each source file name must be unique in the project hierarchy (i.e. a file cannot be under control of two different projects). This ensures that the same file will be found no matter what project is managing the source file that uses
When sources from imported sub-projects are recompiled, the resulting object files are put in the sub project's own object directory, and will never pollute the parent's object directory.
The default to find this set of source files is to take all the files in the source directories that follow the naming scheme (see below) for each language. In addition if you edit the project file manually, it is possible to provide an explicit list of source files.
This attribute cannot be modified graphically yet.
The name of the file is generally related to the name of the executable.
A given project file hierarchy can be used to compile and link several executables. GPS will automatically update the Compile, Run and Debug menu with the list of executables, based on this list.
GPS also supports embedded targets (VxWorks, ...) by specifying alternate names for the build and debug tools.
The project file contains the information required to log on the remote host.
Another information stored in the project is the list of languages that this project knows about. GPS support any number of language, with any name you choose. However, advanced support is only provided by default for some languages (Ada, C and C++), and you can specify other properties of the languages through customization files (see Adding support for new languages).
By default, the graphical interface will only give you a choice of languages among the ones that are known to GPS at that point, either through the default GPS support or your customization files. But you can also edit the project files by hand to add support for any language.
Languages are a very important part of the project definition. For each
language, you should specify a naming scheme that allows GPS to associate
files with that language. You would for instance specify that all .adb
files are Ada, all .txt files are standard text files, and so on.
Only the files that have a known language associated with them are displayed
in the Project View, or available for easy selection through the
File->Open From Project menu. Similarly, only these files are shown
in the Version Control System interface.
It is therefore important to properly setup your project to make these files
available conveniently in GPS, although of course you can still open any file
through the File->Open menu.
If your project includes some README files, or other text files, you should
add "txt" as a language (or any other name you want), and make sure that
these files are associated with that language in the Project properties
editor.
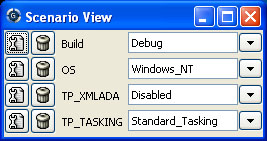
The behavior of projects can be further tailored by the use of scenarios.
All the attributes of a project, except its list of imported projects,
can be chosen based on the value of external variables, whose value is
generally coming from the host computer environment, or directly set in
GPS. The interface to manipulate these scenarios is the scenario view, which
can be displayed by selecting the menu Tools->Scenario View.
It can be convenient to drag this window with your mouse, and drop it above
the project view, so that you can see both at the same time.
This area allows you to select new values for the scenario variables defined in your project, and thus change dynamically the view GPS has of your project and your source files.
This facility can for instance be used to compile all the sources either in debug mode (so that the executables can be run in the debugger), or in optimized mode (to reduce the space and increase the speed when delivering the software). In this configuration scenario, all the attributes (source directories, tools, ...) remain the same, except for the compilation switches. It would be more difficult to maintain a completely separate hierarchy of project, and it is much more efficient to create a new configuration variable and edit the switches for the appropriate scenario (The Project Properties Editor).
Creating a new scenario variable is done through the contextual menu
(right-click) in the Project Explorer. Select the menu Edit Project->Add
Configuration Variable. This opens the following dialog:
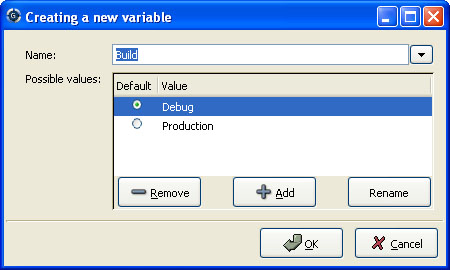
There are two main areas in this dialog: in the top line, you specify the name of the variable. This name is used for two purposes:
If you click on the arrow on the right of this name area, GPS will display the list of all the environment variables that are currently defined. However, you don't need to pick the name of an existing variable, neither must the variable exist when GPS is started.
The second part of this dialog is the list of authorized value for this variable. Any other value will generate an error reported by GPS, and the project won't be loaded as a result.
One of these values is the default value (the one whose button in the Default column is selected). This means that if the environment variable doesn't exist when GPS is started, GPS will behave as if it did exist with this default value.
The list of possible values can be edited through the Remove,
Add and Rename buttons, although you can also simply
click on the value itself to change it.
If at least one configuration variable is defined in your project, the
scenario view will contain something similar to:
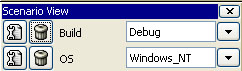
This screen shot shows two configuration variables, named Build
and OS, with their current value (resp. Debug and
Unix).
You can easily change the current value of any of these variables by clicking on the arrow on the right of the value. This will display a pop-up window with the list of possible values, from which you select the one you wish to use.
As soon as a new value is selected, GPS will recompute the project
explorer (in case source directories, object directories or list
of source files have changed). A number of things will also be updated
(like the list of executables in the Compile, Run and
Debug menus).
Currently, GPS will not recompute the contents of the various browsers (call graph, dependencies, ...) for this updated project. This would be too expensive to do every time the value changes, and therefore you need to explicitly request an update.
You can change the list of possible values for a configuration variable at any time by clicking on the button to the far left of the variable's name. This will pop up the same dialog that is used to create new variables
Removing a variable is done by clicking on the button immediately to the left of the variable's name. GPS will then display a confirmation dialog.
If you confirm that you want to delete the variable, GPS will simply remove the variable, and from now on act as if the variable always had the value it had when it was deleted.
The project explorer, as mentioned in the general description of the GPS window, is one of the explorers found by default on the left of the window. It shows in a tree structure the project hierarchy, along with all the source files belonging to the project, and the entities declared in the source files.
It is worth noting that the explorer provides a tree representation of the project hierarchy. If a project is imported by multiple other projects in the hierarchy, then this project will appear multiple times in the explorer.
Likewise, if you have edited the project manually and have used the
limited with construct to have cycles in the project
dependencies, the cycle will expand infinitely. For instance, if
project a imports project b, which in turns imports
project a through a limited with clause, then expanding
the node for a will show b. In turn, expanding the node
for b will show a node for a, and so on.
The contextual menu in this explorer provides a number of items to modify the project hierarchy (what each project imports), as well as to visualize and modify the attributes for each projects (compilation switches, naming scheme, ...)
The following entries are available in the contextual menu:
Show Projects Imported by...
Save The Project...
Project->Save All.
Edit Project/Properties
Edit Project Source File
Edit Project/Dependencies...
Add Configuration Variable
Build
Any time one or several projects are modified, the contents of the
explorer is automatically refreshed. No project is automatically
saved. This provides a simple way to temporarily test new values for
the project attributes.
Unsaved modified projects are shown with a special icon in the project
explorer, displaying a red exclamation mark on top of the standard
icon:

The project files should generally be considered as part of the sources, and thus be put under control of a version control system. As such, you might want to prevent accidental editing of the project files, either by you or some other person using the same GPS installation.
The main thing to do to prevent such accidental edition is to change the write permissions on the project files themselves. On Unix systems, you could also change the owner of the file. When GPS cannot write a project file, it will report an error to the user.
However, the above doesn't prevent a user from trying to do some modifications at the GUI level, since the error message only occurs when trying to save the project (this is by design, so that temporary modification can be done in memory).
You can disable all the project editing related menus in GPS by adding
special startup switches. The recommended way is to create a small batch
script that spawns GPS with these switches. You should use the following
command line:
gps --traceoff=MODULE.PROJECT_VIEWER --traceoff=MODULE.PROJECT_PROPERTIES
What these do it prevent the loading of the two GPS modules that are responsible for project edition.
The menu bar item Project contains several commands that
generally act on the whole project hierarchy. If you only want to act
on a single project, use the contextual menu in the project explorer.
Some of these menus apply to the currently selected project. This notion depends on what window is currently active in GPS: if it is the project explorer, the selected project is either the selected node (if it is a project), or its parent project (for a file, directory, ...). If the currently active window is an editor, the selected project is the one that contains the file.
In all cases, if there is no currently selected project, the menu will apply to the root project of the hierarchy.
These commands are:
New
Yes, the new
project will replace the currently loaded project hierarchy.
You will get asked what information you would like to create the project from.
In particular, you can create a set of project files from existing Ada
sources.
Open
Recent
Edit Project Properties
Save All
Edit File Switches
Recompute Project
Project View
The project wizard allows you to create in a few steps a new project file. It has a number of pages, each dedicated to editing a specific set of attributes for the project.
The typical way to access this wizard is through the
Project->New... menu.
The project wizard is also launched when a new dependency is created
between two projects, through the contextual menu in the project
explorer.
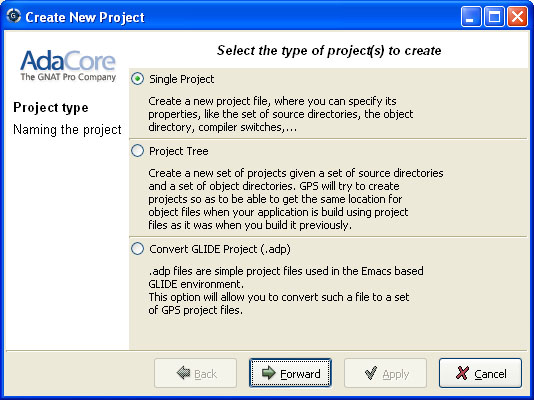
The wizard gives access to the following list of pages:
Several types of project wizards are provided in GPS. Depending on the information you have or your current setup, you will choose one or the other.
This is likely the wizard you will use most often. It creates a project file from scratch, and asks you for the location of source directories, the object directory,... The rest of this chapter describes this wizard in more details
This wizard will attempt to create a set of one or more project files to
represent your current build environment. It will analyze what
your sources are, where the corresponding object files are, and will try
and find some possible setup for the project files (remember that a given
.gpr project file can be associated with a single object directory.
This wizard might not work in all cases, but is worth a try to get you started if you already have an existing set of sources
This wizard will help you convert a .adp project file that is used
by the GLIDE environment. The same restrictions apply as above, except
that the list of source directories, object directories
and tool switches are read directly from that file.
This specialized wizard is similar to the Single Project wizard, except it
adds one extra page, the Library page. The output of the compilation of this
project is a library (shared or static), as opposed to an executable in the
case of Single Project.
This is the first page displayed by any of the wizard.
You must enter the name and location of the project to create. This
name must be a valid Ada identifier (i.e. start with a letter,
optionally followed by a series of digits, letters or
underscores). Spaces are not allowed. Likewise, reserved Ada keywords
must be avoided. If the name is invalid, GPS will display an error
message when you press the Forward button.
Child projects can be created from this dialog. These are project whose
name is of the form Parent.Child. GPS will automatically generate
the dependency to the parent project so as to make the child project
valid.
In this page, you should also select what languages the source files
in this project are written in. Currently supported languages are Ada,
C and C++. Multiple languages can be used for a single
project.
The last part of this page is used to indicate how the path should be stored in the generated project file. Most of the time, this setting will have no impact on your work. However, if you wish to edit the project files by hand, or be able to duplicate a project hierarchy to another location on your disk, it might be useful to indicate that paths should be stored as relative paths (they will be relative to the location of the project file).
This page is used to select the programming languages used for the
sources of this project. By default, only Ada is selected.
New languages can be added to this list by using XML files, see the
section on customizing GPS (see Adding support for new languages).
The second page in the project wizard allows you to select which Version Control system is to be used for the source files of this project.
GPS doesn't attempt to automatically guess what it should use, so you must specify it if you want the VCS operations to be available to you.
The two actions Log checker and File checker are the
name and location of programs to be run just prior an actual commit of
the files in the Version Control System. These should be used for
instance if you wish to enforce style checks before a file is actually
made available to other developers in your team.
If left blank, no program will be run.
This page lists and edits the list of source directories for the project. Any number of source directory can be used (the default is to use the directory which contains the project file, as specified in the first page of the wizard).
If you do not specify any source directory, no source file will be associated with the project, since GPS wouldn't know where to look for them.
To add source directories to the project, select a directory in the top frame, and click on the down arrow. This will add the directory to the bottom frame, which contains the current list of source directories.
You can also add a directory and all its subdirectories recursively by using the contextual menu in the top frame. This contextual menu also provides an entry to create new directories, if needed.
To remove source directories from the project, select the directory in the bottom frame, and click on the up arrow, or use the contextual menu.
All the files in these directories that match one of the language supported by the project are automatically associated with that project.
The relative sizes of the top and bottom frame can be changed by clicking on the separation line between the two frames and dragging the line up or down.
The object directory is the location where the files resulting from
the compilation of sources (e.g. .o files) are placed.
One object directory is associated for each project.
The exec directory is the location where the executables are put. By default, this is the same directory as the object directory.
The main units of a project are the files that should be compiled and linked to obtain executables.
Typically, for C applications, these are the files that contain the
main() function. For Ada applications, these are the files that
contain the main subprogram each partition in the project.
These files are treated specially by GPS. Some sub-menus of
Build and Debug will have predefined entries for the
main units, which makes it more convenient to compile and link your
executables.
To add main units click on the Add button. This opens a file
selection dialog. No check is currently done that the selected file
belongs to the project, but GPS will complain later if it doesn't.
When compiled, each main unit will generate an executable, whose name is visible in the second column in this page. If you are using a recent enough version of GNAT (3.16 or more recent), you can change the name of this executable by clicking in the second column and changing the name interactively.
This page allows you to configure your project so that the output of its compilation is a library (shared or static), as opposed to an executable or a simple set of objet files. This library can then be linked with other executables (and will be automatically if the project is imported by another one.
You need to define the attributes in the top box to transform your project into a library project. See the tooltips that appear when you leave your mouse on top of the label to the left of each field.
If you define any of the attributes in the Standalone Library box, you will compile a standalone library. This is a library that takes care of its elaboration by itself, instead of relying on its caller to elaborate it as is standard in Ada. You also have more control over what files make up the public interface to the library, and what files are private to the library and invisible from the outside.
A naming scheme indicates the file naming conventions used in the different
languages supported by a given project.
For example, all .adb files are Ada files, all .c files are
C files.
GPS is very flexible in this respect, and allows you to specify the
default extension for the files in a given programming language. GPS makes a
distinction between spec (or header) files, which generally contain
no executable code, only declarations, and body files which contain
the actual code. For languages other than Ada, this header file is
used rather than the body file when you select Go To
Declaration in the contextual menu of editors.
In a language like Ada, the distinction between spec and body is part of the definition of the language itself, and you should be sure to specify the appropriate extensions.
The default naming scheme for Ada is GNAT's naming scheme (.ads
for specs and .adb for bodies). In addition, a number of predefined
naming schemes for other compilers are available in the first combo box on
the page. You can also create your own customized scheme by entering a
free text in the text entries.
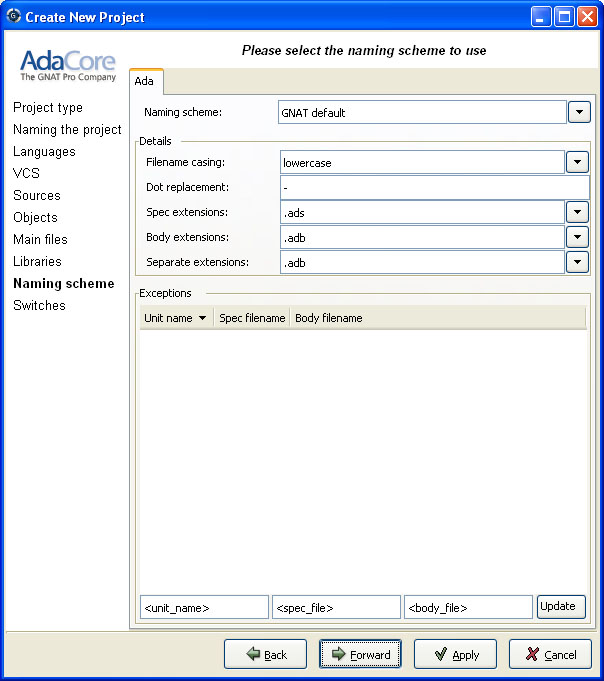
For all languages, GPS accepts exceptions to this standard naming
scheme. For instance, this let you specify that in addition to using
.adb for Ada body files, the file foo.ada should also be
considered as an Ada file.
The list of exceptions is displayed in the bottom list of the naming scheme editor. To remove entries from this list, select the line you want to remove, and then press the <Del> key. The contents of the lines can be edited interactively, by double-clicking on the line and column you want to edit.
To add new entries to this list, use the fields at the bottom of the window, and press the update button.
The last page of the project wizard is used to select the
default switches to be used by the various tools that GPS calls (compiler,
linker, binder, pretty printer, ...).
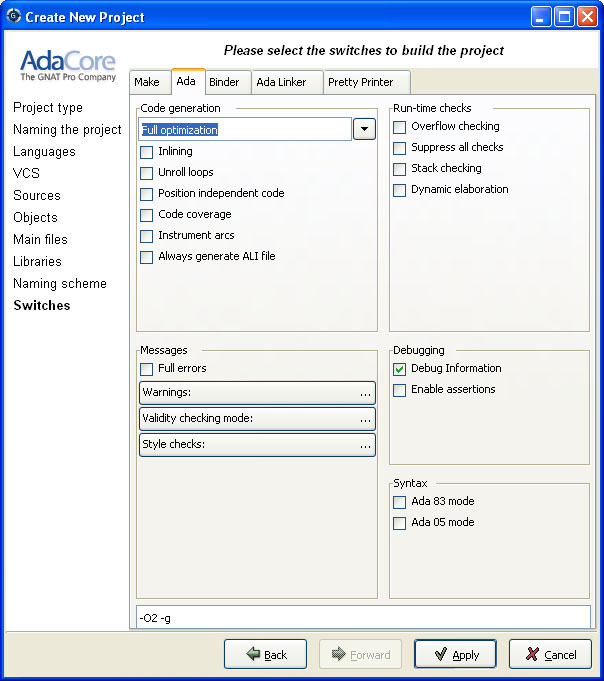
This page appears as a notebook, where each page is associated with a specific tool. All these pages have the same structure:
The two parts of the pages are kept synchronized at any time: clicking on a button will edit the entry field to show the new switch; adding a new switch by hand in the entry field will activate the corresponding button if there is one.
Any switch can be added to the entry field, even if there is no corresponding button. In this case, GPS will simply forward it to the tool when it is called, without trying to represent it graphically.
You can edit the dependencies between projects through the contextual
menu Edit Project->Dependencies... in the Project Explorer.
This view makes it easy to indicate that your project depends on external libraries, or other modules in your source code. For instance, you can give access to the GtkAda graphical library in your project by adding a project dependency to gtkada.gpr, assuming GtkAda has been installed in your system.
The dependencies also determine in what order your application is built.
When you compile a project, the builder will first make sure that the projects
it depends on are up-to-date, and otherwise recompile them.
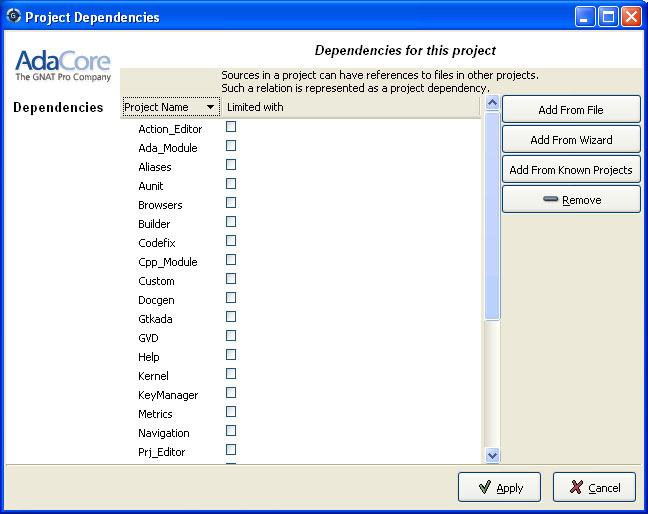
When you select that contextual menu, GPS will open a dialog that allows you to add or remove dependencies to your project. New dependencies are added by selecting a project file name from one of several sources:
These are the projects that are found in one of the directories referenced
in the ADA_PROJECT_PATH environment variable. Typically, these
include third party libraries, such as GtkAda, win32ada, ...
In all these cases, you will generally be able to choose whether this should be a simple dependency, or a limited dependency. The latter allows you to have mutually dependent projects (A depends on B, which in turns depends on A even indirectly), although you cannot reference the attribute of such a project in the current project (for instance to indicate that the compiler switches to use for A are the same as for B - you need to duplicate that information).
In some cases, GPS will force a limited dependency on you to avoid loops in the dependencies that would make the project tree illegal.
The project properties editor gives you access at any time to the properties
of your project. It is accessible through the menu
Project->Edit Project Properties, and through the contextual menu
Edit project properties on any project item, e.g. from the Project
View or the Project Browser.
If there was an error loading the project (invalid syntax, non-existing directories, ...), a warning dialog is displayed when you select the menu. This reminds you that the project might be only partially loaded, and editing it might result in the loss of data. In such cases, it is recommended that you edit the project file manually, which you can do directly from the pop-up dialog.
Fix the project file as you would for any text file, and then reload
it manually (through the Project->Open... or
Project->Recent menus.
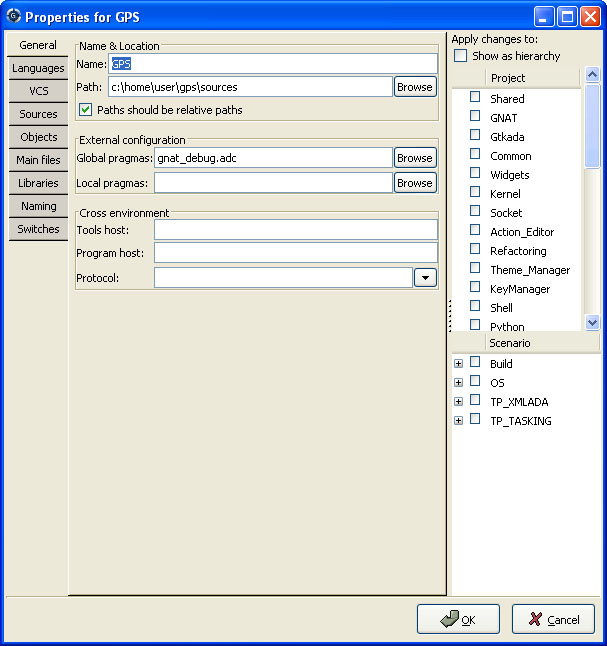
The project properties editor is divided in three parts:
General page are exactly the same, and you should therefore
read the description for these in the project wizard chapter.
The general page gives access to more attributes than the general page of the project wizard does. In addition, you can select the name of the external tools that GPS uses (such as compilers, debugger, ...).
See also Working in a Cross Environment for more info on the
Cross environment attributes.
Clicking on the right title bar (Project) of this selector will sort the
projects in ascending or descending order.
Clicking on the left title bar (untitled) will select or unselect all the projects.
This selector has two different possible presentations, chosen by the
toggle button on top: you can either get a sorted list of all the
projects, each one appearing only once. Or you can have the same
project hierarchy as displayed in the project explorer.
Clicking on the left title bar (untitled, on the left of the Scenario
label) will select or unselect all values of all variables.
To select all values of a given variable, click on the corresponding check button.
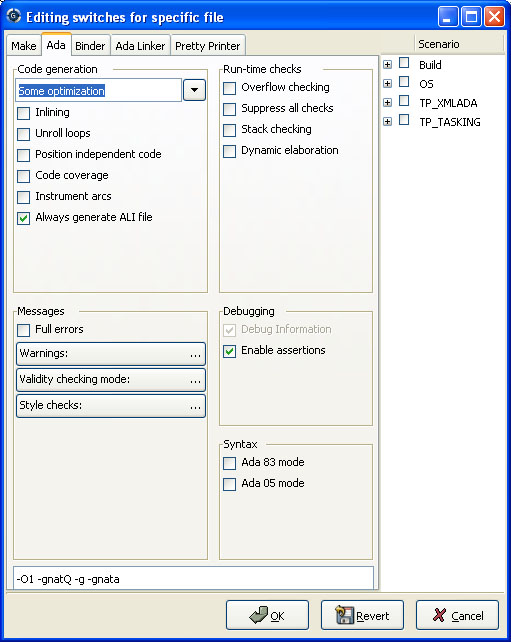
The switches editor, available through the menu Project->Edit
Switches, lists all the source files associated with the selected
project.
For each file, the compiler switches are listed. These switches are displayed in gray if they are the default switches defined at the project level (see The Project Properties Editor). They are defined in black if they are specific to a given file.
Double-clicking in the switches column allows you to edit the switches
for a specific file. It is possible to edit the switches for multiple
files at the same time by selecting them before displaying the contextual
menu (Edit switches for all selected files).
When you double-click in one of the columns that contain the switches, a new dialog is opened that allows you to edit the switches specific to the selected files.
This dialog has a button titled Revert. Clicking on this button
will cancel any file-specific switch, and revert to the default
switches defined at the project level.
The project graph is a special kind of browser (see Source Browsing). It shows the dependencies between all the project in the project hierarchy. Two items in this browser will be linked if one of them imports the other.
It is accessed through the contextual menu in the project explorer, by
selecting the Show projects imported by... item, when
right-clicking on a project node.
Clicking on the left arrow in the title bar of the items will display all the projects that import that project. Similarly, clicking on the right arrow will display all the projects that are imported by that project.
The contextual menu obtained by right-clicking on a project item
contains several items. Most of them are added by the project editor,
and gives direct access to editing the properties of the project,
adding dependencies...
See The Project Explorer.
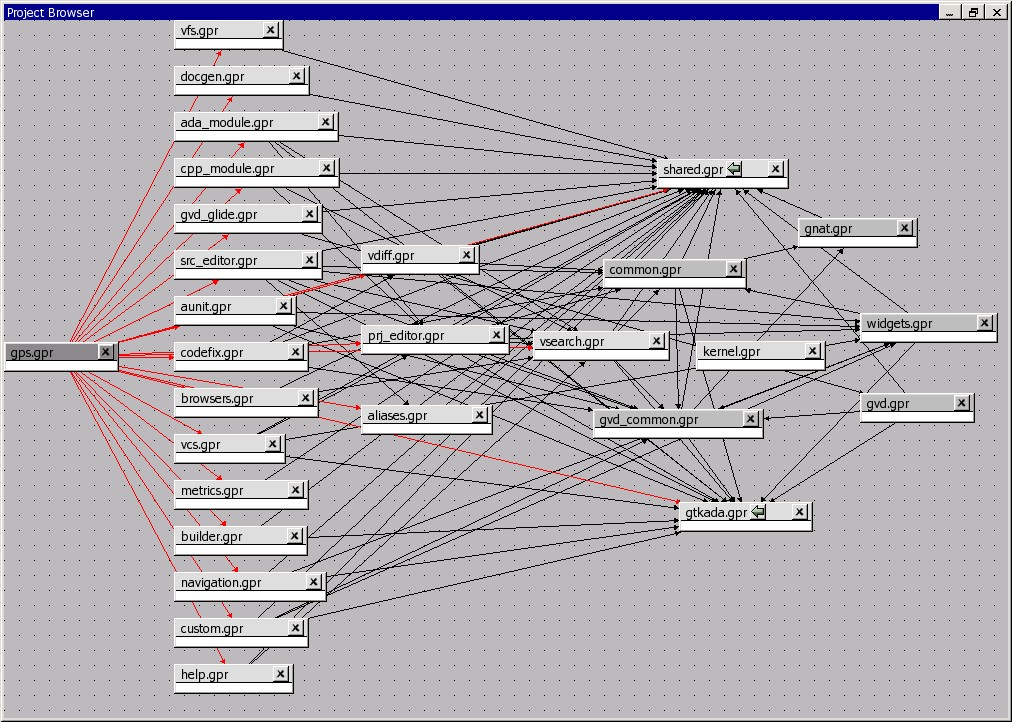
Some new items are added to the menu:
Locate in explorer
Show dependencies
Show recursive dependencies
Show projects depending on
GPS provides extensive search capabilities among its different elements. For instance, it is possible to search in the currently edited source file, or in all the source files belonging to the project, even those that are not currently open. It is also possible to search in the project explorer (on the left side of the main GPS window),...
All these search contexts are grouped into a single graphical window,
that you can open either through the menu Navigate->Find/Replace..., or
the shortcut <Ctrl-F>.
By default, the search window is floating, ie appears as a dialog on top of
GPS. You can choose to put it inside the multiple document interface
permanently for easier access. This can be done by selecting the menu
Window->Floating, and then drag-and-dropping the search window in a
new location if you wish (for instance above the Project View).
Selecting either of these two options will pop up a dialog on the
screen, similar to the following:
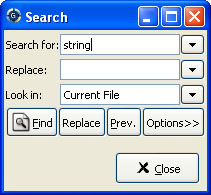
On this screen shot, you can see three entry fields:
Search for
Options button and selecting the
appropriate check box, or by opening the combo box (click on the arrow
on the right of the entry field).
In this combo box, a number of predefined patterns are provided. The
top two ones are empty patterns, that automatically set up the
appropriate fixed strings/regular expression mode. The other regular
expressions are language-specific, and will match patterns like Ada
type definition, C++ method declaration,...
Replace with
Look in
Clicking on the arrow on the right will display the list of all possible contexts. This list includes:
Project Explorer
Projects, Directories, Files, Entities. The search in entities
may take a long time, search each file is parsed during the search.
Open Files
Files... section below.
Files...
*.ad? for all files ending with .ad and any
trailing character. The directory specified where the search starts, and
the Recursive search button whether sub directories will be searched
as well.
The Scope entry is used to restrict the search to a set of language
constructs, e.g. to avoid matching on comments when you
are only interested in actual code, or to only search strings and
comments, and ignore the code.
Files From Project
Files...
section above.
Current File
Files... section above.
Project Browser
The second part of the window is a row of buttons, to start the search
(or continue to the next occurrence), to stop the current search when
it is taking too long, or to display the options.
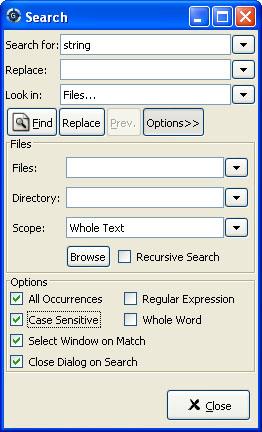
There are four check boxes in this options box.
"Search All Occurrences"
Next button (or the equivalent shortcut
<Ctrl-N>) to go to the next occurrence.
However, if you enable this check box, the search widget will start
searching for all occurrences right away, and put the results in a new
window called Locations (initially found in the bottom dock of
the GPS window). You can interrupt the search at any time by pressing
the Stop button: this will stop when the next occurrence is found.
This button is reset to its default value whenever you modify the searched
pattern or the replacement text.
"Case Sensitive"
"Whole Word Only"
"Regular Expression"
Search for: field.
The grammar followed by the regular expressions is similar to the Perl and
Python regular expressions grammar, and is documented in the GNAT run time file
g-regpat.ads. To open it from GPS, you can use the open from project
dialog (File->Open From Project...) and type g-regpat.ads. See
Open From Project for more information on this dialog.
Select Window on Match
Close Dialog on Search
As most GPS components, the search window is under control of the multiple document interface, and can thus be integrated into the main GPS window instead of being an external window.
To force this behavior, open the menu Window, select
Search in the list at the bottom of the menu, and then select
either Floating or Docked.
If you save the desktop (File->Save More->Desktop, GPS will
automatically reopen the search dialog in its new place when it is
started next time.
This chapter describes how to compile files, build executables and run
them. Most capabilities can be accessed through the Build menu item,
or through the Build and Run contextual menu items, as
described in the following section.
When compiler messages are detected by GPS, an entry is added in the Locations tree, allowing you to easily navigate through the compiler messages (see The Locations Tree), or even to automatically correct some errors or warnings (see Code Fixing).
The build menu gives access to capabilities related to checking, parsing and compiling files, as well as creating and running executables.
If errors or warnings occur during the compilation, the corresponding locations
will appear in the Locations Tree. If the corresponding Preference is set, the
source lines will be highlighted in the editors (see
The Preferences Dialog).
To remove the highlighting on these lines, remove the files from the Locations
Tree.
When running an application from GPS, a new execution window is added in the bottom area where input and output of the application is handled. This window is never closed automatically, even when the application terminates, so that you can still have access to the application's output. If you explicitly close an execution window while an application is still running, a dialog window will be displayed to confirm whether the application should be terminated.
When using an external terminal, GPS launches an external terminal utility that will take care of the execution and input/output of your application. This external utility can be configured in the preferences dialog (External Commands->Execute command).
Similarly, the Run contextual menu accessible from a project
entity contains the same entries.
GPS contains several kinds of browsers, that have a common set of basic functionalities. There are currently four such browsers: the project browser (see The Project Browser), the call graph (see Call Graph), the dependency browser (see Dependency Browser) and the entity browser (see Entity Browser).
All these browsers are interactive viewers. They contain a number of items, whose visual representation depends on the type of information displayed in the browser (they can be projects, files, entities, ...).
In addition, the following capabilities are provided in all browsers:
The refresh layout menu item in the background contextual menu
can be used to recompute the layout of items at any time, even for
items that were previously moved interactively.
By default, links are displayed as straight lines. You can choose to
use orthogonal links instead, which are displayed only with vertical
or horizontal lines. Select the entry orthogonal links in the
background contextual menu.
png image
using the entry Export... in the background contextual menu.
zoom in,
zoom out and zoom. The latter is used to select directly
the zoom level you want.
This zooming capability is generally useful when lots of items are
displayed in the browser, to get a more general view of the layout and
the relationships between the items.
Selected items are drawn with a different title bar color. All items
linked to them also use a different title bar color, as well as the
links. This is the most convenient way to understand the relationships
between items when lots of them are present in the browser.
Two types of contextual menus are available in the browsers: the background contextual menu is available by right-clicking in the background area (i.e. outside of any item). As described above, it contains entries for the zooming, selecting of orthogonal links, and refresh; the second kind of contextual menu is available by right-clicking in items.
The latter menu contains various entries. Most of the entries are added by various modules in GPS (VCS module, source editor, ...). In addition, each kind of browser also has some specific entries, which is described in the corresponding browser's section.
There are two common items in all item contextual menus:
Hide Links
Remove all other items
The call graph shows graphically the relationship between subprogram callers and callees. A link between two items indicate that one of them is calling the other.
A special handling is provided for renaming entities (in Ada): if a
subprogram is a renaming of another one, both items will be displayed
in the browser, with a special hashed link between the two. Since the
renaming subprogram doesn't have a proper body, you will then need to
ask for the subprograms called by the renamed to get the list.
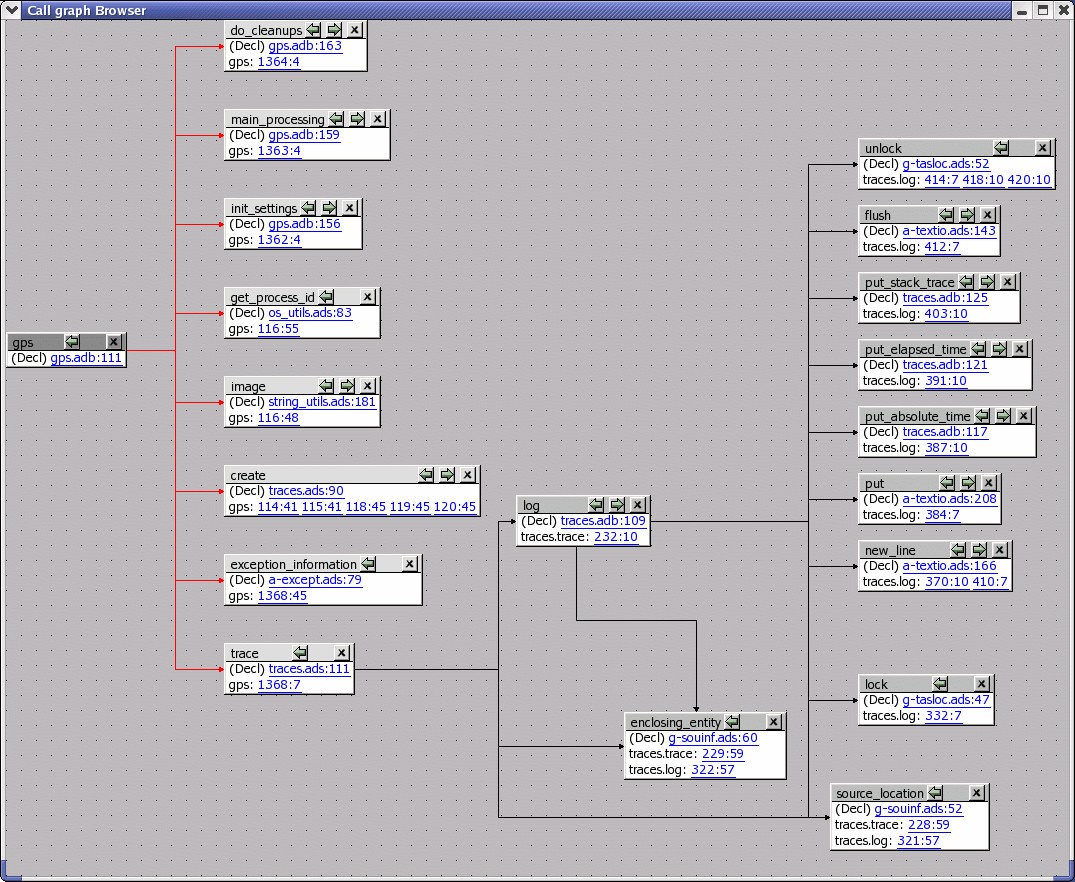
In this browser, clicking on the right arrow in the title bar will display all the entities that are called by the selected item.
Clicking on the left arrow will display all the entities that call the selected item (i.e. its callers).
This browser is accessible through the contextual menu in the project explorer and source editor, by selecting one of the items:
All boxes in this browser list several information: the location of their declaration, and the list of all their references in the other entities currently displayed in the browser. If you close the box for an entity that calls them, the matching references are also hidden, to keep the contents of the browser simpler.
References->Entity calls
References->Entity is called by
The contextual menu available by right-clicking on the entities in the browser has the following new entries, in addition to the ones added by other modules of GPS.
Entity calls
Entity is called by
Go To Spec
Go To Body
Locate in explorer
The dependency browser shows the dependencies between source
files. Each item in the browser represents one source file.
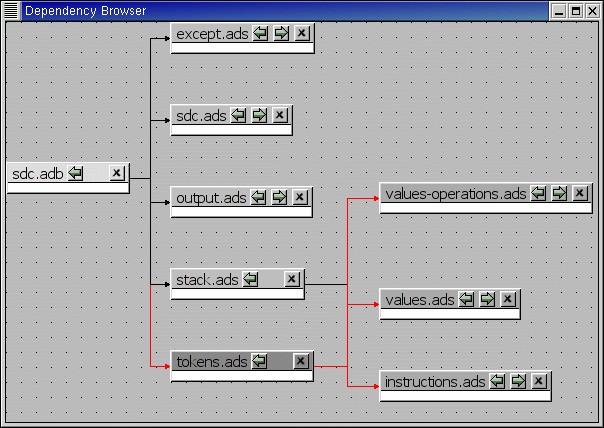
In this browser, clicking on the right arrow in the title bar will
display the list of files that the selected file depends on. A file
depend on another one if it explicitly imports it (with
statement in Ada, or #include in C/C++). Implicit dependencies
are currently not displayed in this browser, since the information is
accessible by opening the other direct dependencies.
Clicking on the left arrow in the title bar will display the list of files that depend on the selected file.
This browser is accessible through the contextual menu in the explorer and the source editor, by selecting one of the following items:
Show dependencies for file
This has the same effect as clicking on the right arrow for a file
already in the browser, and will display the direct dependencies for
that file.
Show files depending on file
This has the same effect as clicking on the left arrow for a file already in the browser, and will display the list of files that directly depend on that file.
The background contextual menu in the browser adds a few entries to the standard menu:
Open file...
Refresh
This menu entry will check that all links displays in the dependency browser are still valid. If not, they are removed. The arrows in the title bar are also reset if necessary, in case new dependencies were added for the files.
The browser is not refreshed automatically, since there are lots of
cases where the dependencies might change (editing source files,
changing the project hierarchy or the value of the scenario
variables,...)
Show system files
This menu entry indicates whether standard system files (runtime files
for instance in the case of Ada) are displayed in the browser. By
default, these files will only be displayed if you explicitly select
them through the Open file menu, or the contextual menu in the
project explorer.
Show implicit dependencies
This menu entry indicates whether implicit dependencies should also be
displayed for the files. Implicit dependencies are files that are
required to compile the selected file, but that are not explicitly
imported through a with or #include statement. For
instance, the body of generics in Ada is an implicit dependency.
Any time one of the implicit dependencies is modified, the selected
file should be recompiled as well.
The contextual menu available by right clicking on an item also adds a number of entries:
Analyze other file
This will open a new item in the browser, displaying the complement
file for the selected one. In Ada, this would be the body if you
clicked on a spec file, or the opposite. In C, it depends on the
naming conventions you specified in the project properties, but you
would generally go from a .h file to a .c file and back.
Show dependencies for file
These play the same role as in the project explorer contextual menu
The entity browser displays static information about any source entity.
The exact content of the items depend on the type of the item. For instance:
Ada record / C struct
Ada tagged type / C++ class
Subprograms
Packages
and more ...
This browser is accessible through the contextual menu in the explorer and source editor, when clicking on an entity:
Examine entity entity
Open a new item in the entity browser that displays information for the selected entity.
Most information in the items are click-able (by default, they appear as underlined blue text). Clicking on one of these hyper links will open a new item in the entity browser for the selected entity.
This browser can display the parent entities for an item. For instance, for a C++ class or Ada tagged type, this would be the types it derives from. This is accessible by clicking on the up arrow in the title bar of the item.
Likewise, children entities (for instance types that derive from the item) can be displayed by clicking on the down arrow in the title bar.
An extra button appear in the title bar for the C++ class or Ada tagged types, which toggles whether the inherited methods (or primitive operations in Ada) should be displayed. By default, only the new methods, or the ones that override an inherited one, are displayed. The parent's methods are not shown, unless you click on this title bar button.
GPS is also a graphical front-end for text-based debuggers such as GDB. A knowledge of the basics of the underlying debugger used by GPS will help understanding how GPS works and what kind of functionalities it provides.
Please refer to the debugger-specific documentation -
e.g. the GDB documentation
(<gdb.html>)
- for more details.
The integrated debugger provided by GPS is using an improved version of the GVD engine, so the functionalities between GVD and GPS are very similar. If you are familiar with GVD, you may be interested in reading Upgrading from GVD to GPS which explains the differences between the two environments.
Debugging is tightly integrated with the other components of GPS. For example, it is possible to edit files and navigate through your sources while debugging.
To start a debug session, go to the menu Debug->Initialize, and choose
either the name of your executable, if you have specified the name of
your main program(s) in the project properties, or start an empty debug
session using the <no main file> item. It is then possible to load
any file to debug, by using the menu Debug->Debug->Load File...
Note that you can create multiple debuggers by using the Initialize
menu several times: this will create a new debugger each time.
All the debugger-related actions (e.g. stepping, running) are performed on
the current debugger, which is represented by the current debugger console.
To switch between debuggers, simply select its corresponding console.
After the debugger has been initialized, you have access to two new windows:
the data window (in the top of the working area), and the debugger console
(in a new page, after the Messages and Shell windows).
All the menus under Debugger
are now also accessible, and you also have access to additional contextual
menus, in particular in the source editor where it is possible to easily
display variables, set breakpoints, and get automatic display
(via tool tips) of object values.
When you want to quit the debugger without quitting GPS, go to the menu
Debug->Terminate Current, that will terminate your current debug
session, or the menu Debug->Terminate that will terminate all your
debug sessions at once.
The Debug entry in the menu bar provides operations that act at a
global level. Key shortcuts are available for the most common operations, and
are displayed in the menus themselves.
Here is a detailed list of the menu items that can be found in the menu bar:
gdb) used
to handle the low level debugging.
Terminate Current if there
is only one debugger open.
Opens a file selection dialog that allows you to choose a program to
debug. The program to debug is either an executable for native debugging, or
a partially linked module for cross environments (e.g VxWorks).
Note that most items in this menu need to access the underlying debugger when the process is stopped, not when it is running. This means that you first need to stop the process on a breakpoint or interrupt it, before using the following commands. Failing to do so will result in blank windows.
When supported by the underlying debugger, clicking on a thread will
change the context (variables, call stack, source file) displayed,
allowing you to inspect the stack of the selected thread.
As for the thread window, the process being debugged needs to be stopped
before using this window.
p/x var) or a procedure call in the program being
debugged (e.g call my_proc).
The call stack window gives a list of frames corresponding to the current
execution stack for the current thread/task.
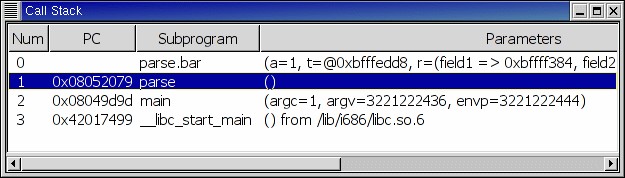
The bottom frame corresponds to the outermost frame where the thread is currently stopped. This frame corresponds to the first function executed by the current thread (e.g main if the main thread is in C). You can click on any frame to switch to the caller's context, this will update the display in the source window. See also the up and down buttons in the tool bar to go up and down one frame in the call stack.
The contextual menu (right mouse button) allows you to choose which information you want to display in the call stack window (via check buttons):
By default, only the subprogram name is displayed.
You can hide the call stack window by closing it, as for other windows, and
show it again using the menu Data->Call Stack.
The data window contains all the graphic boxes that can be accessed using the Data->Display menu items, or the data window Display Expression... contextual menu, or the source window Display contextual menu items, or finally the graph command in the debugger console.
For each of these commands, a box is displayed in the data window
with the following information:
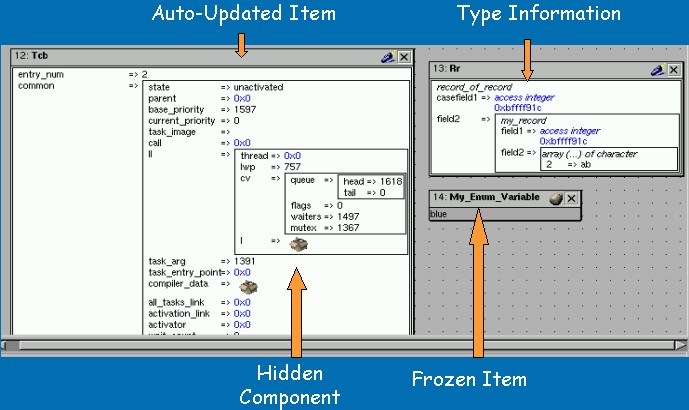
C, Ada, C++) and will
organize them accordingly.
For example, each field of a record/struct/class, or each item of an
array will be displayed separately. For each subcomponent, a thin box
is displayed to distinguish it from the other components.
A contextual menu, that takes into account the current component selected by the mouse, gives access to the following capabilities:
A contextual menu can be accessed in the canvas itself (point the mouse to an empty area in the canvas, and click on the right mouse button) with the following entries:
p/x var) or a procedure call in the program being
debugged (e.g call my_proc).
All the items on the canvas have some common behavior and can be fully manipulated with the mouse. They can be moved freely anywhere on the canvas, simply by clicking on them and then dragging the mouse. Note that if you are trying to move an item outside of the visible area of the data window, the latter will be scrolled so as to make the new position visible.
Automatic scrolling is also provided if you move the mouse while dragging an item near the borders of the data window. As long as the mouse remains close to the border and the button is pressed on the item, the data window is scrolled and the item is moved. This provides an easy way to move an item a long distance from its initial position.
Most of the items are displayed using several colors, each
conveying a special meaning. Here is the meaning assigned to all colors
(note that the exact color can be changed through the preferences
dialog; these are the default colors):
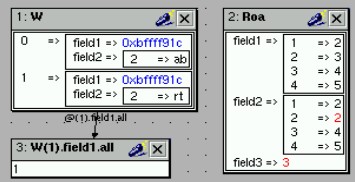
You can easily dereference these (that is to say see the value pointed to)
by double-clicking on the blue text itself.
As another example, if you choose to display the value of local variables in the data window (Display->Display Local Variables), then only the variables whose value has changed are highlighted, the others are left in black.
Several different icons can be used in the display of items. They also convey special meanings.
Double-clicking on this icon will expand the hidden part, and clicking on any sub-rectangle in the display of the variable will hide that part and replace it with that icon.
See also the description of the contextual menu to automatically show or hide all the contents of an item. Note also that one alternative to hiding subcomponents is to clone them in a separate item (see the contextual menu again).
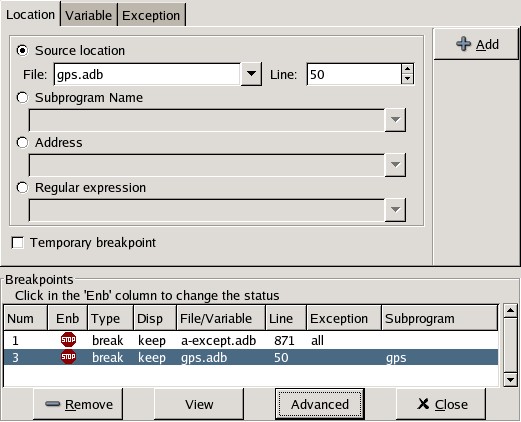
The breakpoint editor can be accessed from the menu Data->Edit Breakpoints. It gives access to the different kind of breakpoints: on source location, subprogram, address and Ada exceptions.
The top area provides an interface to easily create the different kinds of breakpoints, while the bottom area lists the existing breakpoints and their characteristics.
It is possible to access to advanced breakpoint characteristics for a given
breakpoint, by first selecting a breakpoint in the list, and then by clicking
on the Advanced button, which will display a new dialog window
where you can specify commands to run automatically after a breakpoint
is hit, or specify how many times a selected breakpoint will be ignored.
If running VxWorks AE, you can also change the Scope and Action
of breakpoints.
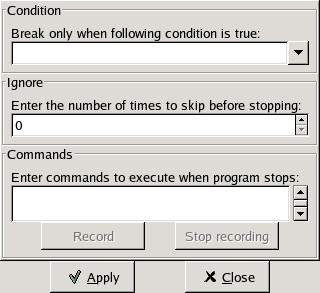
In VxWorks AE breakpoints have two extra properties:
These two properties can be set/changed through the advanced breakpoints characteristics by clicking on the Advanced button. There are two ways of setting these properties:
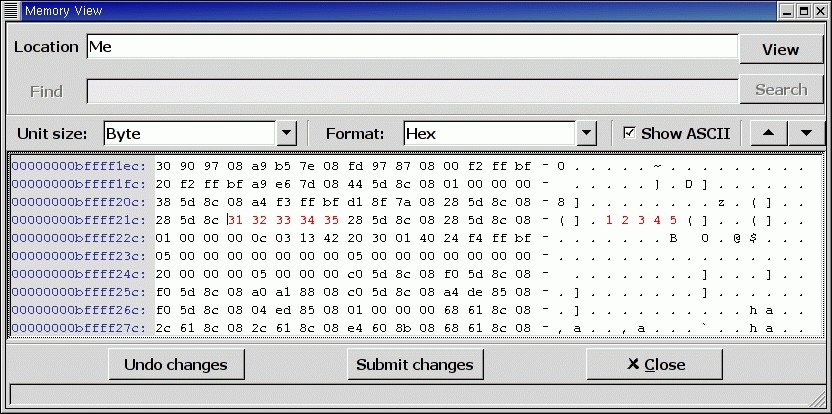
The memory window allows you to display the contents of memory by specifying either an address, or a variable name.
To display memory contents, enter the address using the C hexadecimal notation: 0xabcd, or the name of a variable, e.g foo, in the Location text entry. In the latter case, its address is computed automatically. Then either press Enter or click on the View button. This will display the memory with the corresponding addresses in the bottom text area.
You can also specify the unit size (Byte, Halfword or Word), the format (Hexadecimal, Decimal, Octal or ASCII), and you can display the corresponding ASCII value at the same time.
The up and down arrows as well as the <Page up> and <Page down> keys in the memory text area allows you to walk through the memory in order of ascending/descending addresses respectively.
Finally, you can modify a memory area by simply clicking on the location you want to modify, and by entering the new values. Modified values will appear in a different color (red by default) and will only be taken into account (i.e written to the target) when you click on the Submit changes button. Clicking on the Undo changes or going up/down in the memory will undo your editing.
Clicking on Close will close the memory window, canceling your last pending changes, if any.
When debugging, the left area of each source editor provides the following information:
The second area in the source window is a text window on the right that displays the source files, with syntax highlighting. If you leave the cursor over a variable, a tooltip will appear showing the value of this variable. Automatic tooltips can be disabled in the preferences menu. See preferences dialog.
When the debugger is active, the contextual menu of the source window
contains a sub menu called Debug providing the following entries.
Note that these entries are dynamic: they will apply to the entity found under the cursor when the menu is displayed (depending on the current language). In addition, if a selection has been made in the source window the text of the selection will be used instead. This allows you to display more complex expressions easily (for example by adding some comments to your code with the complex expressions you want to be able to display in the debugger).
It is sometimes convenient to look at the assembly code for the subprogram or source line you are currently debugging.
You can open the assembly window by using the menu
Debug->Data->Assembly.
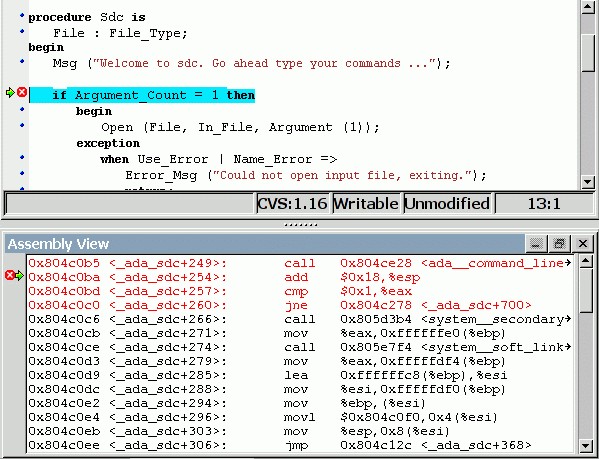
The current assembly instruction is highlighted with a green arrow on its left. The instructions corresponding to the current source line are highlighted in red by default. This allows you to easily see where the program counter will point to, once you have pressed the "Next" button on the tool bar.
Moving to the next assembly instruction is done through the "Nexti" (next instruction) button in the tool bar. If you choose "Stepi" instead (step instruction), this will also jump to the subprogram being called.
For efficiency reasons, only a small part of the assembly code around the current instruction is displayed. You can specify in the preferences dialog how many instructions are displayed by default. Also, you can easily display the instructions immediately preceding or following the currently displayed instructions by pressing one of the <Page up> or <Page down> keys, or by using the contextual menu in the assembly window.
A convenient complement when debugging at the assembly level is the
ability of displaying the contents of machine registers.
When the debugger supports it (as gdb does), you can select the
Data->Display Registers menu to get an item in the canvas that will
show the current contents of each machine register, and that will be updated
every time one of them changes.
You might also choose to look at a single register.
With gdb, select the Data->Display Any Expression, entering
something like
output /x $eax
in the field, and selecting the toggle button "Expression is a subprogram call". This will create a new canvas item that will be refreshed every time the value of the register (in this case eax) changes.
This is the text window located at the bottom of the main window. In this console, you have direct access to the underlying debugger, and can send commands (you need to refer to the underlying debugger's documentation, but usually typing help will give you an overview of the commands available).
If the underlying debugger allows it, pressing <Tab> in this window will provide completion for the command that is being typed (or for its arguments).
There are also additional commands defined to provide a simple text interface to some graphical features.
Here is the complete list of such commands. The arguments between square brackets are optional and can be omitted.
graph (print|display) expression [dependent on display_num] [link_name name]
The command graph print will create a frozen item, that is not
automatically refreshed when the debugger stops, whereas graph display
displays an automatically refreshed item.
The new item is associated with a number, that is visible in its title bar.
These numbers can be used to create links between the items, using the
second argument to the command, dependent on. The link itself (i.e. the
line) can be given a name that is automatically displayed, using the third
argument.
graph (print|display) `command`
For instance, if you want to display the value of a variable in hexadecimal
rather than the default decimal with gdb, you should use a command like:
graph display `print /x my_variable`
This will evaluate the command between back-quotes every time the debugger stops, and display this in the canvas. The lines that have changed will be automatically highlighted (in red by default).
This command is the one used by default to display the value of registers
for instance.
graph (enable|disable) display display_num [display_num ...]
Using the graph enable command will force the item to be automatically
refreshed every time the debugger stops, whereas the graph disable
command will freeze the item.
graph undisplay display_num
view (source|asm|source_asm)
This section is intended for users already familiar with GVD, in order to help them transitioning to GPS. If you have not used GVD, you may want to skip this section.
This section outlines the differences between GVD and GPS, and also lists some of the advantages of GPS compared to GVD.
The following command line switches related to debugging are available in GPS:
--debug
--pargs and executable-file arguments in GVD.
--debugger
--dargs option.
--target
For example, the equivalent of the following command line using a sh-like
shell would be:
$ gvd --debugger=gdb-5 executable --pargs 1 2 3
would be
$ gps --debug="executable 1 2 3" --debugger=gdb-5
--traceon=GVD.OUT
All the debugger-related menus in GVD can be found under the 'Debug' menu in GPS, with the following mapping:
File->xxx
Debug->Debug->xxx
Program->xxx
Debug->xxx
Data->xxx
Debug->Data->xxx
The menu File->New Debugger... is replaced by the combination of
the menu Debug->Initialize and the project properties, available
under Project->Edit Project Properties where you can similarly
specify your Debugger Host (called Tools Host), your
Program Host, the Protocol used by the underlying debugger
to communicate with the target, and the name of the debugger.
To conveniently switch between multiple debugger configurations, we
recommend to use a scenario variable and set different properties based
on the value of this variable. See
Scenarios and Configuration Variables and
Working in a Cross Environment for more details.
GPS provides by default fewer debugger buttons than GVD, because some buttons are actually not used very often, and others have been merged. In addition, it will be possible in the future to completely configure the GPS tool bar.
Run
Debug->Run... (<F2>)
Start
Step
Stepi
Debug->Step Instruction (<Shift-F5>)
Next
Nexti
Debug->Next Instruction (<Shift-F6>)
Finish
Cont
Up
Down
Interrupt
Debug->Interrupt (<Control-Backslash>)
The same key shortcuts have been kept by default between GVD and GPS except for the Interrupt menu, which is now <Control-Backslash> instead of <Esc>.
All the debugger-related contextual menus can now be found under the
Debug sub-menu.
The only difference is the contextual menu Show used to display
the assembly dump of the current code. It is replaced by the menu
Debug->Data->Assembly, see The Assembly Window for more
details.
The file explorer provided in GVD is replaced by the Project View
and the File View in GPS.
When using the --debug command line switch and no explicit project
file, GPS will automatically create a project file in a way very
similar to what GVD does to display its file explorer, and available under
the Project View.
In addition, the File View gives access to any file in your file
system, even if it is not available as part of the debug information.
The advantages when using GPS instead of GVD can be classified in two main categories: when not using project files, and when using them.
When not using project files, you get access to the following advantages in GPS:
When using project files, you will get, in addition to the advantages listed above:
GPS offers the possibility for multiple developers to work on the same project,
through the integration of version control systems (VCS). Each project can be
associated to a VCS, through the VCS tab in the Project property
editor. See The Project Properties Editor.
GPS does not come with any version control system: it uses underlying command-line systems such as CVS, Subversion or ClearCase to perform the low level operations, and provides a high level user interface on top of them. Be sure to have a properly installed version control system before enabling it under GPS.
The systems that are supported out of the box in GPS are CVS, Subversion and ClearCase. There are two interfaces to ClearCase: the standard ClearCase interface, which is built-in and uses a generic GPS terminology for VCS operations, and the Native ClearCase interface, which is fully customizable and uses by default the terminology specific to ClearCase.
Note that, at the moment, only Snapshot Views are supported in the ClearCase integration; Dynamic Views are not supported.
It is also possible to add your own support for other version control systems, or modify the existing CVS, Subversion and ClearCase interfaces, see Adding support for new Version Control Systems for more information.
When using CVS or Subversion, GPS will also need a corresponding
patch command that usually comes with it. If you are under
Windows, be sure to install a set of CVS and patch executables that
are compatible. Additionally a diff command is required to
use Subversion.
It is recommended that you first get familiar with the version control system that you intend to use in GPS first, since many concepts used in GPS assume basic knowledge of the underlying system.
Associating a VCS to a project enables the use of basic VCS features on the source files contained in the project. Those basic features typically include the checking in and out of files, the querying of file status, file revision history, comparison between various revisions, and so on.
Administration of VCS systems is not handled by GPS at this stage. Therefore, before working on a project using version control system, make sure that the system is properly set-up before launching GPS.
Note: the set-up must make sure that the VCS commands can be launched without entering a password.
The VCS Explorer provides an overview of source files and their status.
The easiest way to bring up the VCS Explorer is through the menu
VCS->Explorer. The Explorer can also be brought up using the
contextual menu Version Control->Query status on files,
directories and projects in the file and project views, and on file
editors. See The Version Control Contextual Menu.
The VCS Explorer contains the following columns:
Unknown
 The status is not yet determined or the VCS repository is not able to
give this information (for example if it is unavailable, or locked).
The status is not yet determined or the VCS repository is not able to
give this information (for example if it is unavailable, or locked).
Not registered
 The file is not known to the VCS repository.
Up-to-date
 The file corresponds to the latest version in the corresponding branch
on the repository.
The file corresponds to the latest version in the corresponding branch
on the repository.
Added
 The file has been added remotely but is not yet updated in the local
view.
The file has been added remotely but is not yet updated in the local
view.
Removed
 The file still exists locally but is known to have been removed from
the VCS repository.
The file still exists locally but is known to have been removed from
the VCS repository.
Modified
 The file has been modified by the user or has been explicitly opened
for editing.
The file has been modified by the user or has been explicitly opened
for editing.
Needs merge
 The file has been modified locally and on the repository.
Needs update
 The file has been modified in the repository but not locally.
Contains merge conflicts
 The file contains conflicts from a previous update operation.
The VCS Explorer supports multiple selections. To select a single line, simply left-click on it. To select a range of lines, select the first line in the range, then hold down the <Shift> key and select the last line in the range. To add or remove single columns from the selection, hold down the <Control> key and left-click on the columns that you want to select/unselect.
The explorer also provides an interactive search capability allowing you to quickly look for a given file name. The default key to start an interactive search is <Ctrl-i>. See Interactive Search for more details.
The VCS contextual menu can be brought up from the VCS explorer by left-clicking on a selection or on a single line. See The Version Control Contextual Menu.
Basic VCS operations can be accessed through the VCS menu. Most of
these functions act on the current selection, i.e. on the selected items
in the VCS Explorer if it is present, or on the currently selected
file editor, or on the currently selected item in the Tools->File View.
In most cases, the VCS contextual menu offers more control on
VCS operations. See The Version Control Contextual Menu.
For a description of the other entries in the VCS menu, see The Version Control Contextual Menu
This section describes the version control contextual menu displayed when you right-click on an entity (e.g. a file, a directory, a project) from various parts of GPS, including the project explorer, the source editor and the VCS Explorer.
Depending on the context, some of the items described in this section won't be shown, which means that they are not relevant to the current context.
It is possible to tell GPS to check the file before the actual commit
happens. This is done by specifying a File checker in the
VCS tab of the project properties dialog. This File
checker is in fact a script or executable that takes an absolute file
name as argument, and displays any error message on the standard
output. The VCS commit operation will actually occur only if nothing
was written on the standard output.
It is also possible to check the change-log of a file before commit, by
specifying a Log checker in the project properties dialog. This
works on change-log files in the same way as the File checker works on
source files.
When using CVS or Subversion, the annotations are clickable. Left-clicking on
an annotation line will query and display the changelog associated to the
specific revision for this line.
A global ChangeLog file contains revision logs for all files in a
directory and is named ChangeLog. The format for such a file
is:
   ISO-DATE  name  <e-mail>

   <HT>* filename[, filename]:
   <HT>revision history
where:
The name and <e-mail> items can be entered automatically by setting
the GPS_CHANGELOG_USER environment variable. Note that there is
two spaces between the name and the <e-mail>.
On sh shell:

   export GPS_CHANGELOG_USER="John Doe  <john.doe@home.com>"

On Windows shell:
   set GPS_CHANGELOG_USER="John Doe  <john.doe@home.com>"
Using the menu entry Edit global ChangeLog will open the file
ChangeLog in the directory where the current selected file is
and create the corresponding ChangeLog entry. This means that
the ISO date and filename headers will be created if not yet
present. You will have to enter your name and e-mail address.
This ChangeLog file serve as a repository for revision logs,
when ready to check-in a file use the standard Edit revision log
menu command. This will open the standard revision log buffer with the
content filled from the global ChangeLog file.
The Tools menu gives access to additional tools. Some items are
currently disabled, meaning that these are planned tools not yet available.
The list of active items includes:
help.
The visual comparison, available either from the VCS menus or from the Tools menu, provide a way to display graphically differences between two files, or two different versions of the same file.
This tool is based on the standard text command diff, available
on all Unix systems. Under Windows, a default implementation is provided
with GPS, called gnudiff.exe. You may want to provide an alternate
implementation by e.g. installing a set of Unix tools such as cygwin
(<http://www.cygwin.com>).
When querying a visual comparison in GPS, the user area will show, side by side, editors for the files involved in the comparison. The reference file is placed by default on the left side.
Color highlighting will be added to the file editors:
These colors can be configured, see The Preferences Dialog.
As with all highlighted lines in GPS, the visual differences highlights are visible in the Speed Column at the left of the editors.
Blank lines are also added in the editors, in places that correspond to existing lines in the other editors. The vertical and horizontal scrolling are synchronized between all editors involved in a visual comparison.
When a visual comparison is created, the Locations View is populated with the entries for each chunk of differences, and can be used to navigate between those.
Closing one of the editors involved in a visual comparison removes the highlighting, blank lines, and scrolling in the other editors.
Editors involved in a visual comparison have a contextual menu
Visual diff that contains the following entries:
Recompute
Hide
Close editors
Use this editor as reference
GPS provides an interactive way to fix or improve your source code, based on messages (errors and warnings) generated by the GNAT compiler.
This capability is integrated with the Locations tree (see The Locations Tree): when GPS can take advantage of a compiler message, an icon is added on the left side of the line.
For a simple fix, a wrench icon is displayed. If you click with the left button on this icon, the code will be fixed automatically, and you will see the change in the corresponding source editor. An example of a simple fix, is the addition of a missing semicolon.
You can also check what action will be performed by clicking on the right button which will display a contextual menu with a text explaining the action that will be performed. Similarly, if you display the contextual menu anywhere else on the message line, a sub menu called Code Fixing gives you access to the same information. In the previous example of a missing semicolon, the menu will contain an entry labeled Add expected string ";".
Once the code change has been performed, the tool icon is no longer displayed.
For more complex fixes, where more than one change is possible, the icon will display in additional of the tool, a red question mark. In this case, clicking on the icon will display the contextual menu directly, giving you access to the possible choices. For example, this will be the case when an ambiguity is reported by the compiler for resolving an entity.
GPS provides a documentation generator which processes source files and generates annotated HTML files.
It is based on the source cross-reference information (e.g. generated by GNAT for Ada files). This means that you should ensure that cross-reference information has been generated before generating the documentation.
Currently, documentation can only be generated for Ada files.
The documentation is put into a directory called html, created
under the object directory of the root project loaded in GPS.
Once the documentation is generated, the main documentation file is loaded in your default browser.
The documentation generator uses a set of templates files to control
the final rendering. This means that you can control precisely the
rendering of the generated documentation. The default set of templates
is defined in the file docgen.xml and can be found under
<install_dir>/share/gps/docgen/html. For a description of the
documentation generator renderer see Defining a documentation format.
The documentation generator can be invoked from two places inside GPS:
Generate project
Generate projects & subprojects
Generate current file
Generate for...
Documentation contextual menu.
From a source file contextual menu, you have one option called
Generate for <filename>, that will generate documentation
for this file and if needed its corresponding body
(see The Preferences Dialog).
From a project contextual menu (see The Project View), you will have the choice between generating documentation for all files from the selected project or from the selected project recursively.
You will find the list of all documentation options in
The Preferences Dialog.
Furthermore, the documentation generator relies on the ALI files created by GNAT. Depending on the version of GNAT used, the following restrictions may or may not apply:
GPS provides an interface with the GNAT software metrics generation tool
gnatmetric.
The metrics can be computed for the entire project, one source file belonging to the project, or (when applicable) a specific entity in the source file, e.g. a subprogram.
The metrics generator can be invoked from two places inside GPS:
Metrics->Compute metrics for root project
Metrics->Compute metrics for current file
From a source file contextual menu, you have an option called
Metrics for file that will generate the metrics for
the current file.
From a project contextual menu (see The Project View), you have an
option Metrics for project that will generate the metrics for
all files in the project.
Each of these commands produces a new window in the left-side area, which shows the computed metrics as a hierarchical tree view. The metrics are arranged by files, and then by scopes inside the files in a nested fashion. Double-clicking on any of the files or scopes displayed will open the appropriate source location in the editor. Any errors encountered during metrics computation will be displayed in the Locations Window.
This chapter explains how to adapt your project and configure GPS when working in a cross environment.
This section describes some possible ways to customize your projects when working in a cross environment. For more details on the project capabilities, see Project Handling.
When using the project editor to modify the project's properties, two
areas are particularly relevant to cross environments: Tools and
Cross environment, part of the General page.
In the Tools section, you will typically need to change the name of
the compiler(s) and the debugger, as well as gnatls' name if you are
using Ada.
For example, assuming you have an Ada project, and using a powerpc VxWorks
configuration. You will set the Ada compiler to
powerpc-wrs-vxworks-gnatmake; Gnatls to
powerpc-wrs-vxworks-gnatls and Debugger to
powerpc-wrs-vxworks-gdb.
If you are using an alternative run time, e.g. a soft float run time,
you need to add the option --RTS=soft-float to the Gnatls
property, e.g: powerpc-wrs-vxworks-gnatls --RTS=soft-float, and
add this same option to the Make switches in the switch editor.
See Switches for more details on the switch editor.
To modify your project to support configurations such as multiple targets, or multiple hosts, you can create scenario variables, and modify the setting of the Tools parameters based on the value of these variables. See Scenarios and Configuration Variables for more information on these variables.
For example, you may want to create a variable called Target to handle
the different kind of targets handled in your project:
Similarly, you may define a Board variable listing the different
boards used in your environment and change the Program host and Protocol
settings accordingly.
In some cases, it is useful to provide a different body file for a given
package (e.g. to handle target specific differences). A possible approach
in this case is to use a configuration variable (e.g. called TARGET),
and specify a different naming scheme for this body file (in the project
properties, Naming tab), based on the value of TARGET.
This section describes some debugger issues that are specific to cross environments. You will find more information on debugging by reading Debugging.
To connect automatically to the right remote debug agent when
starting a debugging session (using the menu Debug->Initialize),
be sure to specify the Program host and Protocol project
properties, as described in the previous section.
For example, if you are using the Tornado environment, with a target
server called target_ppc, set the Protocol to wtx and
the Program host to target_ppc.
Once the debugger is initialized, you can also connect to a remote agent
by using the menu Debug->Debug->Connect to Board.... This will open
a dialog where you can specify the target name (e.g. the name of your
board or debug agent) and the communication protocol.
In order to load a new module on the target, you can select the menu
Debug->Debug->Load File....
If a module has been loaded on the target and is not known
to the current debug session, use the menu
Debug->Debug->Add Symbols... to load the symbol tables in the current
debugger.
Similarly, if you are running the underlying debugger (gdb) on a remote
machine, you can specify the name of this machine by setting the
Tools host field of the project properties.
In a network environment, it is common for programmers to use as a desktop a computer that is not directly suitable for their development tasks. For instance, each developers may have a PC running Windows or GNU/Linux as their main entrypoint to the company network and do all their development activities on servers potentially running a different operating system and on which the various project resources are shared. A typical way of operating in such an environment is to access the server through X-Windows. GPS does naturally work in such a context but it is not necessarily the most efficient organization. Running GPS remotely on a shared remote server will increase the workload of the server as well as the traffic on the network. When the network is slow or saturated, the user interactions can become uncomfortably sluggish. This is a pity when the desktop used to access the network is often a powerful PC which remains idle most of the time. GPS offers the possibility to run natively on the desktop while compilation, run and/or debug activities are performed transparently on the remote server.
Future versions of GPS will most certainly have new features that will facilitate its use with remote servers. Nonetheless, in its current state GPS already provides many interesting features that can be used once the limitation of the current scheme as well as their workaround are understood.
In order to compile, run or debug on a remote host from GPS, two conditions need to be met:
The first condition can be met by using protocols such as 'rsh' or 'ssh'. In
the first case, you will have to create the necessary entries in your
.rhosts file on the remote machine to allow a password-less connection.
In the second case, an ssh agent or .shosts file are one of the
possibilities that can be used to obtain the same effect.
Here are the steps that need to be taken in order to setup the work with the remote host:
Edit->Preferences:
External Command->Remote shell should contain the desired remote
password-less connection command (e.g. "ssh").
Debugger->Execution Window is disabled.
Project->Edit Project Properties:
General->Cross environment->Tools host shall contain the name
of the server (e.g. machine.company.com) or an IP address if the name is not
available. The 2 fields below Program host and Protocol should
be left empty.
Languages->Tools->compiler->Ada may be set to the full
pathname of the gnatmake command on the remote machine (e.g.
/opt/gnatpro/5.03a/bin/gnatmake)
Languages->Tools->compiler->Gnatls may be set to the full
pathname of the gnatls command on the remote machine (e.g.
/opt/gnatpro/5.03a/bin/gnatls)
Languages->Tools->Debugger may be set to the full
pathname of the gdb command on the remote machine (e.g.
/opt/gnatpro/5.03a/bin/gdb)
The 3 latter changes are necessary when the remote shell command does not
initialize the user environment on the remote machine when used in batch mode.
This is the case when using directly 'rsh' or 'ssh'. Providing
the full path names of the GNAT tools on the remote machine allows GPS to
access the right GNAT toolset without having to rely on the user default
initialization (such as .profile or .cshrc on Unix machines). If a more complex
setup is required in order to properly run GNAT commands on the remote host,
then it is possible to replace the remote shell command specified in the
preferences by a script calling another script on the remote machine
whose job is to set up the environment before launching the command.
For instance, if both the desktop and the remote hosts are unix machines (or
Windows machines running cygwin), you can use this script on your desktop
after having set Preferences->External Command->Remote shell to
"sh /some_path/my_ssh":
#!/bin/sh #along with a script "execute" on the remote host which can look like:my_sshis a wrapper to ssh callingexecuteon the remote host machine=$1 shift ssh $machine sh --login bin/execute "$@"
#!/bin/sh
# execute sets the environment and calls the command in argument
# enter here the commands necessary of the setup

# call the command in argument
"$@"
The second condition mentioned earlier is related to providing GPS with a coherent view of the project on the desktop and on the remote host. A GNAT project is composed of several elements such as project files, sources, objects, ALI files, etc. that can be spread through various directories. Most of those elements must be accessible from both the desktop and the remote machine. More specifically, For editing/modifying the project, the source code need to be accessible from the desktop along with the project files. The paths used in the project need to be coherent with the desktop filesystem. For compiling, The source code need to be accessible from the remote server and the path in project files must be coherent with the server filesystem. For browsing and navigating, the ALI files produced during compilation must be accessible from the desktop. For debugging, the project and sources must be accessible from the desktop while the sources and the executable must be accessible from the remote server.
It is recommended to use relative paths in the project files instead of absolute paths so that the relative path match on the local and remote machines. The next sections describe two setups that help meeting this second condition.
Having the shared disk between the desktop machine and the remote host offers simple ways of meeting the coherent view requirement mentioned in the previous section.
GPS will also need to reference for building the root project file with the same pathname for the desktop and the remote host, so this requires appropriate mounting and possibly the use of symbolic links under Unix systems.
Similarly, GPS will need to access executables (found in the executable or object directory of the project file) with same pathname between the desktop and the remote host. When under Windows, the drive letter will also be used by GPS.
If the remote host is a Unix machine, you will need create in your remote home directory a symbolic link corresponding to the drive letter where the project is, pointing to the directory starting the directory hierarchy used by your project.
For example, if you have a project file called d:\projects\foo.gpr
corresponding to the remote file /home/users/projects/foo.gpr and that
your remote home directory is /home/users, you need to create the
following link on the remote host:
$ cd /home/users  # home directory
$ ln -s . d:
So that, when GPS will be referencing d:/projects/foo.gpr on the remote
host, this will automatically get transformed into
/home/users/projects/foo.gpr
When a shared filesystem is not an option, the next best option is to have all
the elements of the project (sources, ALI files etc.) duplicated on both sides.
It is possible to synchronize automatically both sides by using a standard tool
such as rsync in conjunction with slightly more sophisticated version of the
remote shell script my_ssh mentioned earlier. Here is an example that has
been tested with a local Windows machine running cygwin and a remote Unix
server or another Windows server running cygwin and in particular a sshd deamon:
#!/bin/sh
machine=$1
shift
#where is the main project file
local_dir="C:/my_home/test/demo2"
remote_dir="test/demo2"

# convert the local path into a path suitable for the remote machine
cmd=`echo "$@" | sed -e "s|$local_dir|$remote_dir/|g"`

# This line can be removed if the local machine is a Unix machine
local_dir=`cygpath -u $local_dir`

# synchronize sources from local to remote machine
rsync -ar --rsh="ssh" --include="*.ads" --include="*.adb" \
      --include="*.gpr" --include="*/" --exclude="*" \
      $local_dir/ $machine:$remote_dir

# execute the remote command
ssh $machine "bin/execute $cmd"

# synchronize ALI files from remote to local machine
rsync -ar --rsh="ssh" --include="*.ali" --exclude="*" \
      $machine:$remote_dir/ $local_dir/
This script makes a few assumptions:
execute script described in a previous section must be
installed in the $HOME/bin directory of the remote machine.
local_dir variable needs to be set to the full path of the
project file on the local machine precisely as GPS will generate it when it
launches gnatmake command.
remote_dir variable must be set to the directory on the remote
hosts that will serve as a root of the project mirror hierarchy.
cygpath command must only be used
from a local Windows machine running cygwin. Otherwise it must be removed.
GPS provides several levels of customization, from simple preferences dialog
to powerful scripting capability through the python language.
This chapters describes each of these capabilities.
This dialog, available through the menu Edit->Preferences, allows you to
modify the global preferences of GPS.
To enable the new preferences, you simply need to confirm by pressing
the OK button. To test your changes, you can use the Apply
button. Pressing the Cancel button will undo all your changes.
Each preference is composed of a label displaying the name of the preference, and an editing area to modify its value. If you leave to mouse over the label, a tool tip will be displayed giving an on-line help on the preference.
The preferences dialog is composed of several areas, accessible through the tabs at the left of the dialog. Each page corresponds to a set of preferences.
This page allows you to quickly change the current settings for GPS, including preferences, key bindings, menus.... See GPS Themes for more information on themes. It is only displayed when there are themes registered.
When this preference is enabled, you can navigate through the menus, and type
the key binding you want to associate to a particular item.
To remove a key binding, use the <Backspace> key.
Your changes will be saved when GPS exits, in a file called
$HOME/.gps/custom_keys. In particular, this means that if for some
reason you need to edit the file manually, you need to do it outside of
GPS, or save the file under a different name, and rename it after exiting GPS.
If you wish to save vertical screen space, you can hide this status
bar. The progress bars will no longer be visible. Instead, you can
display the Task Manager through the Tools->Task Manager menu,
to get similar information. This manager can then be put on the right
or left side of the GPS window, for instance just below the Project
View.
By default, GPS will call gnatmake to build projects containing Ada sources,
meaning that non Ada sources won't be built. By enabling this preference,
a multi-language build tool, called gprmake will be called.
Note that this tool is still under development, so this option should
only be activated with caution.
This section specifies preferences that apply to the Multiple Document Interface described in Multiple Document Interface.
If False, the title bar is not displayed, to save space on the screen. The
tabs of the notebooks will then be highlighted.
{}[]()
Each modified file is saved under a file called .#filename#, which is
removed on the next explicit save operation.
Edit->Refill command.
Never
Automatic
Always
xterm -geo 80x50 -exe vi +%l %f
On Windows, it may be necessary to use cmd.exe to invoke the external
editor. For example, to invoke Windows Notepad as a custom editor, use:
cmd /c notepad.exe %f
The following substitutions are provided:
%l
%c
%f
%e
%p
%%
variable1,
    variable2,
    variable3 : Integer;
case Value is
   when others =>
      null;
end case;
If this preference is set to Non_Rm_Style, this would be indented as:
case Value is
when others =>
   null;
end case;
By default (Automatic), GPS will choose to indent with an extra
level or not based on the first when construct: if the first
when is indented by an extra level, the whole case statement will
be indented following the RM style.
Disabled no auto-casing will be done;
End_Of_Line auto-casing will be done when hitting <Enter> key;
On_The_Fly auto-casing will be done word-by-word while typing.
For the End_Of_Line and On_The_Fly policies it is always
possible to force the casing of the current line by pressing the indentation
key (<Ctrl-Tab> by default).
Unchanged will keep the casing as-is;
Upper will change the casing of all reserved words to upper case;
Lower will change the casing to lower case;
Mixed will change the casing to mixed case (all characters to
lower case except first character and characters after an underscore
which are set to upper case);
Smart_Mixed As above but do not force upper case characters to
lower case.
<=, :=, =>, ...)
Consider the following code:
Variable : constant String :=
  "a string";
If this preference is enabled, it will be indented as follows:
Variable : constant String :=
             "a string";
Note that in this mode under Windows, the Debug->Interrupt menu
will not interrupt the debugged program. Instead, you need to hit
<Ctrl-C> in the separate execution window to interrupt it while it is
running. On Windows this separate execution window uses the default
system-wide console properties (the size of the window, the
colors...). It is possible to change those properties using the
default console menu (top-left of the console) on Windows XP or using
the control panel on Windows NT.
If false, no execution window will be created. The debugger assumes that the
program being debugged does not require input, or that if it does, input
is handled outside GPS. For example, when you attach to a running process,
this process already has a separate associated terminal.
rsh -l user
rcp -l user
This program is required under Unix systems in order to print, and is set to
a2ps by default.
If a2ps is not installed on your system, you can download it
from <ftp://ftp.enst.fr/pub/unix/a2ps/>, although other printing programs
such as lp can be specified instead.
Under Windows systems, this program is optional and is empty by default, since
a built-in printing is provided. An external tool will be used if specified,
such as the PrintFile freeware utility available from
<http://www.lerup.com/printfile/descr.html>
Note that in order to perform visual comparison between files, GPS
needs to call external tool (not distributed with GPS) such as diff
or patch. These tools are usually found on most unix systems, and
may not be available by default on other OSes. Under Windows, you can
download them from one of the unix toolsets
available, such as msys (<http://www.mingw.org/msys.shtml>) or
cygwin (<http://www.cygwin.com>).
-c nor -u switch).
Arguments of interest may include (this will depend on the version of diff
used):
This command should be compatible with the GNU patch utility.
GPS assumes that the following restricitions are true when the preference is activated. If this isn't the case, no error is reported, and only minor drawacks will be visible in GPS (no detection that two files are the same if one of them is a symbolic link for instance, although GPS will still warn you if you are trying to overwrite a file modified on the disk).
The restrictions are the following:
This section specifies preferences that apply to the Documentation Generator. Documentation Generation for more information.
GPS provides an extensive support for themes. Themes are predefined set of value for the preferences, for the key bindings, or any other configurable aspect of GPS.
For instance, color themes are a convenient way to change all colors in GPS at once, according to predefined choices (strongly contrasted colors, monochrome,...). It is also possible to have key themes, defining a set of key bindings to emulate e.g. other editors.
Any number of themes can be activated at the same time through the
preferences dialog (Edit->Preferences). This dialog contains a list
of all themes that GPS knows about, organized into categories for convenient
handling. Just click on the buttons on the left of each theme name to activate
that theme.
Note that this will immediately change the current preferences settings. For
instance, if the theme you just selected changes the colors in the editor,
these are changed immediately in the Editor->Fonts & Colors. You can
of course still press Cancel to keep your previous settings
If multiple themes are active at the same time and try to override the same preferences, the last theme which is loaded by GPS will override all previously loaded themes. However, there is no predefined order in which the themes are loaded.
The Emacs Theme, which is provided by default with GPS, defines a number of key bindings similar to Emacs.
control-c n
control-k
control-d
control-t
control-x control-s
control-a
control-e
alt-less
control-c control-d
control-c o
control-y
alt-w
control-w
shift-control-underscore
control-x k
control-x control-c
control-s
control-x 3
control-x 2
control-x o
control-l
alt-backspace
alt-right
alt-left
The key manager is accessible through the menu Edit->Key Shortcuts.
This dialog provides an easy way to associate key shortcuts with actions.
These actions are either predefined in GPS, or defined in your own
customization files, as documented in Customizing through XML files.
It also provides an easy way to redefine the menu shortcuts.
Actions are referenced by their name, and are grouped into categories. These
categories indicate when the action applies. For instance, the indentation
command only applies in source editors, whereas the command to change the
current window applies anywhere in GPS. The categories correspond in fact to
filters that indicate when the action can be executed. You can create your own
new categories by using the <filter> tag in the customization files
(see Customizing through XML files).
Through the key manager, you can define key bindings similar to what Emacs
uses (<control-x> followed by <control-k> for instance). To register
such key bindings, you need to press the Grab button as usual, and then
type the shortcut. The recording of the key binding will stop a short while
after the last key stroke.
If you define complex shortcuts for menus, they will not appear next to the menu name when you select it with the mouse. This is expected, and is due to technical limitations in the graphical toolkit that GPS uses.
You can customize lots of capabilities in GPS using XML files that are loaded by GPS at start up.
For example, you can add items in the menu and tool bars, as well as defining new key bindings, new languages, new tools, ...
XML files are found through three mechanisms, described here in the order in
which they are searched. Files with the .xml extension found through
GPS_CUSTOM_PATH or the user's directory can override any setup found in
the system directory. Likewise, files found in the user's directory can
override any file found in the GPS_CUSTOM_PATH directories.
Note that only files with the .xml extension are considered, other
files are ignored.
The INSTALL/share/gps/plug-ins directory, where
INSTALL is the name of the GPS installation directory, should contain
the xml and python files that will always be loaded whenever GPS is started,
by any user on the system.
GPS_CUSTOM_PATH
This environment variable can be set before launching GPS. It should contain a list of directories, separated by semicolons (';') on Windows systems and colons (':') on Unix systems. All the files found in these directories will be searched for customization files.
This is a convenient way to have project-specific customization files. You can for instance create scripts, or icons, that set the appropriate value for the variable and then start GPS. Depending on your project, this allows you to load specific aliases which do not make sense for other projects.
The directory $HOME/.gps/plug-ins on Unix
systems, and %HOME%\.gps\plug-ins on Windows systems, can also contain
customization files which are loaded at startup. This is a convenient way for
users to define their own plug-ins, that they want to load no matter which
project they are working on. Note that you can use the environment variable
GPS_HOME to override the value of the HOME variable.
Alternatively, if none of HOME and GPS_HOME are defined,
USERPROFILE is also considered.
XML files must be utf8-encoded by default. In addition, you can specify any
specific encoding through the standard <?xml encoding="..." ?>
declaration, as in the following example:
<?xml version="1.0" encoding="iso-8859-1"?>
<submenu>
  <title>encoded text/title>
</submenu>
Any given XML file can contain customization for various aspects of GPS, mixing aliases, new languages or menus,... in a single file. This is a convenient way to distribute your plug-ins to other users.
These files must be valid XML files, i.e. must start with the
<?xml?> tag, and contain a single root XML node, the name of which is
left to your consideration. The general format is therefore
<?xml version="1.0" ?>
<root_node>
   ...
</root_node>
The list of valid XML child nodes that can be specified under <root> is described in later sections. It includes:
<action>
<key>
<submenu>
<pref>
<preference>
<alias>
<language>
<button>
<entry>
<vsearch-pattern>
<tool>
<filter>
<contextual>
<case_exceptions>
<documentation_file>
<stock>
<project_attribute>
<docgen_backend>
This facility distinguishes the actions from their associated menus or key bindings. Actions can take several forms: external commands, shell commands and predefined commands, as will be explained in more details below.
The general form to define new actions is to use the <action> tag.
This tag accepts the following attributes:
name (mandatory)
output (optional)
<shell> and <external> tags,
See Redirecting the command output.
show-command (optional)
This attribute can be overridden for each command.
If you are defining the same action multiple times, the last definition will be kept. However, existing menus, buttons,... that already reference that action will keep their existing semantic. The new definition will only be used for all new menus created from that point on.
The <action> can have one or
several children, all of which define a particular command to execute. All
of these commands are executed one after the other, unless one of them
fails in which case the following commands are not executed.
The following XML tags are valid children for <action>.
<external>
Note for Windows users: like under UNIX, scripts can be called
from custom menu. In order to do that, you must write your script in a
.bat or .cmd file, and call this file using cmd /c.
Thus, the external tag would look like:
<?xml version="1.0" ?>
<external_example>
  <action name="my_command">
    <external>cmd /c c:\.gps\my_scripts\my_cmd.cmd</external>
  </action>
</external_example>
This tag accepts the following attributes:
show-command (optional)
<action> tag.
output (optional)
<action> tag.
progress-regexp (optional)
The name of the action is printed in the progress bar while the action is
executing.
<?xml version="1.0" ?>
<progress_action>
  <action name="progress" >
    <external
      progress-regexp="(\d+) out of (\d+).*$"
      progress-current="1"
      progress-final="2"
      progress-hide="true">gnatmake foo.adb
    </external>
  </action>
</progress_action>
progress-current (optional, default is 1)
progress-regexp
that contains the current step.
progress-final (optional, default is 2)
progress-regexp
that contains the current last step. This last index can grow as
needed. For example, gnatmake will output the number of
the file it is currently examining, and the total number of files to be
examined. However, that last number may grow up, since parsing a new file
might generate a list of additional files to parse later on.
progress-hide (optional, default is true)
progress-regexp and are used to compute the progress will
not be displayed in the output console. For any other value of this
attribute, these lines are displayed along will the rest of the output.
<on-failure>
For instance, the following action spawn an external tool, and parses its output to the location window and the automatic fixing tool if the external tool happens to fail.
In this group of commands the %... and $... macros can be used.
<?xml version="1.0" ?>
<action_launch_to_location>
  <action name="launch tool to location" >
    <external>tool-path</external>
    <on-failure>
      <shell>Locations.parse "%1" category<shell>
      <external>echo the error message is "%2"</external>
    </on-failure>
    <external>echo the tool succeeded with message %1</external>
  </action>
</action_launch_to_location>
<shell>
shell tag. These are command written in one of the
shell scripts supported by GPS.
This tag supports the same show-command and output attributes
as the <action> tag.
The following example shows how to
create two actions to invoke the help interactive command and to open
the file main.c.
<?xml version="1.0" ?>
<help>
  <action name="help">
    <shell>help</shell>
  </action>
  <action name="edit">
    <shell>edit main.c</shell>
  </action>
</help>
By default, commands are expected to be written in the GPS shell language.
However, you can specify the language through the lang attribute. Its
default value is "shell".
The value of this attribute could also be "python".
When programming with the GPS shell, you can execute multiple commands
by separating them with semicolons. Therefore, the following example
adds a menu which lists all the files used by the current file, in a
project browser.
<?xml version="1.0" ?>
<current_file_uses>
  <action name="current file uses">
    <shell lang="shell">File %f</shell>
    <shell lang="shell">File.uses %1</shell>
  </action>
</current_file_uses>
<description>
<filter>, <filter_and>, <filter_or>
It is possible to mix both shell commands and external commands. For
instance, the following command opens an xterm (on Unix systems only)
in the current directory, which depends on the context.
<?xml version="1.0" ?>
<xterm_directory>
  <action "xterm in current directory">
    <shell lang="shell">cd %d</shell>
    <external>xterm</external>
  </action>
</xterm_directory>
As seen in some of the examples above, some special strings are expanded by GPS just prior to executing the command. These are the "%f", "%d",.. See below for a full list.
More information on chaining commands is provided in See Chaining commands.
Some actions are also predefined in GPS itself. This include for instance
aliases expansion, manipulating MDI windows,... All known actions (predefined
and the ones you have defined in your own customization files) can be
discovered by opening the key shortcut editor (Edit->Key shortcuts menu).
When an action is defined, you can use macro arguments to pass to your shell or external commands. Macro arguments are special parameters that are transformed every time the command is executed. The following macro arguments are provided.
The equivalent python command is given for all tests. These commands are useful when you are writing a full python script, and want to test for yourself whether the context is properly defined.
%f
import os.path
os.path.basename (GPS.current_context().file().name())
%F
GPS.current_context().file().name()
%fk
%e
GPS.current_context().entity().name()
%ek
%e, except long names are shorted as in %fk.
%d
GPS.current_context().directory()
%dk
%l
GPS.current_context().line()
%c
GPS.current_context().column()
%a
%i
%p
.gpr extension is not included in this name, and the casing is the
one found inside the project file, not the one of the file name itself.
If the current context is an editor, this is the name of the project to which
the source file belongs.
Python equivalent:
GPS.current_context().project().name()
%P
GPS.Project.root().name()
%pp
GPS.current_context().project().file().name()
%PP
GPS.Project.root().file().name()
%pps
%pp, except it returns the project name prepended
with -P, or an empty string if there is no project file selected and the
current source file doesn't belong to any project. This is mostly for use with
the GNAT command line tools.
Python equivalent:
if GPS.current_context().project():
   return "-P" & GPS.current_context().project().path()
%PPs
%PP, except it returns the project name prepended
with -P, or an empty string if the root project is the default project.
This is mostly for use with the GNAT command line tools.
%(p|P)[r](d|s)[f]
P
p
r
d
Python equivalent:
GPS.current_context().project().source_dirs()
s
Python equivalent:
GPS.current_context().project().sources()
f
Examples:
%Ps
%prs
%prdf
%%
By default, an action will execute in any context in GPS. The user just selects the menu or key, and GPS tries to execute the action.
It is possible to restrict when an action should be considered as valid. If the current context is incorrect for the action, GPS will not attempt to run anything, and will display an error message for the user.
Actions can be restricted in several ways:
For instance, if you have specified %F as a parameter to one of the
commands, GPS will check prior to running the action that there is a current
file. This can be either a currently selected file editor, or for instance that
the project explorer is selected, and a file node inside it is also selected.
You do not have to specify anything else, this filtering is automatic
Note however that the current context might contain more information than you
expect. For instance, if you click on a file name in the Project View, then
the current context contains a file (thus satisfies %F), but also
contains a project (and thus satisfies %p and similar macros).
<filter>, <filter_and>
and <filter_or> tags, see below.
These tags can be used to further restrict when the command is valid. For instance, you can use them to specify that the command only applies to Ada files, or only if a source editor is currently selected.
Such filters can be defined in one of two places in the customization files:
<action>, <menu> or
<button> tags, you can define named filters. These are general filters,
that can be referenced elsewhere without requiring code duplication. They
also appear explicitly in the key shortcuts editor if at least one action is
depending on them.
<action> tag.
Such filters are anonymous, although they provide exactly the same capabilities
as the ones above. These are mostly meant for simple filters, or filters that
you use only once, or don't want to appear in the key shortcuts manager.
There are three different kinds of tags:
<filter>
<filter_and>
<filter>, <filter_and>
and <filter_or>.
<filter_or>
<filter>,
<filter_and> and <filter_or>.
If several such tags are found following one another under an <action>
tag, they are combined through "or", i.e. any of the filters may match for the
action to be executed.
The <filter>, <filter_and> and <filter_or> tags accept the
following set of common attributes:
name (optional)
id attribute. The name can
take any form. This is also the name that appears in the context of the
key shortcuts editor.
error (optional)
<filter_and> and <filter_or>, only the error message of
the top-level filter will be printed.
In addition, the <filter> has the following specific attributes:
id (optional)
<?xml version="1.0" ?>
<test_filter>
  <filter name="Test filter" language="ada" />
  <action name="Test action" >
     <filter id="Test filter" />
     <shell>pwd</shell>
  </action>
</test_filter>
A number of filters are predefined by GPS itself. The full list appears in the key shortcut editor, and is listed here:
Source editor
Explorer_Project_Node
Explorer_Directory_Node
Explorer_File_Node
Explorer_Entity_Node
language (optional)
ada,
you must have an Ada file selected, or the action won't execute. The language
for a file is found by GPS following several algorithms (file extensions, and
via the naming scheme defined in the project files).
shell_cmd (optional)
Note that currently no expansion of macro arguments (%f, %p,...) is done
in this command.
shell_lang (optional)
module (optional)
The list of module names can be obtained by typing lsmod in the shell
console at the bottom of the GPS window.
This attribute is mostly useful when creating new contextual menus.
When several attributes are specified for a <filter> node (which is not
possible with id), they must all match for the action to be executed.
<?xml version="1.0" ?>
<!-- The following filter will only match if the currently selected
     window is a text editor editing an Ada source file -->
<ada_editor>
  <filter_and name="Source editor in Ada" >
    <filter language="ada" />
    <filter id="Source editor" />
  </filter_and>

  <!-- The following action will only be executed for such an editor -->

  <action name="Test Ada action" >
     <filter id="Source editor in Ada" />
     <shell>pwd</shell>
  </action>

  <!--  An action with an anonymous filter. It will be executed if the
        selected file is in Ada, even if the file was selected through
        the project explorer  -->

  <action name="Test for Ada files" >
      <filter language="ada" />
      <shell>pwd</shell>
  </action>
</ada_editor>
These commands can be associated with menus, tool bar buttons and keys. All of these use similar syntax.
Binding a menu to an action is done through the <menu> and
<submenu> tags.
The <menu> tag takes the following attributes:
action (mandatory)
This attribute can be omitted only when no title is specified for the menu to make it a separator (see below).
If a filter is associated with the action through the <filter> tag,
then the menu will be greyed out when the filter doesn't match. As a
result, users will not be able to click on it.
before (optional)
after (optional)
before, but has a lower priority. If it
is specified, and there is no before attribute, it specifies a reference
menu after which the new menu should be inserted.
It should also have one XML child called <title> which specifies the
label of the menu. This is really a path to a menu, and thus you can define
submenus by specifying something like "/Parent1/Parent2/Menu" in the title
to automatically create the parent menus if they don't exist yet.
You can define the accelerator keys for your menus, using underscores
in the titles. Thus, if you want an accelerator on the first letter in
a menu named File, set its title as _File.
The tag <submenu> accepts the following attributes:
before (optional)
<menu>
after (optional)
<menu>
It accepts several children, among <title> (which must be specified
at most once), <submenu> (for nested menus), and <menu>.
Since <submenu> doesn't accept the action attribute, you should
use <menu> for clickable items that should result in an action, and
<submenu> if you want to define several menus with the same path.
You can specify which menu the new item is added to in one of two ways:
title attribute of <menu>
<menu> as a child of a <submenu> node
This requires slightly more typing, but it allows you to specify the exact
location, at each level, of the parent menu (before or after an existing
menu).
For example, this adds an item named mymenu to the standard
Edit menu.
<?xml version="1.0" ?>
<test>
  <submenu>
    <title>Edit</title>
    <menu action="current file uses">
       <title>mymenu</title>
    </menu>
  </submenu>
</test>
The following has exactly the same effect:
<?xml version="1.0" ?>
<test>
  <menu action="current file uses">
    <title>Edit/mymenu</title>
  </menu>
</test>
The following adds a new item "stats" to the "unit testing" submenu
in "my_tools".
<?xml version="1.0" ?>
<test>
  <menu action="execute my stats">
     <title>/My_Tools/unit testing/stats</title>
  </menu>
</test>
The previous syntax is shorter, but less flexible than the following,
where we also force the My_Tools menu, if it doesn't exist yet, to
appear after the File menu. This is not doable by using only <menu>
tags. We also insert several items in that new menu
<?xml version="1.0" ?>
<test>
  <submenu after="File">
    <title>My_Tools</title>
    <menu action="execute my stats">
       <title>unit testing/stats</title>
    </menu>
    <menu action="execute my stats2">
       <title>unit testing/stats2</title>
    </menu>
  </submenu>
</test>
Adding an item with an empty title or no title at all inserts a
menu separator. For instance, the following example will insert a separator
followed by a File/Custom menu:
<?xml version="1.0" ?>
<menus>
  <action name="execute my stats" />
  <submenu>
     <title>File</title>
     <menu><title/></menu>
     <menu action="execute my stats">
         <title>Custom</title>
     </menu>
  </submenu>
</menus>
The actions can also be used to contribute new entries in the contextual menus everywhere in GPS. These menus are displayed when the user presses the right mouse button, and should only show actions relevant to the current context.
Such contributions are done through the <contextual> tag, which takes
the following attributes:
"action" (mandatory)
If this attribute is set to an empty string, a separator will be inserted
in the contextual menu instead. If you specify a reference item with one of
the "before" or "after" attribute, the separator will be visible only when
the reference item is visible.
"before" (optional, default="")
<title> child.
There is no guarantee that the new menu will appear just before the referenced
menu. In particular, it won't be the case if the new menu is created before
the reference menu was created, or if another later contextual menu indicates
that it must be displayed before the same reference item.
"after" (optional, default="")
If both "after" and "before" are specified, only the latter is taken into account.
It accepts one child tag, <Title> which specifies the name of the
menu entry. If this child is not specified, the menu entry will use the name
of the action itself. The title is in fact the full path to the new menu entry.
Therefore, you can create submenus by using a title of the form
"Parent1/Parent2/Menu".
Special characters can be used in the title, and will be automatically expended based on the current context. These are exactly the ones described in the section for macros arguments, See Macro arguments.
The new contextual menu will only be shown if the filters associated with the action match the current context.
For instance, the following example inserts a new contextual menu which prints
the name of the current file in the GPS console. This contextual menu is only
displayed in source editors. This contextual menu entry is followed by a
separator line, visible when the menu is visible
<?xml version="1.0" ?>
<print>
  <action name="print current file name" >
    <filter module="Source_Editor" />
    <shell>echo %f</shell>
  </action>

  <contextual action="print current file name" >
    <Title>Print Current File Name</Title>
  </contextual>
  <contextual action="" after="Print Current File Name" />
</print>
As an alternative to creating new menu items, you can create new
buttons on the tool bar, with a similar syntax, by using
the <button> tag. As for the <menu> tag, it requires an
action attribute which specifies what should be done when the button
is pressed. The button is not created if no such action was created.
Within this tag, the tag <pixmap> can be used to indicate
the location of an image file (of the type jpeg, png, gif
or xpm) to be used as icon for the button. An empty
<button> tag indicates a separator in the tool bar.
A title can also be specified with <title>. This will be visible only
if the user choses to see both text and icons in the tool bar.
The following example defines a new button:
<?xml version="1.0" ?>
<stats>
  <button action="execute my stats">
    <title>stats</title>
    <pixmap>/my_pixmaps/button.jpg</pixmap>
  </button>
</stats>
The <button> tag allows you to create a simple button that the user
can press to start an action. GPS also supports another type of button,
a combo box, from which the user can choose among a list of choices. Such
a combo box can be created with the <entry> tag.
This tag accepts the following arguments:
id (mandatory)
label (default is "")
on-changed (default is "")
It also accepts any number of <choice> tags, each of which defines
one of the values the user can choose from. These tags accepts one optional
attribute, "on-selected", which is the name of a GPS action to call when
that particular value is selected.
   <action name="animal_changed">
      <shell>echo A new animal was selected in combo $1: animal is $2"</shell>
   </action>
   <action name="gnu-selected">
      <shell>echo Congratulations on choosing a Gnu</shell>
   </action>
   <entry id="foo" label="Animal" on-changed="animal_changed">
      <choice>Elephant</choice>
      <choice on-selected="gnu-selected">Gnu</choice>
   </entry>
A more convenient interface exists for Python, the GPS.Toolbar class, which gives you the same flexibility as above, but also gives you dynamic control over the entry. See the python documentation.
All the actions defined above can be bound to specific key shortcuts through
the <key> attribute. As usual, it requires one <action>
attribute to specify what to do when the key is pressed. The name of the
action can start with a '/' to indicate that a menu should be executed
instead of a user-defined action.
This tag doesn't contain any child tag. Instead, its text contents specified
the keyboard shortcut. The name
of the key can be prefixed by control-, alt-, shift- or
any combination of these to specify the key modifiers to apply.
You can also define multiple key bindings similar to Emacs's by separating them
by a space. For instance, control-x control-k means that the user should
press <control-x>, followed by a <control-k> to activate the
corresponding action.
Use an empty string to describe the key binding if you wish to deactivate a
preexisting binding. The second example below deactivates the standard binding.
<?xml version="1.0" ?>
<keys>
  <key action="expand alias">control-o</key>
  <key action="Jump to matching delimiter" />

  <!--  Bind a key to a menu -->
  <key action="/Window/Close">control-x control-w</key>
</key>
Multiple actions can be bound to the same key binding. The first one with a filter valid for the current context is executed. If no action with a filter can be executed, then the first action with no filter will be executed.
GPS has a number of predefined preferences to configure its behavior and its appearance. They are all customizable through the Edit->Preferences menu.
However, you might wish to add your own kind of preferences for your extension modules. This can easily be done through the usual GPS customization files. Preferences are different from project attributes (see Defining project attributes), in that the latter will vary depending on which project is loaded by the user, whereas preferences are always set to the same value no matter what project is loaded.
Such preferences are created with the <preference> tag, which takes
a number of attributes.
name (mandatory)
$HOME/.gps/preferences file, and to query the value of
a preference interactively through the GPS.Preference class in the
GPS shell or python. There are a few limitation to the form of these names:
they cannot contain space or underscore characters. You should replace the
latter with minus signs for instance.
page (optional, default is "General")
Subpages are references by separating pages name with colons (':').
default (optional, default depends on the type of the preference)
tip (optional, default is "")
label (mandatory)
type (mandatory)
The preference can be True or False.
The preference is an integer. Two optional attributes can be specified for
<preference>, "minimum" and "maximum", which define the range of
valid values for that integer. Default values are 0 and 10 respectively.
The preference is a string, which might contain any value
The preference is a color name, in the format of a named color such as "yellow", or a string similar to "#RRGGBB", where RR is the red component, GG is the green component, and BB is the blue component
The preference is a font
The preference is a string, whose value is chosen among a static list of
possible values. Each possible value is defined in a <choice> child
of the <preference> node.
Here is an example that defines a few new preferences:
<?xml version="1.0"?>
<custom>
<preference name="my-int"
page="Editor"
label="My Integer"
default="30"
minimum="20"
maximum="35"
page="Manu"
type="integer" />
<preference name="my-enum"
page="Editor:Fonts & Colors"
label="My Enum"
default="1"
type="choices" >
<choice>Choice1</choice>
<choice>Choice2</choice> <!-- The default choice -->
<choice>Choice3</choice>
</preference>
</custom>
The values of the above preferences can be queries in the scripting languages:
Preference "my-enum"
Preference.get %1
val = GPS.Preference ("my-enum").get ()
val2 = GPS.Preference ("my-int").get ()
You can force specific default values for the preferences in the customization
files through the <pref> tag. This is the same tag that is used by
GPS itself when it saves the preferences edited through the preferences
dialog.
This tag requires on attribute:
name
$HOME/.gps/preferences file for each user,
or by looking at one of the predefined GPS themes.
It accepts no child tag, but the value of the <pref> tag defines the
default value of the preference, which will be used unless the user has
overridden it in his own preferences file.
Any setting that you have defined in the customization files will be overridden by the user's preferences file itself, unless the user was still using the default value of that preference.
This <pref> tag is mostly intended for use through the themes
(see Creating themes).
In addition to the predefined themes that come with GPS, you can create your own themes and share them between users. You can then selectively chose which themes they want to activate through the preferences dialog (see GPS Themes).
Creating new themes is done in the customization files through
the <theme> tag.
This tag accepts a number of attributes:
name (mandatory)
description (optional)
category (optional, default is General)
This tag accepts any other customization tag that can be put in the
customization files. This includes setting preferences (<pref>,
defining key bindings (<key), defining menus (<menu>),...
If the same theme is defined in multiple locations (multiple times in the same customization file or in different files), their effects will be cumulated. The first definition of the theme seen by GPS will set the description and category for this theme.
All the children tags of the theme will be executed when the theme is activated
through the preferences dialog. Although there is no strict ordering in which
order the children will be executed, the global order is the same as for the
customization files themselves: first the predefined themes of GPS, then the
ones defined in customization files found through the GPS_CUSTOM_PATH
directories, and finally the ones defined in files found in the user's
own GPS directory.
<?xml version="1.0" ?>
<my-plug-in>
   <theme name="my theme" description="Create a new menu">
       <menu action="my action"><title>/Edit/My Theme Menu</title></menu>
   </theme>
</my-plug-in>
The search dialog contains a number of predefined search patterns for Ada, C and C++. These are generally complex regular expressions, presented in the dialog with a more descriptive name. This includes for instance "Ada assignment", which will match all such assignments.
You can define your own search patterns in the customization files. This is
done through the <vsearch-pattern> tag. This tag can have a number of
children tags:
<name>
<regexp>
This accepts one optional attribute, named case-sensitive. This
attribute accepts one of two possible values ("true" or "false") which
indicates whether the search should distinguish lower case and upper
case letters. Its default value is "false".
<string>
<regexp> and <string> should be provided. If
both exists, the first <regexp> child found is used. If there is
none, the first <string> child is used.
The tag accepts the same optional attribute case-sensitive as
above
Here is a small example on how the "Ada assignment" pattern was
defined.
<?xml version="1.0" ?>
<search>
  <vsearch-pattern>
    <name>Ada: assignment</name>
    <regexp case-sensitive="false">\b(\w+)\s*:=</regexp>
  </vsearch-pattern>
</search>
You can define new languages in a custom file by using the Language
tag. Defining languages gives GPS the ability to highlight the syntax of a
file, explore a file (using e.g. the project explorer), find files
associated with a given language, ...
As described previously for menu items, any file in the plug-ins
directory will be loaded by GPS at start up. Therefore, you can either
define new languages in a separate file, or reuse a file where you already
define actions and menus.
The following tags are available in a Language section:
Name
Parent
Ada, C++) or
another custom language, this language will inherit by default all its
properties from this language. Any field explicitly defined for this language
will override the inherited settings.
Spec_Suffix
Extension tag instead.
This tag must be unique.
Body_Suffix
Spec_Suffix, so that the user
can choose to easily go from one file to the other.
This tag must be unique.
Extension
Keywords
Keywords tags can be specified, and will be concatenated
into a single regular expression.
The full grammar of the regular expression can be found in the spec of the
file g-regpat.ads in the GNAT run time.
Engine
The name can be a full pathname, or a short name. E.g. under most Unix systems
if you specify custom, GPS will look for libcustom.so in
the LD_LIBRARY_PATH run time search path. You can also specify
explicitly e.g. libcustom.so or /usr/lib/libcustom.so.
For each of the following five items, GPS will look for the corresponding
symbol in Engine and if found, will call this symbol when needed.
Otherwise, it will default to the static behavior, as defined by the other
language-related items describing a language.
You will find the required specification for the C and Ada languages
to implement the following functions in the directory
<prefix>/share/gps/doc/examples/language of your GPS installation.
language_custom.ads is the Ada spec file; language_custom.h is
the C spec file; gpr_custom.ad? are example files showing a possible Ada
implementation of the function Comment_Line
for the GPS project files (.gpr files), or any other Ada-like language;
gprcustom.c is the C version of gpr_custom.adb.
Comment_Line
Edit->Un/Comment Lines).
Parse_Constructs
This procedure is used by GPS to implement several capabilities such as
listing constructs in the project explorer, highlighting the current block of
code, going to the next or previous procedure, ...
Format_Buffer
This procedure is used to implement the auto indentation when hitting the
<enter> key, or when using the format key on the current selection or
the current line.
Parse_Entities
Context node described below.
Context
Comment_Start
Comment_End
New_Line_Comment_Start
;|# for comments starting
after a semicolon or after the hash sign.
String_Delimiter
Quote_Character
\ in C).
Constant_Character
Can_Indent
Syntax_Highlighting
Case_Sensitive
Categories
Category nodes,
each describing the characteristics of a given category, with the following
nodes:
Name
Pattern
Keywords node, multiple Pattern tags can be
specified and will be concatenated into a single regular expression.
Index
Here is an example of a language definition for the GPS project files:
<?xml version="1.0"?>
<Custom>
  <Language>
    <Name>Project File</Name>
    <Spec_Suffix>.gpr</Spec_Suffix>
    <Keywords>^(case|e(nd|xte(nds|rnal))|for|is|</Keywords>
    <Keywords>limited|null|others|</Keywords>
    <Keywords>p(ackage|roject)|renames|type|use|w(hen|ith))\b</Keywords>

    <Context>
      <New_Line_Comment_Start>--</New_Line_Comment_Start>
      <String_Delimiter>"</String_Delimiter>
      <Constant_Character>'</Constant_Character>
      <Can_Indent>True</Can_Indent>
      <Syntax_Highlighting>True</Syntax_Highlighting>
      <Case_Sensitive>False</Case_Sensitive>
    </Context>

    <Categories>
      <Category>
        <Name>package</Name>
        <Pattern>^[ \t]*package[ \t]+((\w|\.)+)</Pattern>
        <Index>1</Index>
      </Category>
      <Category>
        <Name>type</Name>
        <Pattern>^[ \t]*type[ \t]+(\w+)</Pattern>
        <Index>1</Index>
      </Category>
    </Categories>

    <Engine>gpr</Engine>
    <Comment_Line>gpr_comment_line</Comment_Line>
  </Language>
</Custom>
GPS provides a mechanism known as aliases. These are defined
through the menu Edit->Aliases.
Each alias has a name, which is generally a short string of characters. When you type them in any textual entry in GPS (generally a source editor, but also entry fields for instance in the file selector), and then press the special activation key (by default <control-o>, controlled by a preference), this name is removed from the source editor, and replaced by the text you have associated with it.
Alias names may be composed of any character except newlines, but must start
with a letter. GPS will jump to the start of each word before the current
cursor position, and if the characters between this word start and the
cursor position is an alias name, this alias is expanded.
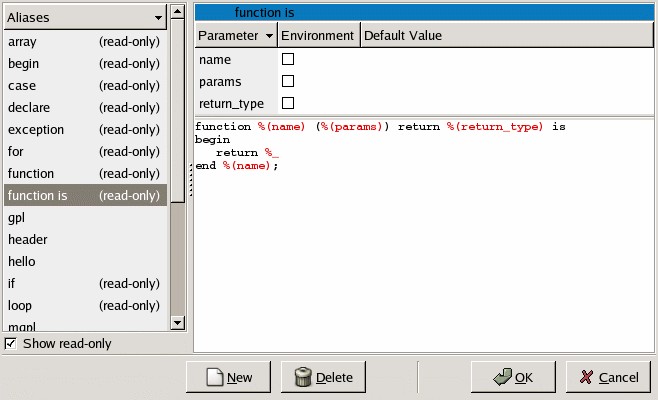
The alias editor is divided into three main parts: on the left side, the list of currently defined aliases is shown. Clicking on any of them will display the replacement text for this alias. If you click again the selected alias, GPS displays a text entry which you can use to rename an existing alias. Alias names must start with a letter. A check button at the bottom selects whether the read-only aliases (i.e. system-wide aliases) should be displayed.
The second part is the expansion text for the alias, at the bottom right corner. This replacement text can used multiple lines, and contain some special text that act as a special replacement. These special texts are highlighted in a different color. You can insert these special entities either by typing them, or by right-clicking in the editor, and select the entity in the contextual menu.
The following special entities are currently defined:
%_
%(name)
%D
%H
%l
%c
%f
%d
%p
%P
%O
You cannot expand an alias recursively when already expanding that alias. For instance, if the alias expansion for procedure contains procedure%O, the inner procedure will not be expanded.
The indentation as set in the expansion of the alias is preserved when
the alias is expanded. All the lines will be indented the same amount
to the right as the alias name. You can override this default behavior
by selecting the check button Indent source editor after expansion.
In this case, GPS will replace the name of the alias by its expansion,
and then automatically recompute the position of each line with its
internal indentation engine, as if the text had been inserted manually.
The third part of the aliases editor, at the top right corner, lists the parameters for the currently selected alias. Any time you insert a %(name) string in the expansion text, GPS automatically detects there is a new parameter reference (or an old reference has changed name or was removed); the list of parameters is automatically updated to show the current list.
Each parameters has three attributes:
When an alias that contains parameters is expanded, GPS will first display a dialog to ask for the value of the parameters. You can interactively enter this value, which replaces all the %(name) entities in the expansion text.
The customization files described earlier can also contain aliases definition. This can be used for instance to create project or system wide aliases. All the customization files will be parsed to look for aliases definition.
All these customization files are considered as read-only by GPS, and therefore cannot be edited through the graphical interface. It is possible to override some of the aliases in your own custom files.
There is one specific files, which must contain only aliases definition. This
is the file $HOME/.gps/aliases. Whenever you edit aliases graphically,
or create new ones, they are stored in this file, which is the only one that
GPS will ever modify automatically.
The system files are loaded first, and aliases defined there can be overridden by the user-defined file.
These files are standard XML customization files. The specific XML tag to use is <alias>, one per new alias. The following example contains a standalone customization file, but you might wish to merge the <alias> tag in any other customization file.
The following tags are available:
alias
name, which the text to type in the source editor
before pressing <control-o>.
It has one optional attribute, indent, which, if set to true,
indicate that GPS should recompute the indentation of the newly inserted
paragraph after the expansion.
param
alias node. There is one per
parameter of the alias. They have one mandatory attribute,
name, which is the name to type between %(name) in the
alias expansion text.
They have one optional attribute, environment, which indicates
the default value must be read from the environment variables if it is
set to true.
These tags contain text, which is the default value for the parameter.
text
alias node, whose value is the
replacement text for the alias.
Here is an example of an alias file:
<?xml version="1.0"?>
<Aliases>
  <alias name="proc" >
    <param name="p" >Proc1</param>
    <param environment="true" name="env" />
    <text>procedure %(p) is
%(env)%_
end %(p);</text>
  </alias>
</Aliases>
The project files are required by GPS, and are used to store various pieces of information related to the current set of source files. This includes how to find the source files, how the files should be compiled, or manipulated through various tools,....
However, the default set of attributes that are usable in a project file is limited to the attributes needed by the tool packaged with GPS or GNAT.
If you are delivering your own tools, you might want to store similar information in the project files themselves, since these are a very convenient place to associate some specific settings with a given set of source files.
GPS lets manipulate the contents of projects through XML customization files and script commands. You can therefore add you own typed attributes into the projects, so that they are saved automatically when the user saves the project, and reloaded automatically the next time GPS is started.
New project attributes can be declared in two ways: either using the advanced
XML tags below, or using the <tool> tag (see Defining tool switches).
The customization files support the <project_attribute> tag,
which is used to declare all the new attributes that GPS should expect
in a project. Attributes that have not been declared explictly will
not be accessible through the GPS scripting languagues, and will
generate warnings in the Messages window.
Project attributes are typed: they can either have a single value, or have a set of such values (a list). The values can in turn be a free-form string, a file name, a directory name, or a value extracted from a list of preset values.
Attributes that have been declared in these customization files will also be graphically editable through the project properties dialog, or the project wizard. Therefore, you should specify when an attribute is defined how it should be presented to the GPS user.
The <project_attribute> tag accepts the following attributes:
package (a string, default value: "")
This is the package in the project file in which the attribute is stored. Common practice suggests that one such package should be used for each tool. These packages provide namespaces, so that attributes with the same name, but for different tools, do not conflict with each other.
name (a string, mandatory)
This is the name of the attribute. This should be a string with no space, and that represents a valid Ada identifier (typically, it should start with a letter and be followed by a set of letters, digits or underscore characters). This is an internal name that is used when saving the attribute in a project file.
editor_page (a string, default value: "General")
This is the name of the page in the Project Properties editor dialog in which the attribute is presented. If no such page already exists, a new one will be created as needed. If the page already exists, the attribute will be appended at its bottom.
editor_section (a string, default value: "")
This is the name of the section, inside editor page, in which the
attribute is displayed. These sections are surrounded by frames, the
title of which is given by the editor_section attribute.
If this attribute is not specified, the attribute is put in an
untitled section.
label (a string, default value: the name of the attribute)
If this attribute is set to a value other than the empty string
"", a textual label is displayed to the left of the attribute
in the graphical editor. This should be used to identify the
attribute. However, it can be left to the empty string if the
attribute is in a named section of its own, since the title of the
section might be a good enough indication.
description (a string, default value: "")
This is the help message that describes the role of the attribute. It is displayed in a tooltip if the user leaves the mouse on top of the attribute for a while.
list (a boolean, default value: "false")
If this is set to "true", the project attribute will in fact
contains a list of values, as opposed to a single value. This is used
for instance for the list of source directories in standard projects.
ordered (a boolean, default value: "false")
This is only relevant if the project attribute contains a list of values. This indicates whether the order of the values is relevant. In most cases, it will not matter. However, for instance, the order of source directories matters, since this also indicates where the source files will be searched, stopping at the first match.
omit_if_default (a boolean, default value: "true")
This indicates whether the project attribute should be set explicitly
in the project if the user has left it to its default value. This can
be used to keep the project files a simple as possible, if all the
tools that will use this project attribute know about the default
value. If this isn't the case, set omit_if_default to "false"
to force the generation of the project attribute.
base_name_only (a boolean, default value: "false")
If the attribute contains a file name or a directory name, this indicates whether the full path should be stored, or only the base name. In most cases, the full path should be used. However, since GPS automatically looks for source files in the list of directories, for instance, the list of source files should only contain base names. This also increases the portability of project files.
case_sensitive_index (a boolean, default value: "false")
This XML attribute is only relevant for project attributes that are indexed on another one (see below for more information on indexed attributes). It indicates whether two indexes that differ only by their casing should be considered the same. For instance, if the index is the name of one of the languages supported by GPS, the index is case insensitive since "Ada" is the same as "C". However, if the index is the name of a file on Windows, the index is case-insensitive.
hide_in (a string, default value: "")
This XML attribute defines the various context in which this attribute should not be editable graphically. Currently, GPS provides two such contexts ("wizard" and "properties", corresponding to the project creation wizard and the project properties editor). If any of those context is specified in hide_in, then the widget to edit this attribute will not be shown. The goal is to keep the graphical interface simple.
The type of the project attribute is specified through one or several
child tags of <project_attribute>. The following tags are
recognized.
<string>
This tag indicates that the attribute is made of one (or more if it is a list) strings. This tag accepts the following XML attributes:
default (a string, default value: "")
This gives the default value to be used for the string (and therefore the project attribute), in case the user hasn't overridden it.
If the attribute's type is a file or a directory, the default value will be
normalized (ie an absolute path will be generated from it, based on the
project's location, where "." will represent the project's directory).
As a special case, if default is surrounded by parenthesis, no normalization
takes place, so that you can later on test whether the user is still using
the default value or not).
type (one of "", "file", "directory", default "")
This indicates what the string represents. In the first case, any value can be used. In the second case, it should represent a file name, although no check is done to make sure the file actually exists on the disk. But GPS will be able to do some special marshalling with the file name. The third case indicates that GPS should expect a directory.
<choice>
This tag can be repeated several times. It indicates one of the valid
values for the attribute, and can be used to provide a static list of
such values. If it is combined with a <string> tag, this
indicates that the attribute can be any string, although a set of
possible values is provided to the user for ease of use.
This tag accepts one optional attribute, "default", which is a
boolean. It indicates whether this value is the default to use for the
project attribute.
If several <choice> tags are used, it is possible that several
of them are part of the default value if the project attribute is a
list, as opposed to a single value.
<shell>
This tag is a GPS scripting command to execute to get a list of valid
values for the attribute. The command should return a list. As for the
<choice> tag, the <shell> tag can be combined with a
<string> tag to indicate that the list of values returned by
the scripting command is only a set of possible values, but that the
project attribute can in fact take any value.
The <shell> tag accepts two attributes:
lang (a string, default value: "shell")
The scripting language in which the command is written. Currently, the only other possible value is "python".
default (a string, default value: "")
The default value that the project attribute takes if the user hasn't overridden it.
In some cases, the type of the project attribute, or at least its
default value, depends on what the attribute applies to. The project
file support this in the form of indexed project attribute. This is
for instance used to specify what should be the name of the executable
generated when compiling each of the main files in the project (ie the
executable name for gps.adb should be gps.exe, the one
for main.c should be myapp.exe, and so on).
Such attributes can also be declared through XML files. In such cases,
the <project_attribute> tag should have one <index>
child, and zero or more <specialized_index> children.
Each of these two tags in turn take one of the already mentioned
<string>, <choice> or <shell> tag.
The <index> tag indicates what other project attribute is used
to index the current one. In the example given above for the
executable names, the index is the attribute that contains the list of
main files for the project.
It accepts the following XML attributes:
attribute (a string, mandatory)
The name of the other attribute. This other attribute must be declared elsewhere in the customization files, and must be a list of values, not a single value.
package (a string, default value: "")
The package in which the index project attribute is defined. This is used to uniquely identify homonym attributes.
The <specialized_index> is used to override the default type of
the attribute for specific values of the index. For instance, the
project files contains an attribute that specify what the name of the
compiler is for each language. It is indexed on the project attribute
that list the languages used for the source files of the project. Its
default value depends on the language ("gnatmake" for Ada, "gcc" for
C, and so on). This attribute accepts requires one XML attribute:
value (a string, mandatory)
This is the value of the attribute for which the type is overriden.
Note that almost all the standard project attributes are defined
through an XML file, projects.xml, which is part of the GPS
installation. Check this file to get advanced examples on how to
declare project attributes.
The following example declares three attributes, with a single string
as their value. This string represents a file or a directory in the
last two cases. You can simply copy this into a .xml file in
your $HOME/.gps/plug-ins directory, as usual.
<?xml version="1.0"?>
<custom>
  <project_attribute
      name="Single1"
      package="Test"
      editor_page="Tests single"
      editor_section="Single"
      description="Any string">

     <string default="Default value" />
  </project_attribute>

  <project_attribute
      name="File1"
      package="Test"
      editor_page="Tests single"
      editor_section="Single"
      description="Any file" >

      <string type="file" default="/my/file" />
  </project_attribute>

  <project_attribute
      name="Directory1"
      package="Test"
      editor_page="Tests single"
      editor_section="Single"
      description="Any directory" >

      <string type="directory" default="/my/directory/" />
  </project_attribute>
</custom>
The following example declares an attribute whose value is a
string. However, a list of predefined possible values is also
provided, as an help for interactive edition for the user. If the
<string> tag wasn't given, the attribute's value would have two
be one of the three possible choices.
<?xml version="1.0" ?>
<custom>
  <project_attribute
      name="Static2"
      package="Test"
      editor_page="Tests single"
      editor_section="Single"
      description="Choice from static list (or any string)" >

      <choice>Choice1</choice>
      <choice default="true" >Choice2</choice>
      <choice>Choice3</choice>
      <string />
  </project_attribute>
</custom>
The following example declares an attribute whose value is one of the
languages currently supported by GPS. Since this list of languages is
only know when GPS is executed, a script command is used to query this
list.
<?xml version="1.0" ?>
<custom>
 <project_attribute
      name="Dynamic1"
      package="Test"
      editor_page="Tests single"
      editor_section="Single"
      description="Choice from dynamic list" >

      <shell default="C" >supported_languages</shell>
  </project_attribute>
</custom>
The following example declares an attribute whose value is a set of
file names. The order of files in this list matters to the tools that
are using this project attribute.
<?xml version="1.0" ?>
<custom>
 <project_attribute
      name="File_List1"
      package="Test"
      editor_page="Tests list"
      editor_section="Lists"
      list="true"
      ordered="true"
      description="List of any file" >

      <string type="file" default="Default file" />
  </project_attribute>
</custom>
The following example declares an attribute whose value is a set of
predefined possible values. By default, two such values are selected,
unless the user overrides this default setting.
<?xml version="1.0" ?>
<custom>
  <project_attribute
      name="Static_List1"
      package="Test"
      editor_page="Tests list"
      editor_section="Lists"
      list="true"
      description="Any set of values from a static list" >

      <choice>Choice1</choice>
      <choice default="true">Choice2</choice>
      <choice default="true">Choice3</choice>
  </project_attribute>
</custom>
The following example declares an attribute whose value is a
string. However, the value is specific to each language (this could
for instance be used for the name of the compiler to use for a given
language). This is an indexed project attribute. It has two default
values, one for Ada, one for C. All other languages have no default
value.
<?xml version="1.0" ?>
<custom>
  <project_attribute
      name="Compiler_Name"
      package="Test"
      editor_page="Tests indexed"
      editor_section="Single"
      <index attribute="languages" package="">
         <string default="" />
      </index>
      <specialized_index value="Ada" >
         <string default="gnatmake" />
      </specialized_index>
      <specialized_index value="C" >
         <string default="gcc" />
      </specialized_index>
  </project_attribute>
</custom>
The new attributes that were defined are accessible from the GPS scripting languages, like all the standard attributes, see Querying project switches.
You can for instance access the Compiler_Name attribute we created
above with a python command similar to:
GPS.Project.root().get_attribute_as_string ("Compiler_Name", "Test", "Ada")
You can also access the list of main files for the project, for
instance, by calling
GPS.Project.root().get_attribute_as_list ("main")
A set of case exceptions can be declared in this file. Each case
exception is put inside the tag <word> or <substring>. These
exceptions are used by GPS to set identifiers or keywords case when
editing case insensitive languages (except if corresponding case is
set to Unchanged). see The Preferences Dialog.
<?xml version="1.0" ?>
<exceptions>
  <case_exceptions>
     <word>GNAT</word>
     <word>OS_Lib</word>
     <substring>IO</substring>
  </case_exceptions>
</exceptions>
New documentation can be added in GPS in various ways. This is useful if you want to point to your own project documentation for instance.
The first possibility is to create a new menu, through a <menu> tag
in an XML file, associated with an action that either spawn an external
web browser or calls the internal GPS.Help.browse() shell command.
However, this will not show the documentation in the Help->Contents
menu, which you also might want to do.
To have both results, you should use the <documentation_file> tag
in an XML file. These tags are generally found in the gps_index.xml
files, as documented in see Adding New Help Files, but you can in fact
add them in any of your customization files.
The documentation files you display can contain the usual type of html links.
In addition, GPS will treat specially links starting with '%', and consider
them as script commands to execute instead of file to display. The following
example show how to insert a link that will in effect open a file in GPS when
clicked by the user
<a href="%shell:Editor.editor g-os_lib.ads">Open runtime file</a>
The first word after '%' is the name of the language, and the command to execute is found after the ':' character.
The <documentation_file> tag accepts two attributes.
<menu> tag.
The <documentation_file> accepts a number of child nodes:
GPS_DOC_PATH.
If this child is omitted, you must specify a <shell> child.
This name can contain a reference to a specific anchor in the html
file, using the standard HTML syntax.
<name>file#anchor</name>
"lang", which is the name of the
language in which the command is written
Help->Contents menu to organize all the
documentation files.
"/". The last part of the
path is the name of the new menu item. If not set, no menu is
displayed for this file, although it will still appear in the
Help->Contents menu
The following example shows how to create a new entry "item" in the Help
menu, that will display file.html. The latter is searched in the
GPS_DOC_PATH list of directories.
<?xml version="1.0"?>
<index>
   <documentation_file>
      <name>file.html</name>
      <descr>Tooltip text</descr>
      <category>name</category>
      <menu>/Help/item</menu>
   </documentation_file>
</index>
XML files can be used to define "stock icons". Stock icons are pictures that are identified by their label, and which are used through GPS in various places, such as buttons, menus, toolbars, and so on.
The stock icons must be declared using the tag <icon>, within the global
tag <stock>. The attribute id indicates the label used to identify
the stock icon, and the attribute file points to the file which contains
the actual picture, either in absolute format, or relative to the directory
which contains the XML file.
For a better rendering, icons that are to be used in menus and buttons should have a size of 24x24 pixels, whereas icons used in toolbars should be 48x48 pixels.
Here is an example:
<?xml version="1.0"?>
<my_visual_preferences>
  <stock>
    <icon id="myproject-my-picture" file="icons/my-picture.png" />
  </stock>
</my_visual_preferences>
Note: as shown in the example above, it is a good practice to prefix the label
by a unique name (e.g. myproject-), in order to make sure that
predefined stock icons will not get overridden by your icons.
GPS has support for textual (as opposed to binary format like PDF) documentation format. A textual documentation format can be described using external template files. This way, it is possible to add support for new textual documentation format by providing a set of templates files.
The node name to define a new documentation format is docgen_backend.
The attributes for this node are:
name (string)
format (string)
There are two categories of children. One is to describe the format
itself, the other is to specify the set of template to use. In the
latter case the children's name are ending with _template:
extension
description
file_header_template
file_footer_template
comment_template
keyword_template
string_template
char_template
package_desc_template
package_template
with_template
variable_template
exception_template
type_template
tagged_type_template
calls_references_template
caller_references_template
entity_template
subprogram_template
header_template
footer_template
header_private_template
main_frame_template
index.html in the HTML backend for example).
unit_index_template
subprogram_index_template
type_index_template
tagged_type_index_template
index_item_template
private_index_template
public_index_template
end_index_template
block_template
link_template
description_template
All template files are given as relative path. GPS will first look for the
template file under share/gps/docgen and if not found it looks
under $HOME/.gps/docgen.
A template file is a file that contains tags and commands. Those files
are parsed by the Templates Parser module as found in
AWS. We give hereafter a short description of this format, for
a complete description see the Templates Parser User's Guide.
simple tag
@_ and _@ like in
@_NAME_@. The templates engine will replace @_NAME_@
with the value associated with the tag named NAME.
vector tag
TABLE command tag.
For example, if the vector tag COLOR contains the three values Red,
Green and Blue then:
@@TABLE@@
   > @_COLOR_@
@@END_TABLE@@
Will be expanded as:
   > Red
   > Green
   > Blue
filter
UPPER filter in the previous
example.
@@TABLE@@
   > @_UPPER:COLOR_@
@@END_TABLE@@
Will be expanded as:
   > RED
   > GREEN
   > BLUE
It exists many filters, see the Template Parser User's Guide for a complete description.
Note that each HTML template files, provided with GPS, contains a complete description of the usage of each tag in the header comments.
GPS has built-in support for external tools. This feature can be used to support a wide variety of tools (in particular, to specify different compilers). Regular enhancements are done in this area, so if you are planning to use the external tool support in GPS, check for the latest GPS version available.
Typically, the following things need to be achieved to successfully use a tool:
Each of these points is discussed in further sections. In all these cases, most
of the work can be done statically through XML customization files.
These files have the same format as other XML customization files
(see Customizing through XML files), and the tool descriptions are found in
<tool> tags.
This tag accepts the following attributes:
name (mandatory)
package (Default value is ide)
See also See Defining project attributes, for more information on defining your own project attributes. Using the "package", "attribute" or "index" XML attributes of <tool> will implicitly create new project attributes as needed.
If this attribute is set to "ide", then the switches cannot be set for a
specific file, only at the project level. Support for file-specific switches
currently requires modification of the GPS sources themselves.
attribute (Default value is default_switches)
index (Default value is the tool name)
This tag accepts the following children, described in separate sections:
<switches>
<language>
<default-cmd-line>
This is the language to which the tool applies. There can be from no to any
number of such nodes for one <tool> tag.
If no language is specified, the tool applies to all languages. In particular, the switches editor page will be displayed for all languages, no matter what languages they support.
If at least one language is specified, the switches editor page will only be
displayed if that language is supported by the project.
<?xml version="1.0" ?>
<my_tool>
  <tool name="My Tool" >
    <language>Ada</language>
    <language>C</language>
  </tool>
</my_tool>
It is possible to define the command line that should be used for a tool when the user is using the default project, or hasn't overridden this command line in the project.
This is done through the <initial-cmd-line> tag, as a child of the
<tool> tag. Its value is the command line that would be passed to the
tool. This command line is parsed as usual, e.g. quotes are taken into account
to avoid splitting switches each time a space is encountered.
<?xml version="1.0" ?>
<my_tool>
  <tool name="My tool" >
     <initial-cmd-line>-a -b -c</initial-cmd-line>
  </tool>
</my_tool>
The user has to be able to specify which switches to use with the tool. If the tool is simply called through custom menus, you might want to hard code some or all of the switches. However, in the general case it is better to use the project properties editor, so that project-specific switches can be specified.
This is what GPS does by default for Ada, C and C++. You can find in the GPS installation directory how the switches for these languages are defined in an XML file. These provide extended examples of the use of customization files.
The switches editor in the project properties editor provides a powerful interface to the command line, where the user can edit the command line both as text and through GUI widgets.
The switches are declared through the <switches> tag in the
customization file, which must be a child of a <tool> tag as described
above.
This <switches> tag accepts the following attributes:
lines (default value is 1)
columns (default value is 1)
separator (default value is "")
" " rather than " ",
since XML parser must normalize the latter to the empty string when reading
the XML file.
This <switches> tag can have any number of child tag, among the
following. They can be repeated multiple times if you need several check boxes.
For consistency, most of these child tags accept attributes among the
following:
line (default value is 1)
lines above.
column (default value is 1)
columns above.
label (mandatory)
switch (mandatory)
combo and spin below.
This switch shouldn't contain any space.
tip (default value is empty)
min (default value is 1)
<spin> tags, and indicates the minimum
value authorized for that switch.
max (default value is 1)
<spin> tags, and indicates the maximum
value authorized for that switch.
default (default value is 1)
<spin> tags. See the description below.
noswitch (default is empty)
<combo> tags, and described below.
nodigit (default is empty)
<combo> tags, and described below.
value (mandatory)
<combo-entry> tags.
separator (default is the value given to <switches>
<switches>.
Here are the valid children for <switches>:
<title>
line and column attributes, is used
to give a name to a specific frame.
The value of the tag is the title itself. You do not have to specify
a name, and this can be left to an empty value.
Extra attributes for <title> are:
line-span (default value is 1)
column-span (default value is 1)
<check>
line, column, label, switch
and tip attributes. It creates a toggle button. When the latter is
active, the text defined in the switch attribute is added as is
to the command line. This tag doesn't have any value or child tags.
<spin>
line, column, label, switch,
tip, min, max, separator and default
attributes.
This switch will add the contents of the switch attribute followed by
the current numeric value of the widget to the command line. This is typically
used to indicate indentation length for instance.
If the current value of the widget is equal to the default attribute,
then nothing is added to the command line.
<radio>
line and column attributes. It groups any
number of children, each of which is associated with its own switch. However,
only one of the children can be selected at any given time.
The children must have the tag radio-entry. This tag accepts the
attributes label, switch and tip. As a special case,
the switch attribute can have an empty value ("") to indicate this is the
default switch to use in this group of radio buttons.
<field>
line, column, label, switch,
separator and tip attributes. This tag describes a text edition
field, which can
contain any text the user types. This text will be prefixed by the value of
the switch attribute, and the separator (by default nothing). If no text
is entered in the field
by the user, nothing is put on the command line.
This tag accepts two extra attributes:
as-directory (optional)
as-file (optional)
as-directory, but opens a dialog to
select a file instead of a directory. If both attributes are set to "true",
the user will select a file.
<combo>
line, column, label, switch,
tip, noswitch, separator and nodigit attributes.
The text inserted in the command line is the text from the switch
attribute, concatenated with the text of the value attribute for the
currently selected entry. If the value of the current entry is the same
as that of the nodigit attribute, then only the text of the
switch attribute is put on the command line. This is in fact necessary
to interpret the gcc switch "-O" as "-O1".
If the value of the current entry is that of the noswitch attribute,
then nothing is put in the command line.
The tag <combo> accepts any number of combo-entry children tags,
each of which accepts the label and value attribute.
<popup>
line, column, label, lines
and columns attributes. This displays a simply button that, when
clicked, displays a dialog with some extra switches. This dialog, just as the
switches editor itself, is organizes into lines and columns of frames, the
number of which is provided by the lines and columns attributes.
This tag accepts any number of children, which are the same as the
<switches> attribute itself.
<dependency>
It has its own set of attributes:
master-page master-switch
<check>
or <field>. If the check button is selected, it forces the
selection of the slave check button. Likewise, if the field is set to
any value, it forces the selection of the slave.
slave-page slave-switch
<check>.
master-status slave-status
<expansion>
It is easier to explain it through an example. Specifying the GNAT switch "-gnaty" is equivalent to specifying "-gnatyabcefhiklmnprst". This is in fact a style check switch, with a number of default values. But it is also equivalent to decomposing it into several switches, as in "-gnatya", "-gnatyb",... With this information, GPS will try to keep the command line length as short as possible, to keep it readable.
Both these aspects are defined in a unique <expansion> tag, which
accepts two attributes: switch is mandatory, and alias is
optional. Alias contains the text "-gnatyabcefhiklmnprst" in our example.
It also accepts any number of <entry> children, each has a mandatory
switch access. The set of all these children define the expanded
equivalent of the switch. In our example, we need one <entry> child
for "-gnatya", one for "-gnatyb",....
The exact algorithm used by GPS is the following:
switch attribute that matches exactly, then it is replaced
by all the switches given in the <entry> children).
If we have
  <expansion switch="-gnatwa">
     <entry switch="-gnatwc" />
     <entry switch="-gnatwd" />
  </expansion>
then any occurrence of "-gnatwa" on the command line is expanded to
"-gnatwc -gnatwd"
switch attribute of an <expansion> node,
then it is grouped with all other similar switches.
if the XML file contains
  <expansion switch="-gnatw" />
then the command line "-gnatwc -gnatt -gnatwd" is transformed
into "-gnatwcd -gnatt", grouping the switches that start with
"-gnatw".
alias attributes of the <expansion> nodes, and
replaced appropriately.
if the XML file contains
   <expansion switch="-gnatwa" alias="-gnatwcd" />
then the command line generated at the second step is further
transformed into "-gnatwa -gnatt".
This rather complex mechanism allows one to either use the various buttons and GUI widgets to edit the switches, or to manually edit the command line.
The user has now specified the default switches he wants to use for the external tool. Spawning the external tool can be done either from a menu item, or as a result of a key press.
Both cases are described in an XML customization file, as described previously,
and both are setup to execute what GPS calls an action, i.e. a set of commands
defined by the <action> tag.
This action tag, as described previously, executes one or more commands, which can either be internal GPS commands (written in any of the scripting language supported by GPS), or external commands provided by executables found on the PATH.
The command line for each of these commands can either be hard-coded in the
customization file, or be the result of previous commands executed as part of
the same action. As GPS executes each command from the action in turn, it
saves its output on a stack as needed. If a command line contains a special
construct %1, %2... then these constructs will be replaced
by the result of respectively the last command executed, the previous from last
command, and so on. They are replaced by the returned value of the command, not
by any output it might have done to some of the consoles in GPS.
Every time you execute a new command, it pushes the previous %1, %2... parameters one step further on the stack, so that they become respectively %2, %3... and the output of that command becomes %1.
The result value of the previous commands is substituted exactly as is. However, if
the output is surrounded by quotes, they are ignored when a substitution takes
place, so you need to put them back if they are needed. The reason for this
behavior is so that for scripting languages that systematically protect their
output with quotes (simple or double), these quotes are sometimes in the
way when calling external commands.
<?xml version="1.0" ?>
<quotes>
  <action name="test quotes">
    <shell lang="python">'-a -b -c'</shell>
    <external> echo with quotes: "%1"</external>
    <external> echo without quotes: %2</external/>
  </action>
</quotes>
If one of the commands in the action raises an error, the execution of the action is stopped immediately, and no further command is performed.
Before launching the external tool, you might want to force GPS to save all
open files, the project.... This is done using the same command GPS itself
uses before starting a compilation. This command is called MDI.save_all,
and takes one optional boolean argument which specifies whether an interactive
dialog should be displayed for the user.
Since this command aborts when the user presses cancel, you can
simply put it in its own <shell> command, as in:
<?xml version="1.0" ?>
<save_children>
  <action name="test save children">
    <shell>MDI.save_all 0</shell>
    <external>echo Run unless Cancel was pressed</external>
  </action>
</save_children>
Some GPS shell commands can be used to query the default switches set by the
user in the project file. These are get_tool_switches_as_string,
get_tool_switches_as_list, or, more generally,
get_attribute_as_string and get_attribute_as_list. The first
two require a unique parameter which is the name of the tool as specified in
the <tool> tag. This name is case-sensitive. The last two commands are
more general and can be used to query the status of any attribute from the
project. See their description by typing the following in the GPS shell
console window:
help Project.get_attribute_as_string
help Project.get_attribute_as_list
The following is a short example on how to query the switches for the tool
"Find" from the project, See Tool example. It first creates an object
representing the current project, then passes this object as the first
argument of the get_tool_switches_as_string command. The last external
command is a simple output of these switches
<?xml version="1.0" ?>
<find_switches>
  <action name="Get switches for Find">
    <shell>Project %p</shell>
    <shell>Project.get_tool_switches_as_string %1 Find </shell>
    <external>echo %1</external>
  </action>
</find_switches>
The following example shows how something similar can be done from Python, in
a simpler manner. For a change, this function queries the Ada compiler
switches for the current project, and prints them out in the messages
window. The
<?xml version="1.0" ?>
<query_switches>
  <action name="Query compiler switches">
    <shell lang="python">GPS.Project("%p").get_attribute_as_list
      (package="compiler",
       attribute="default_switches",
       index="ada")</shell>
    <external>echo compiler switches= %1</external>
  </action>
</query_switches>
Another solution to query the arguments for the tool is to ask the user interactively. The scripting languages provides a number of solutions for these.
They generally have their own native way to read input, possibly by creating a dialog.
In addition, the simplest solution is to use the predefined GPS commands for this. These are the two functions:
yes_no_dialog
input_dialog
From the GPS shell, it is only convenient to query one value at a time, since it doesn't have support for lists, and would return a concatenation of the values. However, this function is especially useful with other scripting languages.
The following is a short example that queries the name of a directory and a
file name, and displays each in the Messages window.
<?xml version="1.0" ?>
<query_file>
  <action name="query file and dir">
    <shell lang="python">list=GPS.MDI.input_dialog \
      ("Please enter directory and file name", "Directory", "File")</shell>
    <shell lang="python">print ("Dir=" + list[0], "File=" + list[1])</shell>
    </shell>
  </action>
</query_file>
The output of external commands is send by default to the GPS console window.
In addition, finer control can be exercised using the output attribute
of the <external> and <shell> tags.
This attribute is a string that may take any value. Two values have specific meanings:
"none"
""
other values
This attribute can also be specified at the <action> tag level, in which
case it defines the default value for all <shell> and <external>
tags underneath. If it isn't specified for the action itself, its default value
will always be the empty string, i.e. output is sent to the GPS console.
<?xml version="1.0" ?>
<ls>
  <action name="ls current directory" output="default output" >
     <shell output="Current directory" >pwd</shell>
     <external output="Current directory contents" >/bin/ls</external>
  </action>
</ls>
The output of the tool has now either been hidden or made visible to the user in one or more windows.
There are several additional things that can be done with this output, for further integration of the tool in GPS.
External tools can usually display error messages for the user that
are associated with specific files and locations in these files. This is for
instance the way the GPS builder itself analyzes the output of make.
This can be done for your own tools using the shell command
Locations.parse. This command takes several arguments, so that you
can specify your own regular expression to find the file name, line number and
so on in the error message. By default, it is configured to work
seamlessly with error message of the forms:
file:line: message
file:line:column: message
Please refer to the online help for this command to get more information
(by e.g. typing help Locations.parse in the GPS Shell).
Here is a small example on how to run a make command and send the errors to the location window afterward.
For languages that support it, it is also recommended that you quote the
argument with triple quotes, so that any special character (newlines, quotes,
...) in the output of the tool are not specially interpreted by GPS. Note
also that you should leave a space at the end, in case the output itself ends
with a quote.
<?xml version="1.0" ?>
<make>
  <action name="make example" >
     <external>make</external>
     <on-failure>
        <shell>Locations.parse """%1 """ make_example</shell>
     </on-failure>
  </action>
</make>
GPS has support for automatically correcting errors for some of the languages.
You can get access to this auto-fixing feature through the Codefix.parse
shell command, which takes the same arguments as for Locations.parse.
This will automatically add pixmaps to the relevant entries in the location
window, and therefore Locations.parse should be called first prior to
calling this command.
Errors can also be fixed automatically by calling the methods of the
Codefix class. Several codefix sessions can be active at the same time,
each of which is associated with a specific category. The list of currently
active sessions can be retrieved through the Codefix.sessions() command.
If support for python is enabled, you can also manipulate the fixable errors
for a given session.
To do so, you must first get a handle on that section, as shown in the example
below. You can then get the list of fixable errors through the errors
command.
Each error is of the class CodefixError, which has one important
method fix which allows you to perform an automatic fixing for that
error. The list of possible fixes is retrieved through possible_fixes.
print GPS.Codefix.sessions ()
session = GPS.Codefix ("category")
errors  = session.errors ()
print errors [0].possible_fixes ()
errors [0].fix ()
This section provides a full example of a customization file.
It creates a top-level menu named custom menu.
This menu contains a menu item named item 1, which is associated to the
external command external-command 1, a sub menu named other menu,
etc...
<?xml version="1.0"?>
<menu-example>
  <action name="action1">
    <external>external-command 1</external>
  </action>

  <action name="action2">
    <shell>edit %f</shell>
  </action>

  <submenu>
    <title>custom menu</title>
    <menu action="action1">
      <title>item 1</title>
    </menu>

    <submenu>
      <title>other menu</title>
      <menu action="action2">
        <title>item 2</title>
      </menu>
    </submenu>
  </submenu>
</menu-example>
This section provides an example that defines a new tool. This is only a short example, since Ada, C and C++ support themselves are provided through such a file, available in the GPS installation.
This example adds support for the "find" Unix utility, with a few switches. All these switches are editable through the project properties editor.
It also adds a new action and menu. The action associated with this menu gets
the default switches from the currently selected project, and then ask the
user interactively for the name of the file to search.
<?xml version="1.0" ?>
<toolexample>
  <tool name="Find" >
    <switches columns="2" >
      <title column="1" >Filters</title>
      <title column="2" >Actions</title>

      <spin label="Modified less than n days ago" switch="-mtime-"
            min="0" max="365" default="0" />
      <check label="Follow symbolic links" switch="-follow" />

      <check label="Print matching files" switch="-print" column="2" />
    </switches>
  </tool>

  <action name="action find">
    <shell>Project %p</shell>
    <shell>Project.get_tool_switches_as_string %1 Find </shell>
    <shell>MDI.input_dialog "Name of file to search" Filename</shell>
    <external>find . -name %1 %2</external>
  </action>

  <Submenu>
    <Title>External</Title>
     <menu action="action find">
       <Title>Launch find</Title>
    </menu>
  </Submenu>
</toolexample>
Scripts are small programs that interact with GPS and allow you to perform complex tasks repetitively and easily. GPS includes support for two scripting languages currently, although additional languages might be added in the future. These two languages are described in the following section.
Support for scripting is currently work in progress in GPS. As a result, not many commands are currently exported by GPS, although their number is increasing daily. These commands are similar to what is available to people who extend GPS directly in Ada, but with a strong advantage: they do not require any recompilation of the GPS core, and can be tested and executed interactively.
The goal of such scripts is to be able to help automate processes such as builds, automatic generation of graphs,...
These languages all have a separate console associated with them,
which you can open from the Tools menu. In each of these
console, GPS will display a prompt, at which you can type interactive
commands. These console provide completion of the command names
through the <tab> key.
For instance, in the GPS shell console you can start typing
GPS> File
then press the <tab> key, which will list all the functions whose name starts with "File".
A similar feature is available in the python console, which also provides completion for all the standard python commands and modules.
All the scripting languages share the same set of commands exported by GPS, thanks to a abstract interface defined in the GPS core. As a result, GPS modules do not have to be modified when new scripting languages are added.
Scripts can be executed immediately upon startup of GPS by using the
command line switch --load. Specifying the following command
line:
gps --load=shell:mytest.gps
will force the gps script mytest.gps to be executed
immediately, before GPS starts reacting to user's requests. This is
useful if you want to do some special initializations of the
environment. It can also be used as a command line interface to GPS,
if you script's last command is to exit GPS.
In-line commands can also be given directly on the command line through
--eval command line switch.
For instance, if you want to analyze an entity in the entity browser
from the command line, you would pass the following command switches:
gps --eval=shell:'Entity entity_name file_name; Entity.show %1'
See the section Customizing through XML files on how to bind key shortcuts to shell commands.
There is a strong relationship between GPS actions, as defined in the customization files (see Defining Actions), and scripting languages
Actions can be bound to menus and keys through the customization files or
the Edit->Key shortcuts dialog.
These actions can execute any script command, See Defining Actions. This is
done through the <shell> XML tag.
But the opposite is also true. From a script, you can execute any action registered in GPS. This can for instance be used to split windows, highlight lines in the editor,... when no equivalent shell function exists. This can also be used to execute external commands, if the scripting language doesn't support this in an easy manner.
Such calls are made through a call to execute_action, as in the
following example:
execute_action "Split horizontally"
GPS.execute_action (action="Split horizontally")
The list of actions known to GPS can be found through the
Edit->Key shortcuts dialog. Action names are case sensitive.
Some of the shell commands take subprograms as parameters. If you are using the GPS shell, this means you have to pass the name of a GPS action. If you are using Python, this means that you pass a subprogram, See Subprogram parameters.
The GPS shell is a very simple-minded, line-oriented language. It is
accessible through the Shell window at the bottom of the GPS
window. It is similar to a Unix shell, or a command window on Windows
systems.
Type help at the prompt to get the list of available commands,
or help followed by the name of a command to get more
information on that specific command.
The following example shows how to get some information on a source
entity, and find all references to this entity in the application. It
searches for the entity "entity_name", which has at least one
reference anywhere in the file "file_name.adb". After the first
command, GPS returns an identifier for this entity, which can be used
for all commands that need an entity as a parameter, as is the case
for the second command. When run, the second command will
automatically display all matching references in the location window.
GPS> Entity my_entity file_name.adb
<Entity_0x09055790>
GPS> Entity.find_all_refs <Entity_0x09055790>
Since the GPS shell is very simple, it doesn't provide any reference
counting for the result types. As a result, all the values returned by
a command, such as <Entity_0x09055790> in the example above,
are kept in memory.
The GPS shell provides the command clear_cache which removes
all such values from the memory. After this command is run, you can no
longer use references obtained from previous commands, although of
course you can run these commands again to get a new reference.
The return value of the 9 previous commands can easily be recalled by
passing %1, %2,... on the command line. For instance,
the previous example could be rewritten as
GPS> Entity my_entity file_name.adb
<Entity_0x09055790>
GPS> Entity.find_all_refs %1
These return values will be modified also for internal commands sent
by GPS, so you should really only use this when you emit multiple
commands at the same time, and don't do any other action in GPS. This
is mostly useful when used for command-line scripts (see --eval
and --load), or for custom files, See Customizing through XML files.
Arguments to commands can, but need not, be quoted. If they don't contain any space, double-quote ('"') or newline characters, you do not need to quote them. Otherwise, you should surround them with double-quotes, and protect any double-quote part of the argument by preceding it with a backslash.
There is another way to quote a command: use three double-quotes characters in
a row. Any character loses its special meaning until the next three
double-quotes characters set. This is useful if you do not know in advance
the contents of the string you are quoting.
Locations.parse """%1 """ category_name
Python is an interpreted object-oriented language, created by Guido
Van Rossum. It is similar in its capabilities to languages such as
Perl, Tcl or Lisp. This section is not a tutorial on python
programming. See <http://www.python.org/doc/current/> to access the
documentation for the current version of python.
If python support has been enabled, the python shell is accessible through the
Python window at the bottom of the GPS window. You can also
display it by using the menu Tools->Python Console.
You can type help(GPS) in the python console to see the list of
functions exported by GPS to python. If you want to save the output of
this (or any) command to a file, you can do:
>>> e=file("/tmp/gps-help.txt", "w")
>>> sys.stdout=e
>>> help(GPS)
>>> e.flush()
>>> sys.stdout=sys.__stdout__
The same example that was used to show the GPS shell follows, now using python. As you can notice, the name of the commands is similar, although they are not run exactly in the same way. Specifically, GPS benefits from the object-oriented aspects of python to create classes and instances of these classes.
In the first line, a new instance of the class Entity is created
through the create_entity function. Various methods can then be
applied to that instance, including find_all_refs, which lists
all references to that entity in the location window:
>>> e=GPS.Entity ("entity_name", "file_name.adb")
>>> e.find_all_refs()
The screen representation of the classes exported by GPS to python has been modified, so that most GPS functions will return an instance of a class, but still display their output in a user-readable manner.
Python has extensive introspection capabilities. Continuing the
previous example, you can find what class e is an instance of
with the following command:
>>> help(e)
Help on instance of Entity:

<GPS.Entity instance>
It is also possible to find all attributes and methods that can be
applied to e, as in the following example:
>>> dir (e)
['__doc__', '__gps_data__', '__module__', 'called_by', 'calls',
'find_all_refs']
Note that the list of methods may vary depending on what modules were loaded in GPS, since each module can add its own methods to any class.
In addition, the list of all existing modules and objects currently known
in the interpreter can be found with the following command:
>>> dir ()
['GPS', 'GPSStdout', '__builtins__', '__doc__', '__name__', 'e', 'sys']
You can also load and execute python scripts with the execfile command,
as in the following example:
>>> execfile ("test.py")
Python supports named parameters. Most functions exported by GPS define
names for their parameters, so that you can use this Python feature, and
make your scripts more readable. A notable exception to this rule are the
functions that take a variable number of parameters.
Using named parameters allows you to specify the parameters in any order
you wish, e.g:
>>> e=GPS.Entity (name="foo", file="file.adb")
On startup, GPS will automatically import (with python's import
command) all the files with the extension .py found in the directory
$HOME/.gps/plug-ins. These files are loaded only after all
standard GPS modules have been loaded, as well as the custom files, and
before the script file or batch commands specified on the command lines
with the --eval or --load switches.
As a result, one can use the usual GPS functions exported to python in these startup scripts. Likewise, the script run from the command line can use functions defined in the startup files.
Since the import command is used, the functions defined in this
modules will only be accessible by prefixing their name by the name of the
file in which they are defined. For instance if a file mystartup.py
is copied to the startup directory, and defines the function func,
then the latter will be accessible in GPS through mystartup.func.
The standard python mechanism for loading scripts on startup is still
available. As usual, python can automatically load a script on startup.
You can do this by setting an environment variable named
PYTHONSTARTUP to the name of a file containing your start-up commands.
If you are writing a set of python scripts that other people will use, you need to provide several things:
.py files, which
the user should install in the plug-ins directory.
<action> tag, exported to the user. This allows him
to either create menus to execute these commands or to bind them to special
key shortcuts
Alternatively, your python script can call the command GPS.parse_xml
to specify some inline XML tags to interpret. These tags can directly create
the new menus or key bindings associated with your command.
The following example defines a python command that inserts a line full of
dashes ('-') at the current cursor location. This command is associated with
the key binding <control-c n>, and can be distributed as a single XML
file.
# This code can be stored in a file test.py in $HOME/.gps/plug-ins
from GPS import *

def add_dashes_line():
   Editor.replace_text (current_context().file().name(),
                        current_context().location().line(),
                        current_context().location().column(),
                        "--------------------------------", 0, 0)
GPS.parse_xml ("""
   <action name="dashes line">
      <shell lang="python">test.add_dashes_line()</shell>
      <context>Source editor</context>
   </action>
   <key action="dashes line">control-c n</key>
""")
Several complex examples are provided in the GPS distribution, in the
directory examples/python. These are modules that you might want
to use for your own GPS, but more important that will show how GPS can
be extended from Python.
If your script doesn't do what you expect it to do, there are several ways to debug it, among which the easiest is probably to add some "print" statements. Since some output of the scripts is sometimes hidden by GPS (for instance for interactive commands), you might not see this output.
In this case, you can reuse the tracing facility embedded in GPS itself.
Modify the file $HOME/.gps/traces.cfg, and add the following line:
PYTHON.OUT=yes
This will include the python traces as part of the general traces available
in the file $HOME/.gps/log. Note that it may slow down GPS if there is
a lot of output to process.
A few of the functions exported by GPS in the GPS shell or in python expect a subprogram as a parameter.
This is handled in different ways depending on what language your are using:
It isn't possible to define new functions in the GPS shell. However, this concept is similar to the GPS actions (see Defining Actions), which allow you to execute a set of commands and launch external processes.
Therefore, a subprogram parameter in the GPS shell is a string, which is the name of the action to execute.
For instance, the following code defines the action "on_edition",
which is called every time a new file is edited. The action is defined
in the shell itself, although this could be more conveniently done in
a separate customization file.
parse_xml """<action name="on_edition">
             <shell>echo "File edited"</shell></action>"""
Hook "file_edited"
Hook.add %1 "on_edition"
Python of course has its own notion of subprogram, and GPS is fully compatible
with it. As a result, the syntax is much more natural than in the GPS shell.
The following example has the same result as above:
import GPS
def on_edition(self, *arg):
  print "File edited"
GPS.Hook ("file_edited").add (on_edition)
Things are in fact slightly more complex if you want to pass methods are arguments. Python has basically three notions of callable subprograms, detailed below. The following examples all create a combo box in the toolbar, which calls a subprogram whenever its value is changed. The documentation for the combo box indicates that the callback in this case takes two parameters:
The first parameter is the instance of the combo box associated with the toolbar widget, and, as always in python, you can store your own data in the instance, as shown in the examples below.
Here is the description of the various subprograms:
These are standard subprograms, found outside class definitions. There
is no implicit parameter in this case. However, if you need to pass
data to such a subprogram, you need to use global variables
import GPS

my_var = "global data"

def on_changed (combo, choice):
   global my_var
   print "on_changed called: " + \
      my_var + " " + combo.data + " " + choice

combo = GPS.Combo \
  ("name", label="name", on_changed=on_changed)
GPS.Toolbar().append (combo)
combo.data = "My own data"
These are methods of a class. You do not specify, when you pass the method in parameter to the combo box, what instance should be passed as its first parameter. Therefore, there is no extra parameter either.
Note however than whatever class the method is defined in, the first parameter is always an instance of the class documented in the GPS documentation (in this case a GPS.Combo instance), not an instance of the current class.
In this first example, since we do not have access to the instance of
MyClass, we also need to store the global data as a class
component. This is a problem if multiple instances of the class can
be created.
import GPS
class MyClass:
   my_var = "global data"
   def __init__ (self):
      self.combo = GPS.Combo \
         ("name", label="name", on_changed=MyClass.on_changed)
      GPS.Toolbar().append (self.combo)
      self.combo.data = "My own data"

   def on_changed (combo, choice):
      ## No direct access to the instance of MyClass.
      print "on_changed called: " + \
         MyClass.my_var + " " + combo.data + " " + choice

MyClass()
As the example above explains, there is no direct access to MyClass
when executing on_changed. An easy workaround is the following, in
which the global data can be stored in the instance of MyClass,
and thus be different for each instance of MyClass.
import GPS
class MyClass:
   def __init__ (self):
      self.combo = GPS.Combo \
         ("name", label="name", on_changed=MyClass.on_changed)
      GPS.Toolbar().append (self.combo)
      self.combo.data = "My own data"
      self.combo.myclass = self   ## Save the instance
      self.my_var = "global data"

   def on_changed (combo, choice):
      print "on_changed called: " + \
         combo.myclass.my_var + " " + combo.data + " " + choice

MyClass()
The last example works as expected, but is not convenient to use. The solution here is to use a bound method, which is a method for a specific instance of a class. Such a method always has an extra first parameter, set implicitly by Python or GPS, which is the instance of the class the method is defined in.
Notice the way we pass the method in parameter to append(), and the
extra third argument to on_changed in the example below.
import GPS
class MyClass:
   def __init__ (self):
      self.combo = GPS.Combo \
         ("name", label="name", on_changed=self.on_changed)
      GPS.Toolbar().append (self.combo)
      self.combo.data = "My own data"
      self.my_var = "global data"

   def on_changed (self, combo, choice):
      # self is the instance of MyClass specified in call to append()
      print "on_changed called: " + \
         self.my_var + " " + combo.data + " " + choice

MyClass()
This section lists some of the problems that have been encountered while using Python inside GPS. This is not a general Python discussion.
There exist various solutions to spawn external processes from a script:
GPS.Process class
GPS.execute_action.
This action should have an <external> XML node indicating how to
launch the process
os.popen() calls
This solution doesn't provide a full interaction with the process, though.
The use of an expect library may be a good solution. There are various python expect libraries that already exist.
These libraries generally try to copy the parameters of the standard file
class. They may fail doing so, as GPS's consoles do not fully emulate all
the primitive functions of that class (there is no file descriptor for
instance).
When possible, it is recommended to use one of the methods above instead.
In general, it is possible to redirect the output of any Python script to
any GPS window (either an already existing one, or creating one automatically),
through the "output" attribute of XML configuration files.
However, there is a limitation in python that the output of processes spawned through os.exec() or os.spawn() is redirected to the standard output, and not to the usual python output that GPS has overriden.
There are two solutions for this:
The output of the pipe is then redirected to Python's output, as in:
import os, sys
def my_external():
   f = os.popen ('ls')
   console = GPS.Console ("ls")
   for l in f.readlines():
      console.write ('   ' + l)
This solution allows you, at the same time, to modify the output, for instance to indent it as in the example above.
You can go through the process of defining an XML customization string for
GPS, and execute your process this way, as in:
GPS.parse_xml ("""
   <action name="ls">
     <external output="output of ls">ls</external>
   </action>""")

def my_external():
   GPS.execute_action ("ls")
This solution also allows you to send the output to a different window than the rest of your script. But you cannot filter or modify the output as in the first solution.
The following filter can be used for actions that can only execute in the
Project View, and only when the user clicks on an object directory. The
contextual menu entry will not be visible in other contexts
<?xml version="1.0" ?>
<root>
   <filter name="object directory"
           shell_cmd="import os.path; os.path.samefile (GPS.current_context().project().object_dirs()[0],GPS.current_context().directory())"
           shell_lang="python"
           module="Explorer" />

   <action name="Test on object directory">
      <filter id="object directory" />
      <shell>echo "Success"</shell>
   </action>

   <contextual action="Test on object directory" >
      <Title>Test on object directory</Title>
   </contextual>
</root>
Another example would be to have a filter so that the contextual menu only
appears when on a project node in the Project View. Using %P in your
command is not enough, since the current context when you click on a file
or directory also contain information about the project this file or directory
belongs to. Thus this implicit filter will not be enough to hide your
contextual menu.
As a result, you need to do a slightly more complex test, where you check that
the current context doesn't contains information on directories (which will
disable the contextual menu for directories, files and entities). Since the
command uses %P, GPS garantees that a project is available.
We'll implement this contextual menu in a Python file, called
filters.py.
import GPS
def on_project():
try:
GPS.current_context().directory()
return False
except:
return True

GPS.parse_xml ("""
<action name="test_filter">
<filter module="Explorer"
     shell_lang="python"
     shell_cmd="filters.on_project()" />
<shell>echo current project is %P</shell>
</action>
<contextual action="test_filter">
<title>Print current project</title>
</contextual>""")
The example above shows the flexibility of filters, since you can pretty much
do anything you wish through the shell commands. However, it is complex to
write for such a simple filter. Luckily, GPS provides a predefined filter
just for that purpose, so that you can write instead, in an XML file:
<action name="test_filter" >
<filter id="Explorer_Project_Node" />
<shell>echo current project is %P</shell>
</action>
By default, the output of all python commands is displayed in the Python console. However, you might want in some cases to create other windows in GPS for this output. This can be done in one of two ways:
If the whole output of your script should be redirected to the same window,
or if the script will only be used interactively through a menu or a key
binding, the easiest way is to create a new XML action, and redirect the
output, as in
<?xml version="1.0" ?>
<root>
  <action name="redirect output" output="New Window">
     <shell lang="python">print "a"</shell>
  </action>
</root>
All the various shell commands in your action can be output in a different window, and this also applies for the output of external commands.
If, however, you want to control in your script where the output should be
sent, for instance if you can't know that statically when you write your
commands, you can use the following code:
sys.stdin = sys.stdout = GPS.Console ("New window")
print "foo"
print (sys.stdin.read ())
sys.stdin = sys.stdout = GPS.Console ("Python")
The first line redirect all input and output to a new window, which is
created if it doesn't exist yet. Note however that the output of stderr
is not redirected, and you need to explicitely do it for sys.stderr.
The last line restore the default Python console. You must do this at the end of your script, or all scripts will continue to use the new consoles.
You can alternatively create separate objects for the output, and use them
in turn:
my_out  = GPS.Console ("New Window")
my_out2 = GPS.Console ("New Window2")

sys.stdout=my_out
print "a"
sys.stdout=my_out2
print "b"
sys.stdout=GPS.Console ("Python")
The parameter to the constructor GPS.Console indicates whether any
output sent to that console should be saved by GPS, and reused for the
%1, %2,... parameters if the command is executed in a
GPS action. That should generally be 1, except for stderr where it should
be 0.
After you have made modification to a python file, you might want to reload it in GPS. This requires careful use of python commands.
Here is an example. Lets assume you have a python file ("mymod.py")
which contains the following:
GPS.parse_xml ("""
   <action name="my_action">
      <shell lang="python">mymod.myfunc()</shell>
   </action>""")

def myfunc():
   print "In myfunc\n"
As you can guess from this file, it defines an action "my_action", that you can for instance associate with a keybinding through the Edit->Key shortcuts menu.
If this file has been copied in one of the plug-ins directories,
it will be automatically loaded at startup.
Notice that the function myfunc is thus found in a separate namespace,
with the name mymod, same as the file.
If you decide, during your GPS session, to edit this file and have the
function print "In myfunc2" instead, you then have to reload the file by
typing the following command in the Python console:
> execfile ("HOME/.gps/plug-ins/mymod.py", mymod.__dict__)
The first parameter is the full path to the file that you want to reload.
The second argument is less obvious, but indicates that the file should be
reloaded in the namespace mymod.
If you omit the optional second parameter, Python will load the file, but
the function myfunc will be defined in the global namespace, and thus
the new definition is accessible through
> myfunc()
Thus, the key shortcut you had set, which still executes mymod.myfunc()
will keep executing the old definition.
By default, GPS provides a contextual menu when you are editing a Python file. This contextual menu (Python->Reload module) will take care of all the above details.
The python extension provided by GPS is fully documentation in this manual and a separate manual accessible through the Help menu in GPS.
However, this documentation is provided in HTML, and might not be the best suitable for printing, if you wish to do so.
The following paragraph explains how you can generate your own documentation
for any python module, including GPS, and print the result.
import pydoc
pydoc.writedoc (GPS)
In the last comamnd, GPS is the name of the module that you want
to print the documentation for.
These commands generate a .html file in the current directory.
Alternatively, you can generate a simple text file with
e=file("./python_doc", "w")
e.write (pydoc.text.document (GPS))
e.flush()
This text file includes bold characters by default. Such bold characters
are correctly interpreted by tools such as a2ps which can be used
to convert the text file into a postscript document.
At startup, GPS will automatically load all python files found in
the directories share/gps/plug-ins and
$HOME/.gps/plug-ins.
In addition, python files located under
<prefix>/share/gps/python can be imported (using the import
command) by any python script.
You can also set the PYTHONPATH environment variable to add other
directories to the python search path.
GPS provides most of its tools through contextual menus, accessed by right clicking in various parts of GPS. Due to the number of tools provided by GPS, these contextual menus tend to be big, and you might want to control what should be displayed in them. There are several ways to control this:
If you are creating your own contextual menus through customization files and
XML, these menus are associated with actions (<action>) that you have
created yourself most of the time. In this case, you need to define filters
appropriately, through the <filter> tag, to decide when the action
is relevant, and therefore when the contextual menu should be displayed.
If you want to control the visibility of predefined contextual menus, or
for menus where you cannot easily modify the associated filter, you can
use shell and python commands to hide the menu entry. For this, you will
need to find out the name of the menu, which can be done by checking the
list returned by GPS.Contextual.list() and using the most likely
entry. This name is also the value of the <title> tag for contextual
menus that you have created yourself. Using this name, you can then disable
the contextual menu by executing:
GPS.Contextual ("name").hide()
in the python console
GPS is based on the Gtk+ graphical toolkit, which is available under many platforms and for many programming languages.
You can install an third party package, downloadable from
<http://www.pygtk.org>, which is a python binding to Gtk+.
Using pygtk, you will be able to create your own dialogs and graphical
windows using the python capabilities provided by GPS.
See the menu Help->Python Extensions, in particular the GPS.MDI
documentation, for a sample of code on how to create your own graphical
interfaces and integrate them in GPS.
A hook is a named set of commands to be executed on particular occasions as a result of user actions in GPS.
GPS and its various modules define a number of standard hooks, which are called for instance when a new project is loaded, when a file is edited, and so on. You can define your own commands to be executed in such cases.
You can find out the list of hooks that GPS currently knows about by calling
the Hook.list function, which takes no argument, and returns a list of
hook names that you can use. More advanced description for each hook is
available through the describe_hook command.
GPS> Hook.list
project_changed
open_file_action_hook
preferences_changed
[...]

GPS> hook preferences_changed
GPS> Hook.describe %1
Hook called when a file needs to be opened or closed
This hook is of type "open_file" -- see describe_hook_type
Python> GPS.Hook ("preferences_changed").describe()
The description of each hooks includes a pointer to the type of the hook, that
is what parameters the subprograms in this hook will receive. For instance:
GPS> Hook.describe_type "open_file"
Common type for all hooks related to opening files.
Arguments are the following: (file, line, column,
column_end, enable_navigation, new_file, force_reload)
The list of all known hook types can be found through the Hook.list_types command. This takes no argument and returns a list of all known types of hooks. As before, you can more information for each of these type through a call to Hook.describe_type.
You can add your own command to existing hooks through a call to the Hook.add command. Whenever the hook is executed by GPS or another script, your command will also be executed, and will be given the parameters that were specified when the hook is run. The first parameter is always the name of the hook being executed.
This Hook.add applies to an instance of the hook class, and takes one parameter, the command to be executed. This is a subprogram parameter (see Subprogram parameters).
The command can be any GPS action (see Defining Actions). The arguments for the hook will be passed to the action, and are available as $1, $2,.... In the following example, the message "Just executed
the hook: project_changed" will be printed in the Shell console. Note that we
are defining the action to be executed inline, but this could in fact be
defined in a separate XML customization file for convenience.
GPS> parse_xml """<action name="my_action"><shell>echo "Just executed the hook"</shell></action_name>"""
GPS> Hook project_changed
GPS> Hook.add %1 "my_action"
The command must be the name of a subprogram to execute. The arguments for the
hook will be passed to this subprogram. In the following example, the
message "The hook project_changed was executed by GPS" will be displayed in the
Python console whenever the project changes.
def my_callback (name):
    print "The hook " + name + " was executed by GPS"
GPS.Hook ("project_changed").add (my_callback)
The example above shows the simplest type of hook, which doesn't take any argument. However, most hooks receive several parameters. For instance, the hook "file_edited" receives the file name as a parameter.
The following code will print the name of the hook ("file_edited") and the
name of the file in the shell console every time a file is open by GPS.
GPS> parse_xml """<action name="my_action"><shell>echo name=$1 file=$2</shell></action>"""
GPS> Hook "file_edited"
GPS> Hook.add %1 "my_action"
The following code prints the name of the file being edited by GPS in the
python console whenever a new editor is opened. The second argument is of type
GPS.File.
def my_file_callback (name, file):
    print "Editing " + file.name()
GPS.Hook ("file_edited").add (my_file_callback)
Some hooks have a special use in GPS. Their name always ends with "_action_hook".
As opposed to the standard hooks described in the previous section, the execution of the action hooks stops as soon as one of the subprograms returns a True value ("1" or "true"). The subprograms associated with that hook are executed one after the other. If any such subprogram knows how to act for that hook, it should do the appropriate action and return "1".
This mechanism is used extensively by GPS internally. For instance, whenever a file needs to be opened in an editor, GPS executes the "open_file_action_hook" hook to request its editing. Several modules are connected to that hook.
One of the first modules to be executed is the external editor module. If the user has chosen to use an external editor, this module will simply spawn Emacs or the external editor that the user has selected, and return 1. This immediately stops the execution of the "open_file_action_hook".
However, if the user doesn't want to use external editors, this module will return 0. This will keep executing the hook, and in particular will execute the source editor module, which will always act and open an editor internally in GPS.
This is a very flexible mechanism. In your own script, you could choose to have some special handling for files with a ".foo" extension for instance. If the user wants to open such a file, you would spawn for instance an external command (say "my_editor") on this file, instead of opening it in GPS.
This is done with a code similar to the following
from os.path import *
import os
def my_foo_handler (name, file, line, column, \
                    column_end, enable_nav, new_file, reload):
    if splitext (file.name())[1] == ".foo":
        os.spawnv \
           (os.P_NOWAIT, "/usr/bin/emacs", ("emacs", file.name()))
        return 1   ## Prevent further execution of the hook
    return 0  ## Let other subprograms in the hook do their job

GPS.Hook ("open_file_action_hook").add (my_foo_handler)
Any module in GPS is responsible for running the hooks when appropriate. Most of the time, the subprograms exported by GPS to the scripting languages will properly run the hook. But you might also need to run them in your own scripts.
As usual, this will result in the execution of all the functions bound to that hook, whether they are defined in Ada or in any of the scripting languages.
This is done through the Hook.run command. This applies to an instance of the Hook class, and a variable number of arguments These must be in the right order and of the right type for that specific type of hook.
If you are running an action hook, the execution will stop as usual as soon as one of the subprograms return a True value.
The following example shows how to run a simple hook with no parameter, and
a more complex hook with several parameters. The latter will in fact request
the opening of an editor for the file in GPS, and thus has an immediately
visible effect on the interface. The file is opened at line 100. See the
description of the hook for more information on the other parameters.
GPS.Hook ("project_changed").run()
GPS.Hook ("open_file_action_hook").run \
              (GPS.File ("test.adb"), 100, 1, 0, 1, 1, 1)
The list of hooks known to GPS is fully dynamic. GPS itself declares a number of hooks, mostly for its internal use although of course you can also connect to them.
But you can also create your own hooks to report events happening in your own modules and programs. This way, any other script or GPS module can react to these events.
Such hooks can either be of a type exported by GPS, which constraints the list of parameters for the callbacks, but make such hooks more portable and secure; or they can be of a general type, which allows basically any kind of parameters. In the latter case, checks are done at runtime to ensure that the subprogram that is called as a result of running the hook has the right number of parameters. If this isn't the case, GPS will complain and display error messages.
Creating new hooks is done through a call to Hook.register. This function takes three arguments: the name of the hook you are creating, a description of when the hook is executed for the interactive help, and the type of the hook.
The name of the hook is left to you. Any character is allowed in that name, although using only alphanumerical characters.
The description is displayed when the user calls Hook.describe.
The type of the hook must be one of the following:
This indicates that the hook doesn't take any argument. None should be given to Hook.run, apart of course from the hook name, and none should be expected by the various commands connected to that hook, once again apart from the hook name itself.
This indicates that the hook is of one of the types exported by GPS itself. The advantage of using such explicit types as opposed to "general" is that GPS is able to make more tests for the validity of the parameters.
This indicates that the hook is of the general type that allows any number of parameter, of any type. Other script will be able to connect to it, but will not be executed when the hook is run if they do not expect the same number of parameters that was given to Hook.run
A small trick worth noting: if the command bound to a hook doesn't have the right number of parameters that this hook provide, the command will not be executed and GPS will report an error. You can make sure that your command will always be executed by either giving default values for its parameter, or by using python's syntax to indicate a variable number of arguments.
This is especially useful if you are connecting to a "general" hook, since you
do not really know in advance how many parameters the call of Hook.run will
provide.
## This callback can be connected to any type of hook
def trace (name, *args):
   print "hook=" + name

## This callback can be connected to hooks with one or two parameters
def trace2 (name, arg1, arg2=100):
   print "hook=" + str (arg1) + str (arg2)

Hook.register ("my_custom_hook", "some description", "general")
Hook ("my_custom_hook").add (trace2)
Hook ("my_custom_hook").run (1, 2) ## Prints 1 2
Hook ("my_custom_hook").run (1)    ## Prints 1 100
The Version Control interface in GPS can be customized, either to refine the behavior of the existing system and adapt it to specific needs, or to add support for other Version Control systems.
Custom VCS interfaces are defined entirely through XML files. Those files are read in the same location as all the other XML customizations that GPS offers. See Customizing through XML files for a complete description.
There are two steps to follow when creating a custom VCS interface. The first step is to describe the VCS itself, and the second step is to implement actions corresponding to all the operations that this VCS can perform. The following two sections (Describing a VCS and Implementing VCS actions) describe those steps.
GPS is distributed with XML files describing the interfaces to
ClearCase, CVS and Subversion. These XML files are located in the directory
share/gps/plug-ins in the GPS installation, and can be used as a
reference for implementing new custom VCS interfaces.
The vcs node is the toplevel node which contains the
description of the general behavior expected from the VCS. It has two
attributes.
The attribute name indicates the identifier of the VCS. The
casing of this name is important, and the same casing must be used in
the project files.
The attribute absolute_name indicates the behavior of the
VCS relative to file names, and can take the values TRUE or
FALSE. If it is set to TRUE, it means that all
commands in the VCS will work on absolute file names. If it set to
FALSE, it means that all actions work on base file names, and
that GPS will move to the appropriate directory before executing an
action.
Here is an example, adapted to the use of CVS:
   <vcs name="Custom CVS" absolute_names="FALSE">

      (... description of action associations ...)
      (... description of supported status ...)
      (... description of output parsers ...)

   </vcs>
GPS knows about a certain set of predefined "operations" that a VCS can perform. The user can decide to implement some of them - not necessarily all of them - in this section.
The following node is used to associate a predefined operation to an
action:
<OPERATION action="ACTION_LABEL" label="NAME OF OPERATION" />
Where:
OPERATION
ACTION_LABEL
NAME OF OPERATION
All VCS have the notion of "status" or "state" to describe the
relationship between the local file and the repository. The XML node
status is used to describe the status that are known to a
custom VCS, and the icons associated to it:
<status label="STATUS_LABEL" stock="STOCK_LABEL" />
Where:
STATUS_LABEL
STOCK_LABEL
Note that the order in which status are defined in the XML file is important: the first status to be displayed must correspond to the status "Up-to-date" or equivalent.
There are cases in which GPS needs to parse the output of the VCS commands: when querying the status, or when "annotating" a file.
The following parsers can be implemented in the vcs node.
status_parser and local_status_parser
They accept the following child nodes:
<regexp> (mandatory)
<file_index>
regexp that contains the name
of a file.
<status_index>
regexp that contains the file
status. This status is passed through the regular expressions defined in the
status_matcher nodes, see below.
<local_revision_index>
regexp that contains the name
of the local revision (the version of the file that was checked out).
<repository_revision_index>
regexp that contains the name
of the repository revision (the latest version of the file in the VCS).
<status_matcher>
label.
<annotations_parser>
It accepts the following child nodes:
<regexp> (mandatory)
<repository_revision_index>
regexp that contains the
repository revision of the line.
<file_index>
regexp that indicates the
part of the line that belongs to the file.
A number of "standard" VCS operations are known to GPS. Each of these operations can be implemented, using Actions. See Defining Actions) for a complete description of how to implement actions.
Here is a list of all the defined VCS operations, and their parameters:
status_files
$1 = whether the log files should be cleared when obtaining up-to-date status
$2- = the list of files to query status for.
status_dir
$1 = the directory.
local_status_files
$* = list of files
open
$* = list of files
update
$* = list of files
update_dir
$* = directory
resolved
$* = list of files
commit
$1 = log file
$2- = list of files
commit_dir
$1 = log
$2 = directory
history
$1 = file
history_revision
$1 = revision
$2 = file
annotate
$1 = file
add
$1 = log
$2 = file or dir
remove
$1 = log
$2 = file or dir
revert
$* = files
diff_head
$1 = file
diff_base_head
$1 = file
diff_working
$1 = file
diff
$1 = rev
$2 = file
diff2
$1 = revision 1
$2 = revision 2
$3 = file
In order to give access to the GPS capabilities from external processes
(e.g. Emacs), GPS can be launched in server mode.
The two relevant command line switches are --server and
--hide.
--server will open a socket on the given port, allowing multiple
clients to connect to a running GPS, and sending GPS shell or python
commands.
--hide tells GPS not to display its main window when starting.
note that under unix systems, you still need to have access to the current
screen (as determined by the DISPLAY environment variable) in this
mode.
Using the two switches together provides a way to launch GPS as a background process with no initial user interface.
Clients connecting through a standard socket have access to a simple
shell using GPS>> as the separating prompt between each command. This
is needed in order to determine when the output (result) of a command
is terminated.
All the GPS shell commands (as defined in The GPS Shell) are
available from this shell. In addition, the python interpreter, if
enabled, is also available through the use of the python prefix
before a python command.
For example, sending pwd through the socket will send the pwd
command through the GPS shell and display the result on the socket;
similarly, sending python GPS.pwd() will send the GPS.help()
command through the python interpreter (see The Python Interpreter for
more details).
The socket shell provides also additional commands:
For example, let suppose that we start gps with the --server=1234
command: this will bring up GPS as usual.
Now, on a separate terminal, create a simple server by typing the following:
telnet localhost 1234
Trying 127.0.0.1...
Connected to localhost.
Escape character is '^]'.
GPS>> id test-1
id set to 'test-1'
GPS>> pwd
c:\working-dir\
GPS>>
Then in the GPS Python Console:
>>> GPS.Socket ("test-1").send ("hello, it's time to logout\n");
At this point, the following is received on the client (telnet) side:
GPS>> hello, it's time to logout
We can then close the client:
logout
Connection closed by foreign host.
Usage:
   gps [options] [-P project-file] [source1] [source2] ...
Options:
   --help              Show this help message and exit
   --version           Show the GPS version and exit
   --debug[=program]   Start a debug session and optionally load the
                       program with the given arguments
   --debugger debugger Specify the debugger's command line
   --hide              Hide GPS main window
   --host=tools_host   Use tools_host to launch tools (e.g. gdb)
   --target=TARG:PRO   Load program on machine TARG using protocol PRO
   --load=lang:file    Execute an external file written in the
                       language lang
   --eval=lang:file    Execute an in-line script written in the
                       language lang
   --server=port       Start GPS in server mode, opening a socket on the
                       given port
   --tracelist         Output the current configuration for logs
   --traceon=name      Activate the logs for a given module
   --traceoff=name     Deactivate the logs for a given module
   --tracefile=file    Parse an alternate configuration file for the logs

Source files can be absolute or relative pathnames.
If you prepend a file name with '=', this file will be
searched anywhere on the project's source path
The following environment variables can be set to override some default settings in GPS:
GPS_ROOT
INSTALL in
the GPS sources for more details) to access information such as the location
of the translation files.
GPS_HOME
GPS_DOC_PATH
GPS_CUSTOM_PATH
GPS_CHANGELOG_USER
GDK_USE_XFT
This option is enabled by default when running GPS locally (DISPLAY set
to ":0.0") and disabled otherwise. Setting this variable explicitely
overrides the default behavior.
GPS_STARTUP_PATH
PATH environment variable just before GPS
was started. This is used by GPS to restore the proper environment before
spawning applications, no matter what particular directories it needed to
set for its own purpose.
GPS_STARTUP_LD_LIBRARY_PATH
GPS_STARTUP_LD_LIBRARY_PATH but for the LD_LIBRARY_PATH
variable.
$HOME/.gps
$HOME/.gps/log
log.<pid>, where
<pid> is the GPS process id, so that multiple GPS sessions do not
clobber each other's log. In case of a successful session, this
file is renamed log when exiting; in case of an unexpected exit
(a bug box will be displayed), the log file is kept under its original name.
Note that the name of the log file is configured by the traces.cfg
file.
$HOME/.gps/aliases
$HOME/.gps/plug-ins
$HOME/.gps/custom_key
$HOME/.gps/keys.xml
$HOME/.gps/actions.xml
$HOME/.gps/desktop.xml
File->Save More->Desktop),
loaded automatically if found.
$HOME/.gps/history
Run->Custom... dialog).
$HOME/.gps/preferences
$HOME/.gps/traces.cfg
$HOME/.gps/log.<pid>.
This file is created automatically when the $HOME/.gps/ directory is
created. If you remove it manually, it won't be recreated the next time you
start GPS.
prefix
/opt/gps.
prefix/bin
prefix/etc/gps
prefix/lib
prefix/doc/gps/html
prefix/doc/gps/examples
prefix/doc/gps/examples/language
prefix/doc/gps/examples/tutorial
gps-tutorial.html>.
prefix/share/gps/plug-ins
prefix/share/gps/python
prefix/share/gps/gps-animation.png
prefix/share/gps/gps-animation.gif
gps-animation.png) will always be displayed.
prefix/share/gps/gps-splash.png
prefix/share/locale
If you would like to make suggestions about GPS, or if you encountered a bug, please report it to mailto:report@gnat.com if you are a supported user, and to mailto:gps-devel@lists.act-europe.fr otherwise.
Please try to include a detailed description of the problem, including sources to reproduce it if possible/needed, and/or a scenario describing the actions performed to reproduce the problem, as well as the tools (e.g debugger, compiler, call graph) involved.
The files $HOME/.gps/log and $HOME/.gps/debugger.log may also
bring some useful information when reporting a bug.
In case GPS generates a bug box, the log file will be kept under a separate
name ($HOME/.gps/log.<pid> so that it does not get erased by further
sessions. Be sure to include the right log file when reporting a bug box.
This section addresses some common problems that may arise when using or installing GPS.
Non-privileged users cannot start GPS
A: You should check the permissions of the directory $HOME/.gps and its
subdirectories, they should be owned by the user.
GPS crashes whenever I open a source editor
$HOME/.gps/preferences and changing the name of the fonts, e.g
changing Courier by Courier Medium, and Helvetica by Sans
should solve the problem.
GPS refuses to start the debugger
Debug->Initialize), it is usually because the underlying debugger
(gdb) cannot be launched properly. To verify this, try to launch the
'gdb' command from a shell (i.e outside GPS). If gdb cannot be launched from
a shell, it usually means that you are using a wrong version of gdb
(e.g a version of gdb built for Solaris 8, but run on Solaris 2.6).
GPS is frozen during a debugging session
ps and kill, or the top command under Unix,
and the Task Manager under Windows: this will terminate your debugging
session, and will unblock GPS.
My Ada program fails during elaboration. How can I debug it ?
-C switch was used) program, compiled in the usual manner,
and fully debuggable provided that the -g switch is used on
the gnatlink command (or -g is used in the
gnatmake command itself).
The name of this package containing the main program is
b~xxx.ads/adb where xxx is the name of the Ada main unit given
in the gnatbind command, and you can edit and debug this file in the
normal manner. You will see a series of calls to the elaboration
routines of the packages, and you can debug these in the usual manner,
just as if you were debugging code in your application.
How can I debug the Ada run-time library ?
The simplest is to recompile your application by adding the switches
-a and -f to the gnatmake command
line. This extra step is then no longer required, assuming that you
keep the generated object and ali files corresponding to the GNAT run time
available.
Another possibility on Unix systems is to use the file Makefile.adalib
that can be found in the adalib directory of your GNAT installation and
specify e.g -g -O2 for the CFLAGS switches.
The GPS main window is not displayed
.gps
directory (see Files) to start from a fresh set up.
My project have several files with the same name. How can I import it in GPS?
There are several solutions to handle this issue:
There is one specific case where a project is allowed to have duplicate source files: if the list of source directories is specified explicitly. All duplicate files must be in the same project. With these conditions, there is no ambiguity for GPS and the GNAT tools which file to use, and the first file found on the source path is the one hiding all the others. GPS only shows the first file.
You can then have a scenario variable that changes the order of source directories to give visibility on one of the other duplicate files.
The idea is that you define various scenarios in your project (For instance compiling in "debug" mode or "production" mode), and change the source directories depending on this setup. Such projects can be edited directly from GPS (in the project properties editor, this is the right part of the window, as described in this documentation). On top of the project explorer (left part of the GPS main window), you have a combo box displayed for each of the variable, allowing a simple switch between scenarios depending on what you want to build.
These projects cannot currently be created through GPS, so you will need to edit them by hand. See the GNAT user's guide for more information on extending projects.
The idea behind this approach is that you can have a local overriding of some source files from the common build/source setup (if you are working on a small part of the whole system, you may not want to have a complete copy of the code on your local machine).